Table of Contents
- YOLO26 Open-Vocabulary Object Detection with YOLOE-26
- Understanding Closed-Set YOLO Object Detection
- Where YOLO Fits Among Object Detection Models
- Why Open-Vocabulary and Zero-Shot Object Detection Matter
- What YOLOE Introduced
- How YOLOE-26 Extends Open-Vocabulary Detection to YOLO26
- How the YOLOE-26 Flow Works
- How YOLOE-26 Trains for Open-Vocabulary Object Detection
- Configuring Your Development Environment
- YOLOE-26 Object Detection Benchmarks and Performance
- Hands-On with Text Prompting
- Why Visual Prompting Is the Real Superpower
- Optional Extension: Prompting from a Separate Reference Image
- YOLOE-26 Prompt-Free Open-Vocabulary Object Detection
- Where YOLOE-26 Beats YOLO26, and Where It Does Not
- Common Failure Modes and How to Debug Them
- One Deployment Detail You Should Not Miss
- Summary
YOLO26 Open-Vocabulary Object Detection with YOLOE-26
In this lesson, you will learn how YOLOE evolved into YOLOE-26, how open-vocabulary detection works, and how to use text prompts, visual prompts, and prompt-free inference with Ultralytics.
This lesson is the 1st in a 2-part series on YOLOE-26 and open-vocabulary detection:
- YOLO26 Open-Vocabulary Object Detection with YOLOE-26 (this tutorial)
- Lesson 2
To learn how to use YOLOE-26 for open-vocabulary object detection with text prompts, visual prompts, and prompt-free inference, just keep reading.

In the last YOLO26 lesson, we stayed in the closed-set world. We loaded a modern YOLO detector, ran it on images and video, and saw just how fast and polished the Ultralytics pipeline has become.
But closed-set detection has a hard limit. A model can only detect the classes it learned during training.
That sounds obvious until you hit it in practice.
You may want to detect a multimeter, a barcode scanner, a microscope slide box, a soldering iron, or a specific logo in a warehouse photo. A standard YOLO model cannot suddenly understand those categories just because you typed their names. If the class was not part of training, the model either misses it or maps it to the closest thing it already knows.
That is the problem YOLOE was built to solve.
This lesson is the foundation piece for the two-part series. We are not fine-tuning anything yet. We are first building the mental model you need before the workflow gets more ambitious in Lesson 2.
In this lesson, you will learn:
- what open-vocabulary detection actually means in plain language
- what YOLOE introduced to the YOLO family
- how YOLOE-26 extends that idea into the YOLO26 generation
- how to run text-prompted, visual-prompted, and prompt-free inference
- when YOLOE-26 is the right tool and when a standard YOLO26 model is still the better choice
Understanding Closed-Set YOLO Object Detection
Let us begin with the constraint that defines standard YOLO models.
A regular YOLO26 detector is excellent at recognizing the categories it was trained on. But it still operates inside a fixed label space. If the class is outside that label space, the model has no mechanism to dynamically add it at inference time.
That is the itch this lesson scratches.
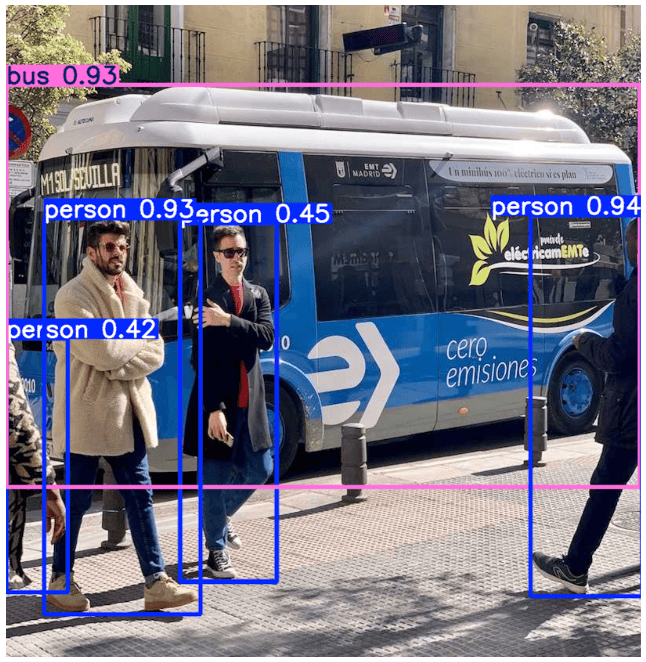
The first example below runs a standard YOLO26 detector on the familiar bus.jpg sample image that ships with Ultralytics:
from ultralytics import YOLO
from ultralytics.utils import ASSETS

baseline_model = YOLO("yolo26s.pt")
baseline_results = baseline_model.predict(ASSETS / "bus.jpg", conf=0.25)
baseline_results[0].show()
In that image, YOLO26 does exactly what you would expect. It finds the obvious closed-set classes such as people and the bus itself.
The problem shows up when your application stops looking like a benchmark and starts looking like the real world. In production, the target object list is often messy, narrow, and unstable. Maybe your robotics pipeline needs to find a clamp that appears in only one manufacturing line. Maybe your e-commerce workflow needs to find a specific product family whose packaging changed last quarter. Maybe your lab automation setup needs to distinguish one kind of equipment tray from another.
In all of those scenarios, a closed-set model puts you in one of 2 boxes:
- the class already exists in the model, so you are fine
- the class does not exist, so you need a new data collection and training workflow
That second path is expensive. You need images. You need labels. You need training time. You need evaluation. You probably need iteration because the first pass will not be clean enough.
This is why open-vocabulary detection matters. It does not replace training forever, but it gives you a much more flexible first step.
This is the key mental shift for the rest of the article. YOLOE does not just make YOLO “a bit better.” It changes how you specify what the model should look for.
Where YOLO Fits Among Object Detection Models
Before going further, it helps to know where YOLO sits among object detection models generally, since not every detector works the same way under the hood.
Most object detection models fall into 1 of 2 architectural families. Two-stage detectors (e.g., Faster Region-based Convolutional Neural Network (R-CNN) implementations available through Detectron2) first propose candidate regions in an image, then classify each region separately. This tends to produce strong accuracy, but the two-pass design costs speed. One-stage detectors, the family YOLO belongs to, predict boxes and classes in a single forward pass. That speed advantage helped make YOLO a common choice for real-time applications, historically trading some accuracy for substantially faster inference.
That architectural split is only half the picture, though, and it is the half most tutorials stop at. A second, independent axis matters just as much for this lesson: whether the class list is closed or open. Whether a detector is one-stage or two-stage, the overwhelming majority share the same constraint: a fixed set of classes, usually drawn from a benchmark like Common Objects in Context (COCO), locked in at training time. To detect anything outside that list, you have to collect new images, label them, and train an object detection model from scratch on the updated data. That process works, but it is slow, and it has to be repeated every time your target categories change.
YOLO26 is a fast, one-stage, closed-set detector. It is excellent at what it was trained to recognize but is bound by that same COCO-style constraint everywhere else. YOLOE-26 keeps YOLO’s one-stage speed but breaks the second constraint. That is the shift the rest of this lesson is about.
Why Open-Vocabulary and Zero-Shot Object Detection Matter
Before we touch YOLOE itself, let us make the term open vocabulary concrete.
In a closed-set detector, the label list is fixed ahead of time. In an open-vocabulary detector, the model can work from language prompts, visual references, or a built-in broader vocabulary instead of a single hardcoded class list.
The practical benefit is simple: you can ask the detector for new concepts without rebuilding the whole model every time the problem changes. That is especially useful when the object is outside everyday benchmark classes, when the label list changes often, or when you want to bootstrap a later fine-tuning workflow.
This is closely related to what is called zero-shot detection in the research literature: the ability to detect object categories the model was never explicitly trained on. Open-vocabulary detection is the broader, more flexible version of that idea, built around accepting arbitrary prompts at inference time rather than a fixed set of unseen classes.
Earlier systems (e.g., Grounded Language-Image Pre-training (GLIP), Open-World Localization Vision Transformer (OWL-ViT), and Grounding DINO) proved that open-vocabulary detection works, but they also made clear how expensive the usual vision-language path can become.
YOLOE matters because it tries to keep that promptable behavior while staying in the real-time YOLO regime.
For PyImageSearch readers who have already trained detectors before, the right framing is this: YOLOE-26 is not a replacement for every older YOLO workflow. It is a new capability layer on top of familiar YOLO deployment patterns.
What YOLOE Introduced
YOLOE, introduced in the paper YOLOE: Real-Time Seeing Anything, takes the familiar YOLO workflow and adds open-vocabulary behavior on top of it.
Instead of being locked to a fixed class list, YOLOE can operate through 3 different prompting modes:
- Text prompting: tells the model what classes to look for using words
- Visual prompting: shows the model an example object and asks it to find more like it
- Prompt-free mode: uses a built-in open vocabulary without supplying your own prompts at inference time
This is the core idea you should carry forward. YOLOE is still part of the YOLO family. It still feels like Ultralytics. But it replaces the “fixed class list only” assumption with a more flexible prompting interface.
The reason that matters is simple. In a text-prompted setting, the detector is no longer just asking, “Does this image contain one of the classes already in its label space?” It is also asking, “How well does this region align with the prompt concept it was given?” That is the conceptual jump.
You do not need to understand every detail of the paper to benefit from it. For this lesson, the important point is that YOLOE creates a bridge between image features and promptable concepts. Sometimes those concepts come from text. Sometimes they come from visual examples. Sometimes they come from a prebuilt broader vocabulary.
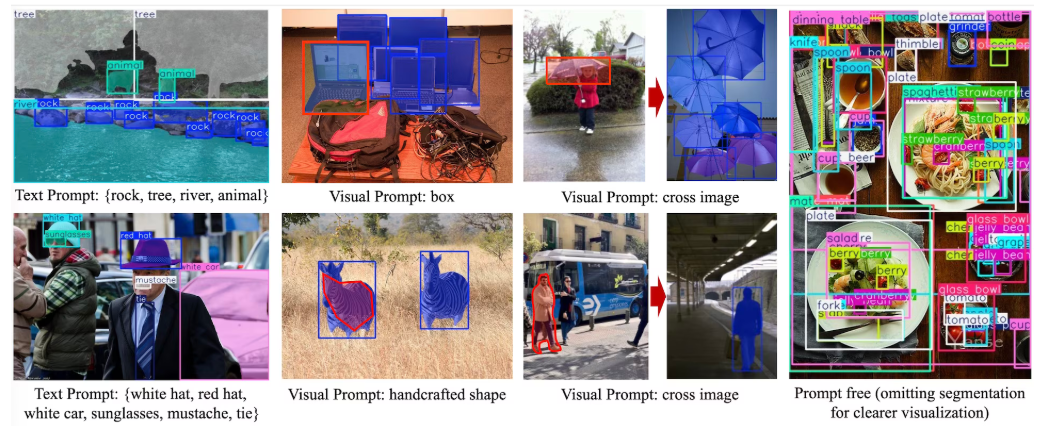
At this point, the most useful question is not “How does every module work?” It is “What new things can we now ask the model to do?” The answer is that YOLOE gives you multiple ways to specify the object of interest, which is exactly what a closed-set detector lacks.
How YOLOE-26 Extends Open-Vocabulary Detection to YOLO26
Earlier YOLOE releases were shipped in YOLOv8-based and YOLO11-based model families. YOLOE-26 brings the same open-vocabulary idea into the YOLO26 family.
The following 2 points matter here. YOLO26 introduced a cleaner end-to-end design with native non-maximum suppression (NMS)-free inference, simpler heads, and a stronger accuracy-latency balance. YOLOE-26 inherits that foundation while keeping the promptable modes that made YOLOE interesting in the first place.
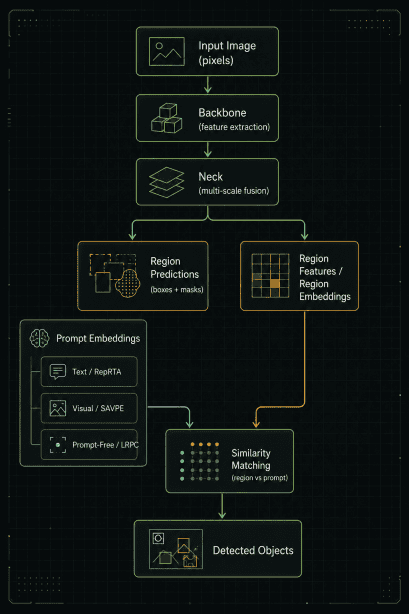
Architecturally, it still follows the familiar YOLO pattern: a backbone for feature extraction, a neck for multi-scale fusion, and a prediction head that turns fused features into boxes, masks, and region-level representations.
According to the Ultralytics docs, YOLOE-26:
- extends the YOLOE family onto the YOLO26 backbone
- inherits the NMS-free end-to-end design of YOLO26
- supports text prompting, visual prompting, and prompt-free inference
- is available across 5 scales:
n,s,m,l, andx
Model Family and Checkpoints
The naming convention is easy to miss when you first see the model files:
yoloe-26n-*: nano variantyoloe-26s-*: small variantyoloe-26m-*: medium variantyoloe-26l-*: large variantyoloe-26x-*: extra-large variant
For this lesson, we are using the s scale so the workflow stays light enough to reproduce easily. We are also using -seg checkpoints because the overlays are easier to inspect visually and align well with the official Ultralytics examples. The released pretrained YOLOE checkpoints are segmentation-first, which is why the lesson uses segmentation weights even when the conceptual discussion focuses on detection behavior.
Choosing the Right Checkpoint
In practice, there are really 2 checkpoint families to keep straight:
yoloe-26*-seg.pt: for text prompting and visual promptingyoloe-26*-seg-pf.pt: for prompt-free inference
The scale suffix then controls the usual size-speed-accuracy tradeoff:
n: for the smallest and lightest deployment targets: for a practical small-model starting pointmandl: when you can spend more compute for stronger qualityx: when you want the highest-end model in the family
For Lesson 1, the s variant is the right teaching checkpoint. It is large enough to show the behavior clearly, but still light enough that readers can reproduce the examples without needing a heavyweight setup. The segmentation-first checkpoints also help because masks make qualitative inspection easier, even when our discussion is mostly about the detection logic.
This is also where Lesson 2 starts to come into focus. We are not reproducing the full YOLOE training pipeline here, but we will borrow the same high-level idea later: use an open-vocabulary model to help create labels for a narrower downstream detector.
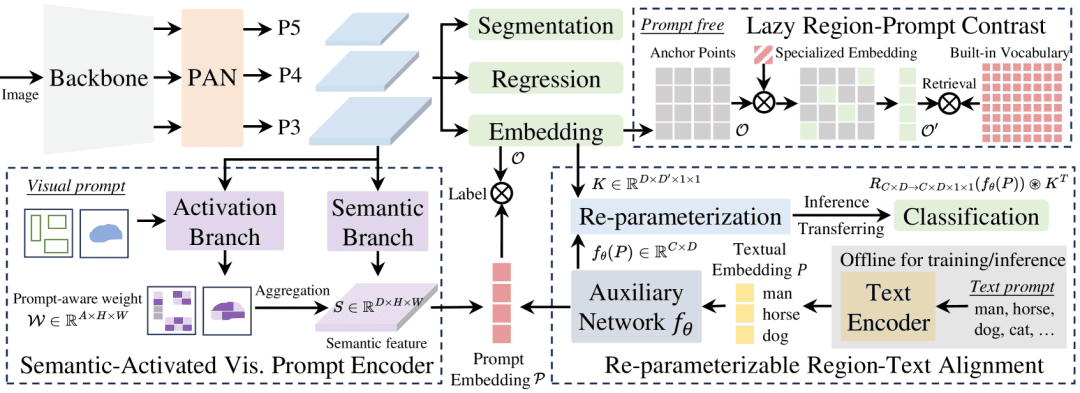
The following 3 architecture details are worth calling out while that figure is on screen:
- Re-parameterizable Region-Text Alignment (RepRTA): supports text-prompted detection.
- Semantic-Activated Visual Prompt Encoder (SAVPE): supports visual-prompted detection.
- Lazy Region-Prompt Contrast (LRPC): supports prompt-free open-vocabulary inference.
You do not need to memorize those names. The practical takeaway is that YOLOE adds dedicated machinery for each prompting mode while preserving the familiar YOLO deployment feel.
How the YOLOE-26 Flow Works
At this point, it helps to slow down and build a slightly more mechanical mental model of what is happening inside the model.
At a high level, YOLOE-26 still begins like a normal YOLO pipeline. The input image goes through a backbone that extracts visual features, then through a neck that fuses those features across scales so small, medium, and large objects can all be represented well. Up to that point, the story still feels very familiar to anyone who has used YOLO before.
The open-vocabulary twist happens after those visual features have been built.
Conceptually, you can think of YOLOE-26 as doing 5 stages:
- Input image to visual features: the image is converted into multi-scale feature maps by the backbone.
- Feature fusion: the neck combines information across scales so object evidence is available at multiple resolutions.
- Region prediction: the model predicts boxes and, in the segmentation checkpoints used here, masks as well.
- Prompt alignment: the model also needs a way to compare each candidate region against some notion of “what you are asking for.”
- Similarity scoring to final detections: region-level visual features are matched against prompt embeddings, and the best matches become named detections.
Another useful way to think about the head is this: boxes and masks still come from a normal YOLO-style prediction path, but class scoring is no longer a fixed set of logits over a closed label list. Instead, each candidate region is compared against prompt embeddings, and that similarity score takes over the role that fixed class scores play in a standard detector.
If you want a simple intuition, think of standard YOLO as answering, “Where are the objects already in the label space?” YOLOE-26 answers two questions at once: “Where are the candidate objects?” and “Which of these candidate regions best matches the prompt concept it was given?”
One important note: the simplified flow diagram below is a conceptual teaching figure, not a literal one-to-one tensor graph from the paper. That is intentional. For a blog lesson, the goal is to make the pipeline intuitive before readers dive into implementation details.
What Each Prompt Mode Changes
The cleanest way to understand the architecture is to ask what changes between the 3 prompting modes.
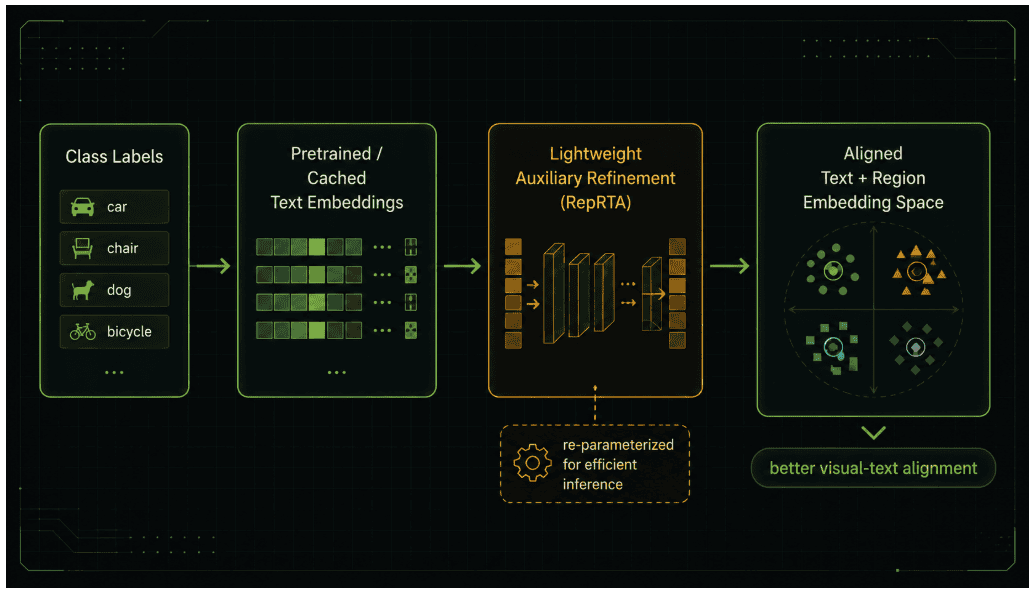
For text prompting, YOLOE uses RepRTA. According to the YOLOE paper, this module refines pretrained text embeddings through a lightweight auxiliary network so the prompt representation aligns better with the detector’s visual region features. The important deployment detail is that this lightweight refinement can be folded back into the model at inference time, which is why text prompting does not introduce the kind of heavy runtime penalty many vision-language models do.
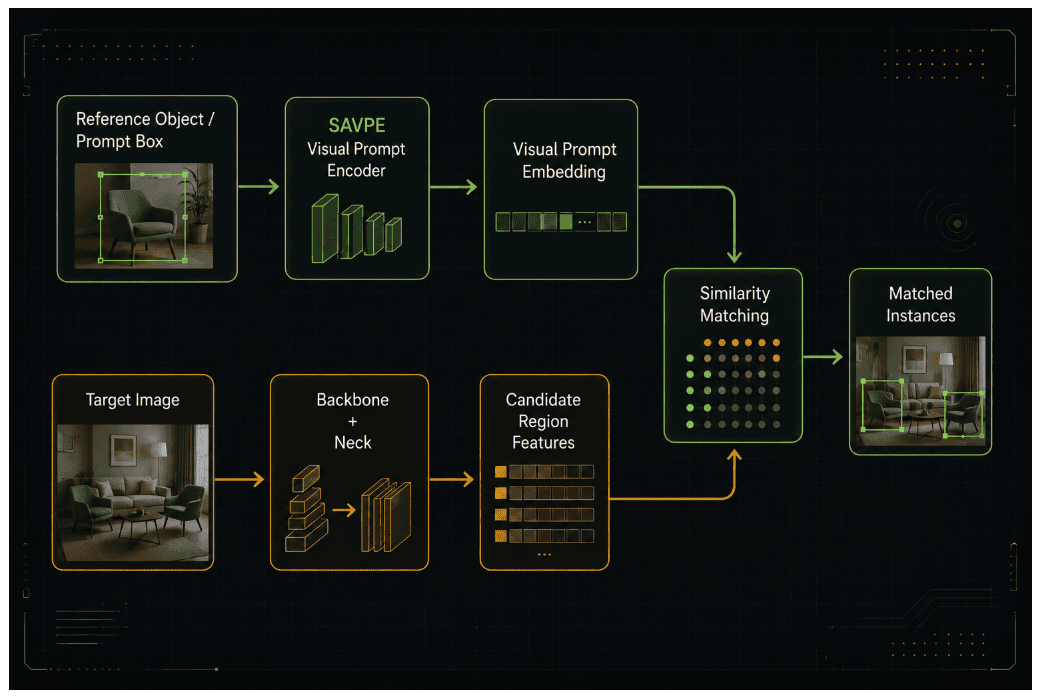
For visual prompting, YOLOE uses SAVPE. Instead of starting from words, it starts from a reference object. The prompt encoder uses semantic and activation cues from that reference so the detector can look for visually similar regions elsewhere. That is why visual prompting feels closer to one-shot retrieval than to ordinary closed-set classification.
For prompt-free mode, YOLOE uses LRPC. Here the model does not wait for an external text prompt at all. It uses a built-in vocabulary and specialized internal embeddings, then scores candidate regions against that internal vocabulary. The Ultralytics docs describe this as open-set recognition using internal embeddings trained on large vocabularies, which is what lets prompt-free mode run without an external prompt encoder at inference time.
This also explains an important checkpoint detail for readers. Text and visual prompting use the same main YOLOE checkpoint family, while prompt-free mode uses separate -pf weights because those models are trained as built-in large-vocabulary variants rather than prompt-conditioned ones.
Where YOLO26 Changes the Base
Now add the YOLO26 side of the story.
The earlier YOLOE families were built on prior YOLO backbones, and YOLOE-26 inherits the lighter, native end-to-end design of YOLO26. According to the YOLO26 paper, that includes NMS-free end-to-end inference, a lighter head with Distribution Focal Loss (DFL) removed, and a training recipe designed to better match the inference-time head. In practice, that means YOLOE-26 is not just “YOLOE with a new name.” It is YOLOE running on a cleaner deployment-oriented detector backbone.
The key intuition is this: YOLOE contributes the promptable alignment machinery, and YOLO26 contributes the faster, simpler end-to-end detector base.
How YOLOE-26 Trains for Open-Vocabulary Object Detection
Readers usually do not need the full training recipe, but they do benefit from understanding what is trained differently.
How Text, Visual, and Prompt-Free Training Diverge
For text prompting, the paper explains that pretrained text embeddings are refined by a lightweight auxiliary network before being aligned with visual region features. That refinement step is a big part of why YOLOE can work with prompts effectively without dragging a large language branch through the full deployment path.
For visual prompting, the model learns how to turn a reference object into a useful prompt representation rather than treating the crop as a raw patch match. That is what SAVPE is doing conceptually: learning a compact visual prompt that can be compared against candidate regions.
For prompt-free mode, the model is trained to work against a built-in vocabulary and internal embedding space, so it can still perform open-vocabulary recognition even when no external prompt is supplied.
Again, the lesson-level takeaway is not every training detail. The takeaway is that YOLOE is trained to bring regions and prompts into a comparable embedding space, then YOLOE-26 places that behavior on top of the more deployment-friendly YOLO26 detector.
Would you like immediate access to 3,457 images curated and labeled with hand gestures to train, explore, and experiment with … for free? Head over to Roboflow and get a free account to grab these hand gesture images.
Configuring Your Development Environment
To follow this guide, you need to install the Ultralytics package.
Luckily, Ultralytics is pip-installable:
$ pip install -U ultralytics
If you want to be a little safer for local runs, you can use:
$ pip install -U ultralytics opencv-python matplotlib
If you need help configuring your development environment for OpenCV, we highly recommend reading our pip install OpenCV guide. It will have you up and running in minutes.
Need Help Configuring Your Development Environment?

All that said, are you:
- Short on time?
- Learning on your employer’s administratively locked system?
- Wanting to skip the hassle of fighting with the command line, package managers, and virtual environments?
- Ready to run the code immediately on your Windows, macOS, or Linux system?
Then join PyImageSearch University today!
Gain access to Jupyter Notebooks for this tutorial and other PyImageSearch guides pre-configured to run on Google Colab’s ecosystem right in your web browser! No installation required.
And best of all, these Jupyter Notebooks will run on Windows, macOS, and Linux!
YOLOE-26 Object Detection Benchmarks and Performance
Before writing code, let us calibrate expectations.
Ultralytics reports that YOLOE-L and YOLOE26-L preserve near-identical inference speed to their underlying closed-set counterparts, while adding open-vocabulary capability. The same documentation also reports stronger Large Vocabulary Instance Segmentation (LVIS) open-vocabulary performance for the YOLO26-based branch.
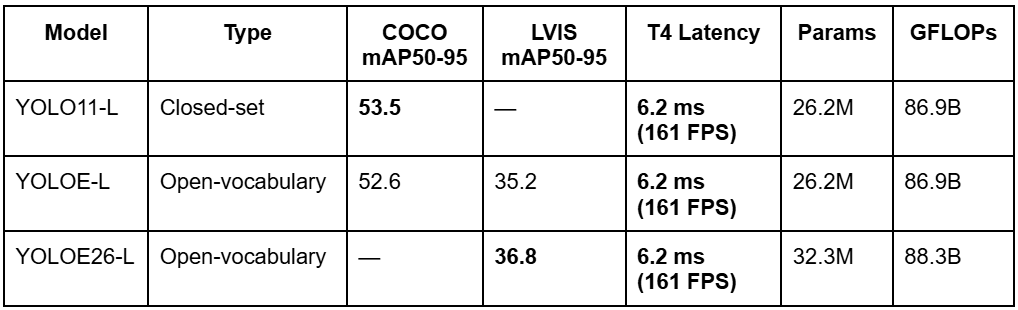
The important pattern is not just that YOLOE-26 scores higher on LVIS. It does so while preserving the same reported T4 latency as YOLO11-L and YOLOE-L, which is exactly why the open-vocabulary story is practical rather than just academic.
The docs also make an important practical claim: in the regular closed-set case, the open-world additions in YOLOE can be re-parameterized back into a standard YOLO-style path, so you do not pay extra inference cost just for carrying the capability.
It is also useful to unpack the benchmark language briefly so readers do not treat the numbers like magic:
- LVIS is a long-tail detection benchmark, which makes it a more meaningful place to discuss open-vocabulary behavior than a short everyday-class benchmark
- AP is average precision, so higher is better
- T4 latency gives you a rough sense of runtime cost on a standard GPU reference point
The benchmark story here is narrower and more useful than hype. YOLOE-26 improves the open-vocabulary side of the problem while staying in the performance neighborhood practitioners expect from modern YOLO models.
Hands-On with Text Prompting
Now let us move from concept to code.
The most beginner-friendly way to meet YOLOE-26 is through text prompting. You load a YOLOE model, call set_classes() once, and then run predict() just like you would with a normal Ultralytics model.
from ultralytics import YOLOE
from ultralytics.utils import ASSETS

text_model = YOLOE("yoloe-26s-seg.pt")
text_model.set_classes(["person", "bus"])
text_results = text_model.predict(ASSETS / "bus.jpg", conf=0.25)
text_results[0].show()
The following 2 points are worth noticing. The application programming interface (API) is almost boringly simple, and the class list is no longer hardwired into the checkpoint in the same way a standard closed-set detector is. You are telling the model what to care about at inference time.
In this first text-prompt example, we are using person and bus because they are stable and easy to reproduce in the official sample image. Once you understand the workflow, you can swap in more interesting prompts that match your own data.
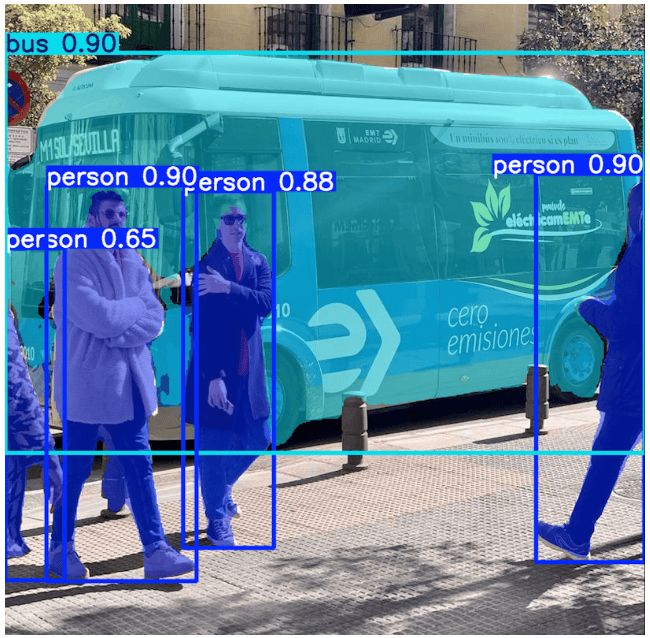
That basic example is intentionally conservative. It is not trying to prove that YOLOE-26 magically does something a closed-set COCO model never could. It is showing you the mechanics in the simplest reproducible way.
Once that is clear, the real value comes from changing the prompt list.
How to Think About Prompt Design
This is where readers often make a subtle mistake. They treat prompting like keyword search. Open-vocabulary detection is not just string matching, so prompt quality matters.
A few practical rules help:
- start with short, concrete nouns
- avoid vague multi-object phrases
- avoid over-describing the object unless needed
- try synonyms if the first prompt underperforms
- if possible, test singular and plural forms only after trying the simplest base term
For example, soldering iron is likely a better prompt than small metal electronics repair tool with handle. The latter contains more words, but that does not automatically make it better.
You should also expect some prompts to fail for perfectly normal reasons:
- the object may be tiny
- the prompt may be semantically broad
- the object may be heavily occluded
- the prompt may describe a category the model has weak visual grounding for
This is simply the cost of asking a flexible model to generalize beyond a fixed short class list.
Good Prompts vs. Weak Prompts
A few concrete examples make this easier to internalize:
soldering iron: stronger thantooltraffic light: stronger thanstreet objectbarcode scanner: stronger thanelectronics devicebus: stronger thanlarge road vehicle with windows
The pattern is consistent. Good prompts are usually short, concrete, and visually grounded. Weak prompts are often too broad, too abstract, or too wordy. If the first prompt underperforms, try a nearby synonym before you conclude the model cannot handle the category at all.
Reading the Result, Not Just Looking At It
Annotated images are useful, but the result object tells you more than the picture does. Printing the top class names and confidence values makes it easier to inspect the output programmatically.
Open-vocabulary work often involves a short loop:
- try a prompt
- inspect detections
- revise the prompt
- re-run inference
This feedback loop is why an interactive workflow works well for Lesson 1. You are not yet building a packaged application. You are exploring the detector’s behavior iteratively.
Inspecting the Result Object
If you want to move one step beyond screenshots, inspect the prediction object directly:
result = text_results[0]

print(result.names)
print(result.boxes.xyxy[:3])
print(result.boxes.conf[:3])
print(result.boxes.cls[:3])

if result.masks is not None:
    print(result.masks.data.shape)
That quick inspection tells you almost everything you need for downstream work:
result.names: maps class identifiers (IDs) to label namesresult.boxes.xyxy: stores box coordinatesresult.boxes.conf: stores confidence scoresresult.boxes.cls: stores predicted class IDsresult.masks: appears because we are using segmentation-first checkpoints, so mask tensors are available alongside the boxes
This is the easiest bridge from “nice demo” to “usable building block.” Once readers understand where the predictions live, they can start saving detections, filtering them, or passing them into a larger pipeline.
Why Visual Prompting Is the Real Superpower
Text prompts are the easiest entry point, but visual prompting is where YOLOE-26 starts to feel genuinely different from a normal detector.
Sometimes words are not enough. Maybe the object is a very specific industrial part. Maybe the text label is ambiguous. Maybe the thing you want to find is easier to show than describe.
That is what visual prompting is for.
How Visual Prompts Are Structured
With visual prompts, you give the model one or more bounding boxes around reference objects. YOLOE-26 then uses those examples to find visually similar instances.
The next example uses the exact same bus.jpg sample image from the docs. To keep the first visual-prompt workflow stable and easy to reproduce, we place 1 prompt box around a person.
import numpy as np

from ultralytics import YOLOE
from ultralytics.models.yolo.yoloe import YOLOEVPSegPredictor
from ultralytics.utils import ASSETS

visual_model = YOLOE("yoloe-26s-seg.pt")
visual_model.set_classes(["person"])
visual_prompts = dict(
   bboxes=np.array(
       [
           [221.52, 405.8, 344.98, 857.54],
       ]
   ),
   cls=np.array([0]),
)

visual_result = visual_model.predict(
   ASSETS / "bus.jpg",
   visual_prompts=visual_prompts,
   predictor=YOLOEVPSegPredictor,
   conf=0.25,
)[0]
visual_result.names = {0: "person"}
visual_result.show()
The only slightly unusual part here is the visual_prompts dictionary:
bboxes: contains the reference boxcls: contains a sequential ID that associates that box with the prompt category
These are not global COCO class IDs. They are temporary identifiers for the prompt session.
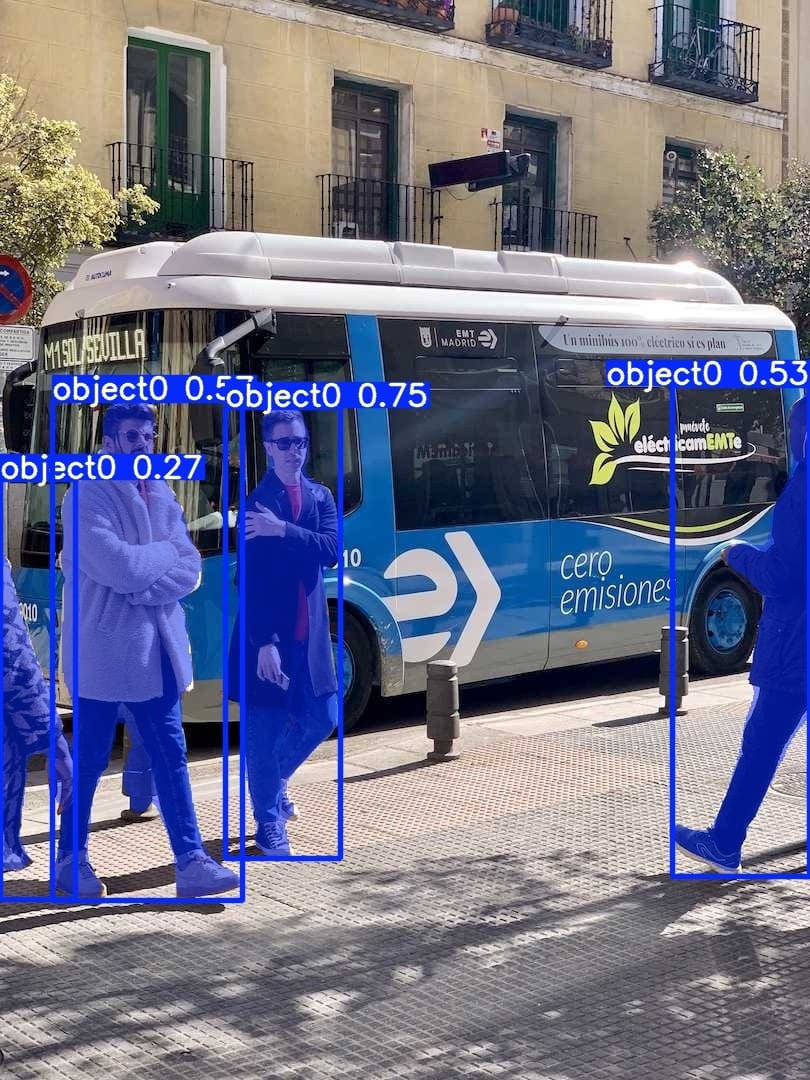
For visualization, we also relabel that temporary prompt ID so the plotted output says person instead of object0.
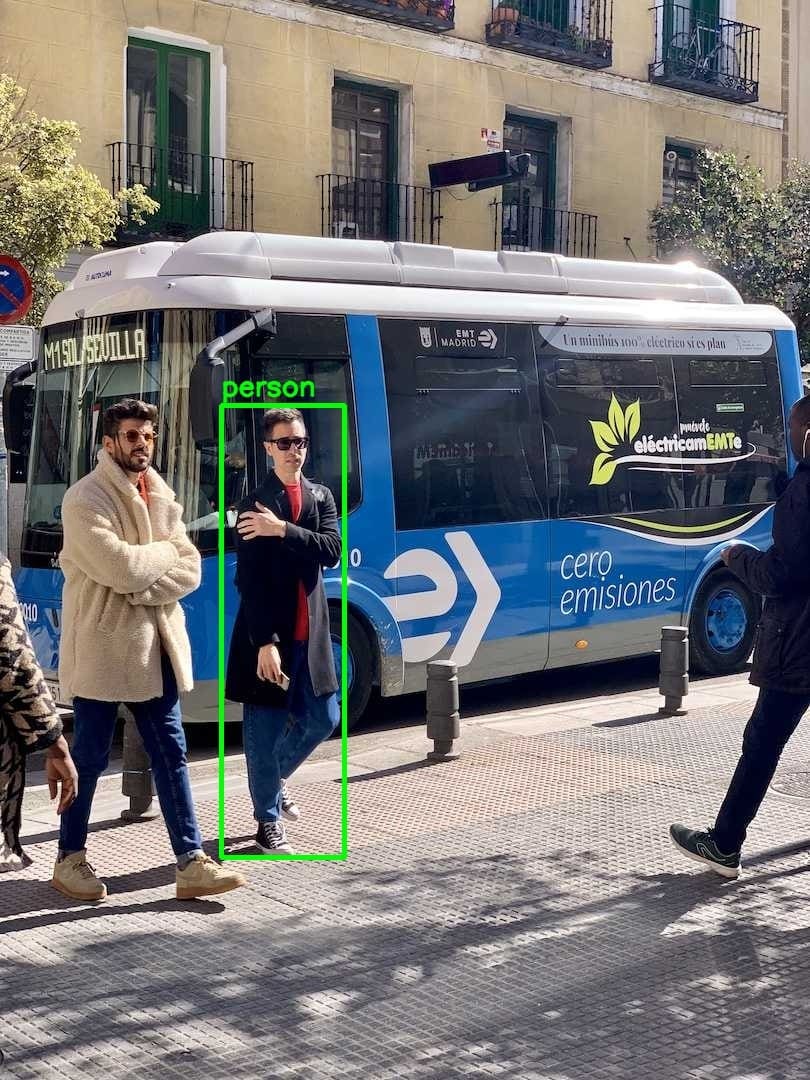
This is the mode many tutorials skip, but it is extremely practical. If you can show the model what an object looks like once, you can turn that into a lightweight one-shot retrieval workflow.
When Visual Prompting Beats Text Prompting
Visual prompting is most useful when the object is easier to show than to describe. Suppose you are looking for a very specific wrench, connector, or control knob. A text label like metal connector may be too broad, but a carefully drawn reference box can tell the model, “Find more objects that look like this.” In practice, make the prompt box tight, representative, and light on background clutter. Very small prompt regions can be brittle, so start with larger, visually distinctive examples when you are learning the workflow.
Optional Extension: Prompting from a Separate Reference Image
One optional demo is also worth mentioning: the prompt does not have to come from the same image as the target. The refer_image argument handles that case. This is closer to a real retrieval workflow, where you have one known example and want to search a different frame set or batch for similar objects.
If you want to include this extension, here is a minimal working example:
import numpy as np

from ultralytics import YOLOE
from ultralytics.models.yolo.yoloe import YOLOEVPSegPredictor
from ultralytics.utils import ASSETS

reference_model = YOLOE("yoloe-26s-seg.pt")
reference_model.set_classes(["person"])

reference_prompts = dict(
   bboxes=np.array([[221.52, 405.8, 344.98, 857.54]]),
   cls=np.array([0]),
)

reference_result = reference_model.predict(
   ASSETS / "zidane.jpg",
   refer_image=ASSETS / "bus.jpg",
   visual_prompts=reference_prompts,
   predictor=YOLOEVPSegPredictor,
   conf=0.10,
)[0]

reference_result.names = {0: "person"}
reference_result.show()
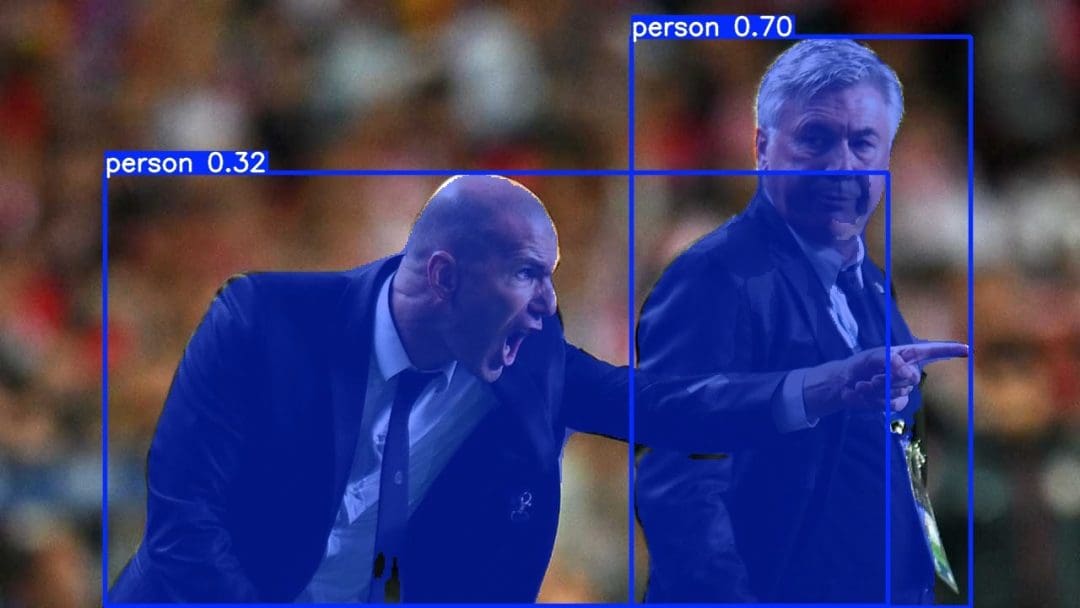
bus.jpg to search for similar instances in zidane.jpg.Treat this as an advanced extension, not a required part of the first pass through the lesson.
YOLOE-26 Prompt-Free Open-Vocabulary Object Detection
YOLOE-26 also has prompt-free variants. These models come with a built-in open vocabulary and do not require your own text prompts or visual prompts at inference time.
How Prompt-Free Inference Works in Practice
Here is the corresponding code:
from ultralytics import YOLOE
from ultralytics.utils import ASSETS

prompt_free_model = YOLOE("yoloe-26s-seg-pf.pt")
prompt_free_results = prompt_free_model.predict(ASSETS / "bus.jpg", conf=0.25)
prompt_free_results[0].show()
This mode is useful when you want a larger built-in vocabulary with minimal setup. According to the Ultralytics documentation, the prompt-free models use a built-in large vocabulary and internal embeddings for open-set recognition.
But there is a tradeoff, and it is important enough to say clearly: prompt-free convenience costs accuracy.
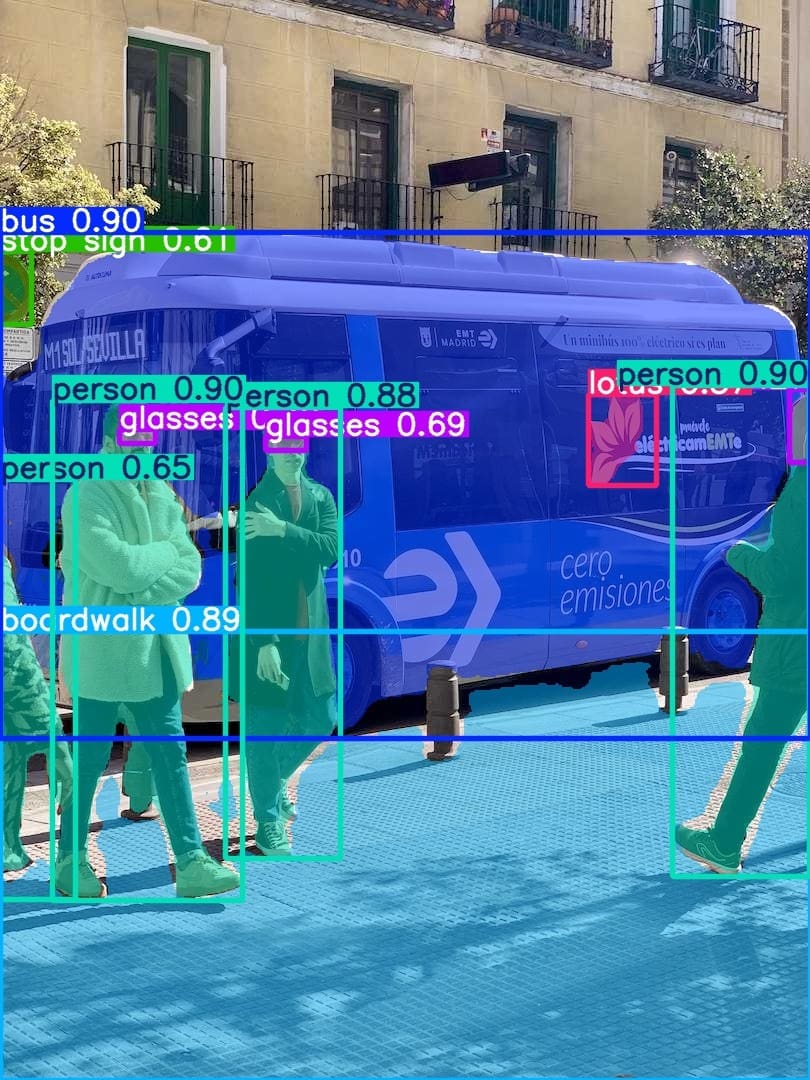
Prompt-free mode is appealing because it feels effortless. Load the model, run inference, and get a wide-vocabulary result without deciding on prompts first. In practice, it is best for exploratory analysis and quick discovery passes, not for the cases where you need the strongest possible precision on one narrow concept. If text prompting is you saying “look for this,” prompt-free mode is closer to saying “show me what the built-in vocabulary thinks is here.”
Where YOLOE-26 Beats YOLO26, and Where It Does Not
YOLOE-26 beats standard YOLO26 whenever the target category is dynamic, long-tail, or simply outside the fixed closed-set label space. If your environment changes often, or if you need to search for unusual objects without retraining a detector from scratch, YOLOE-26 is the more flexible tool.
It also has a strong headline benchmark story. Ultralytics reports that the x model reaches:
- 40.6 AP: on LVIS minival with text prompts
- 38.5 AP: with visual prompts
- 31.1 AP: in the prompt-free non-E2E setting
That is a meaningful spread. Prompt-free mode is convenient, but you pay for that convenience in accuracy.
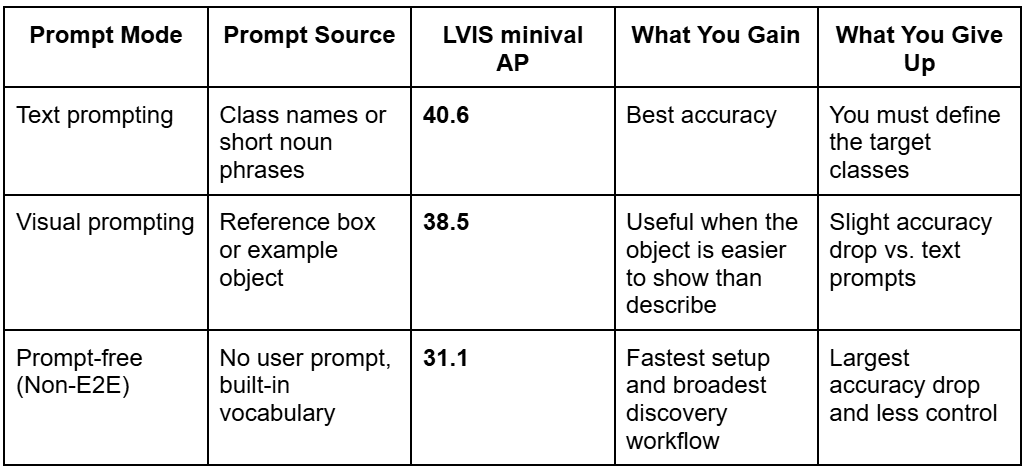
The pattern is straightforward: the more explicit guidance you give YOLOE-26, the better it performs. Prompt-free mode is still useful, but it should be treated as a convenience mode, not the default path when accuracy matters most.
YOLO26 and YOLOE-26 at a Glance
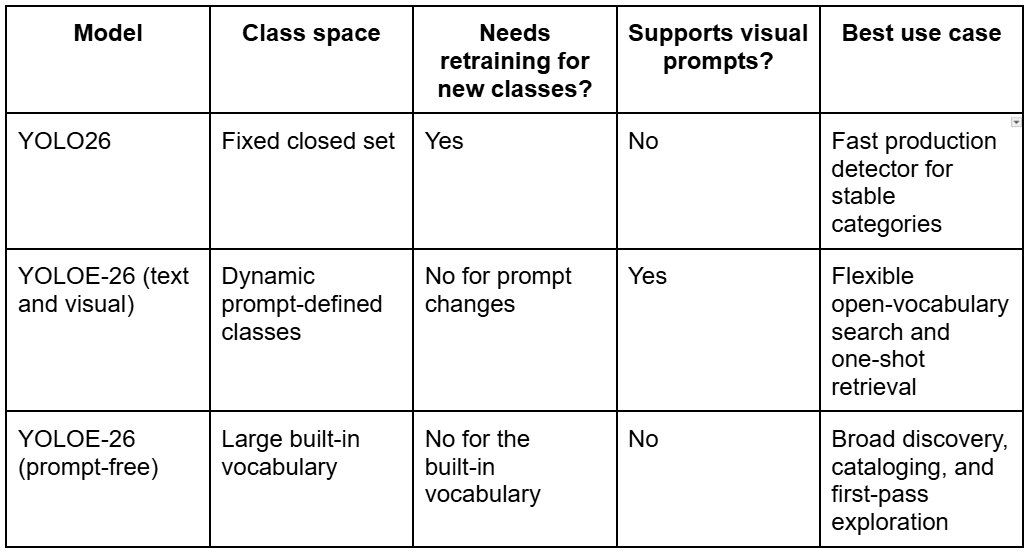
A Practical Decision Framework
At the same time, YOLOE-26 is not automatically “better” than YOLO26 for every production workload. If your class list is fixed, your latency budget is tight, and you already know exactly what you need to detect, a standard fine-tuned YOLO26 model is often the simpler production artifact.
Here is a clean decision framework:
- YOLO26: choose when the classes are fixed and you care most about a lean production artifact
- YOLOE-26 text prompting: choose when you know the concept but want the flexibility to change classes without retraining
- YOLOE-26 visual prompting: choose when the object is easier to show than to describe
- YOLOE-26 prompt-free: choose when you want broad exploratory coverage and are willing to trade accuracy for convenience
This decision framework is exactly why Lesson 1 comes before Lesson 2. You need to understand where YOLOE-26 shines before you can use it intelligently as a labeling engine later.
Common Failure Modes and How to Debug Them
Open-vocabulary detection is powerful, but it is not magic. Here are the most common reasons your first run may disappoint you:
The Prompt Is Too Broad
A prompt (e.g., tool or electronics device) may be semantically valid but visually broad. The model has too many ways to satisfy the prompt, so detections may become noisy.
Fix: start narrower. Use the most concrete noun you can.
The Prompt Is Too Obscure
Sometimes the opposite happens. You use a very domain-specific term that the model has weak grounding for.
Fix: try a simpler synonym or a more common parent concept first.
The Object Is Too Small
Tiny objects are hard for almost every detector. Open-vocabulary capability does not remove that challenge.
Fix: use a larger input size, crop the image, or test on closer examples before judging the prompt.
The Visual Prompt Box Is Poor
If your reference box includes too much background or cuts off the object, you are teaching the model the wrong visual concept.
Fix: redraw the prompt box tightly and try again.
You Are Expecting Prompt-Free Mode to Behave Like Curated Prompting
Prompt-free is convenient, not optimal. If the results are underwhelming, that does not mean YOLOE-26 as a whole is weak. It may simply mean you should move to text or visual prompting.
Fix: switch to a more controlled prompt mode before drawing conclusions.
Your Prompts Overlap Semantically
Some prompt sets are too close to each other. If you ask for overlapping concepts (e.g., person, pedestrian, and worker, or tool, hand tool, and screwdriver), the detector may produce messy or merged behavior because multiple prompts can plausibly match the same region.
Fix: start with clearly separated categories. Add finer-grained prompts only after the coarse categories are behaving the way you expect.
The right question is not “Did one random prompt work perfectly on the first try?” It is “How much controllability do we get, and how quickly can we improve the result through prompting?”
One Deployment Detail You Should Not Miss
One operational detail from the Ultralytics docs deserves explicit attention. When you export a YOLOE model, the configured classes are baked into the exported weights. After that, you cannot keep swapping prompt classes on the exported artifact. To change them, you need to re-export from the original checkpoint.
During experimentation, this is not a big deal. You just change the prompts and rerun the code. But if you are preparing a deployable artifact, the prompt configuration becomes part of what you are exporting.
This is one of the clearest ways to understand the line between experimentation and production:
- exploration mode: YOLOE-26 is highly flexible
- deployment mode: some of that flexibility gets frozen into the exported artifact
That detail will matter a lot in Lesson 2, because Lesson 2 is about what happens when you stop exploring and start converging on a narrower detector workflow.
What's next? We recommend PyImageSearch University.

120+ total classes • 115+ hours of on-demand code walkthrough videos • Last updated: August 2026
★★★★★ 4.84 (128 Ratings) • 16,000+ Students Enrolled
I strongly believe that if you had the right teacher you could master computer vision and deep learning.
Do you think learning computer vision and deep learning has to be time-consuming, overwhelming, and complicated? Or has to involve complex mathematics and equations? Or requires a degree in computer science?
That’s not the case.
All you need to master computer vision and deep learning is for someone to explain things to you in simple, intuitive terms. And that’s exactly what I do. My mission is to change education and how complex Artificial Intelligence topics are taught.
If you're serious about learning computer vision, your next stop should be PyImageSearch University, the most comprehensive computer vision, deep learning, and OpenCV course online today. Here you’ll learn how to successfully and confidently apply computer vision to your work, research, and projects. Join me in computer vision mastery.
Inside PyImageSearch University you'll find:
- ✓ 120+ courses on essential computer vision, deep learning, and OpenCV topics
- ✓ 94+ Certificates of Completion
- ✓ 115+ hours of on-demand video
- ✓ Brand new courses released regularly, ensuring you can keep up with state-of-the-art techniques
- ✓ Pre-configured Jupyter Notebooks in Google Colab
- ✓ Run all code examples in your web browser — works on Windows, macOS, and Linux (no dev environment configuration required!)
- ✓ Access to centralized code repos for all 540+ tutorials on PyImageSearch
- ✓ Easy one-click downloads for code, datasets, pre-trained models, etc.
- ✓ Access on mobile, laptop, desktop, etc.
Summary
The easiest way to think about this lesson is:
- YOLO26 is your fast closed-set baseline.
- YOLOE introduced promptable open-vocabulary detection to the YOLO family.
- YOLOE-26 brings that same idea into the YOLO26 generation with stronger open-vocabulary performance and the same real-time mindset.
By now, you have seen 3 concrete workflows:
- Text prompting: inference with
set_classes() - Visual prompting: inference with reference boxes
- Prompt-free inference: inference with a built-in vocabulary
You have also seen the deeper point behind those workflows. YOLOE-26 changes how quickly we can move from “we have an object in mind” to “we have a detector doing something useful.”
That is already enough to start experimenting. But it also raises the next practical question.
What if you do not want a permanently flexible open-vocabulary detector? What if you want to use YOLOE-26 to discover and pre-label a niche category, then turn that into a small, fast, deployable closed-set detector?
That is exactly what we will do in Lesson 2.
Citation Information
Singh, V. “YOLO26 Open-Vocabulary Object Detection with YOLOE-26,” PyImageSearch, S. Huot, A. Sharma, and P. Thakur, eds., 2026, https://pyimg.co/mzpx3
@incollection{Singh_2026_yolo26-open-vocabulary-object-detection-yoloe-26,
  author = {Vikram Singh},
  title = {{YOLO26 Open-Vocabulary Object Detection with YOLOE-26}},
  booktitle = {PyImageSearch},
  editor = {Susan Huot and Aditya Sharma and Piyush Thakur},
  year = {2026},
  url = {https://pyimg.co/mzpx3},
}
To download the source code to this post (and be notified when future tutorials are published here on PyImageSearch), simply enter your email address in the form below!

Download the Source Code and FREE 17-page Resource Guide
Enter your email address below to get a .zip of the code and a FREE 17-page Resource Guide on Computer Vision, OpenCV, and Deep Learning. Inside you'll find my hand-picked tutorials, books, courses, and libraries to help you master CV and DL!


Comment section
Hey, Adrian Rosebrock here, author and creator of PyImageSearch. While I love hearing from readers, a couple years ago I made the tough decision to no longer offer 1:1 help over blog post comments.
At the time I was receiving 200+ emails per day and another 100+ blog post comments. I simply did not have the time to moderate and respond to them all, and the sheer volume of requests was taking a toll on me.
Instead, my goal is to do the most good for the computer vision, deep learning, and OpenCV community at large by focusing my time on authoring high-quality blog posts, tutorials, and books/courses.
If you need help learning computer vision and deep learning, I suggest you refer to my full catalog of books and courses — they have helped tens of thousands of developers, students, and researchers just like yourself learn Computer Vision, Deep Learning, and OpenCV.
Click here to browse my full catalog.