Table of Contents
- Setting Up LLaVA/BakLLaVA with vLLM: Backend and API Integration
- Why vLLM for Multimodal Inference
- Configuring Your Development Environment
- Project Structure
- Offline Python-Based Inference with vLLM
- Launching the vLLM OpenAI-Compatible API Server
- Testing Multimodal Inference via OpenAI-Compatible APIs
- Summary
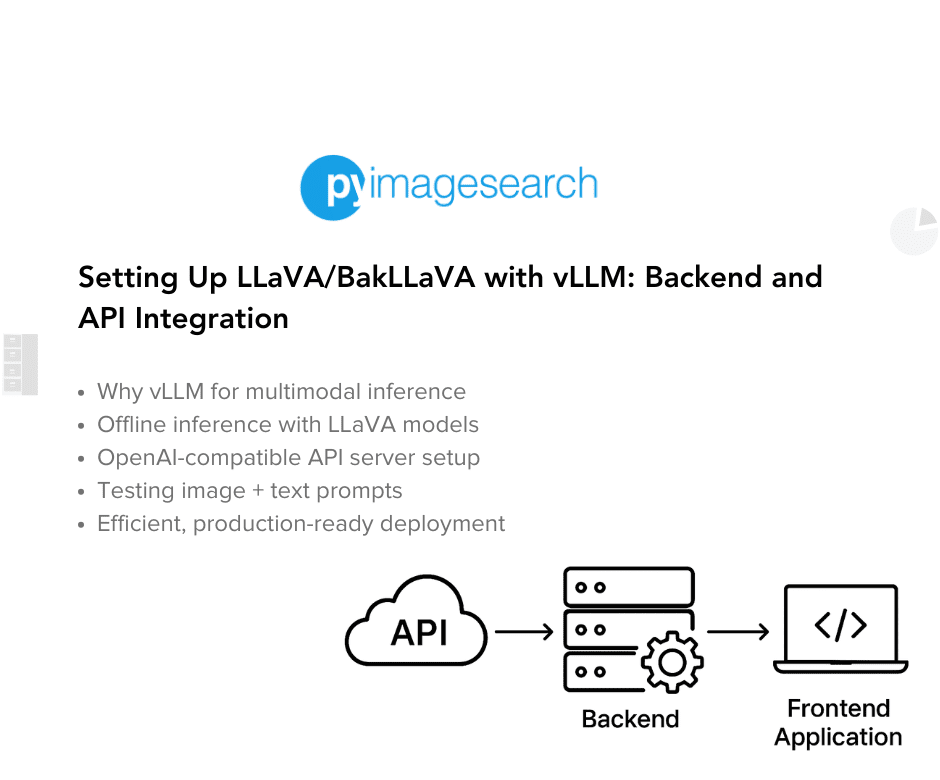
Setting Up LLaVA/BakLLaVA with vLLM: Backend and API Integration
In this tutorial, you’ll learn how to set up the vLLM inference engine to serve powerful open-source multimodal models (e.g., LLaVA) — all without needing to clone any repositories. We’ll install vLLM, configure your environment, and demonstrate two core workflows: offline inference and OpenAI-compatible API testing. By the end of this lesson, you’ll have a blazing-fast, production-ready backend that can easily integrate with frontend tools such as Streamlit or your custom applications.
This lesson is the 2nd of a 3-part series on Deploying Multimodal LLMs with vLLM:
- The Rise of Multimodal LLMs and Efficient Serving with vLLM
- Setting Up LLaVA/BakLLaVA with vLLM: Backend and API Integration (this tutorial)
- Building a Streamlit Python UI for LLaVA with OpenAI API Integration
To learn how to serve multimodal LLMs efficiently with vLLM, just keep reading.
Why vLLM for Multimodal Inference
Multimodal LLMs (e.g., LLaVA and BakLLaVA) are unlocking powerful new capabilities — from answering questions about images to reasoning over documents and complex visual scenes. But serving these models efficiently at scale is still a major challenge.
Let’s break down the pain points with traditional pipelines and see how vLLM addresses each of them with a production-first approach.
The Challenges of Serving Image + Text Prompts at Scale
Most vision-language models are relatively easy to run locally or in notebooks using Hugging Face pipelines such as pipeline("image-to-text", model=...). But try to scale that to hundreds or thousands of concurrent users, and you’ll quickly run into issues:
- High Memory Overhead: Loading large LLMs and vision encoders together can quickly max out GPU memory — especially with longer prompts or high-res images.
- Inefficient Batching: Basic pipelines typically process requests sequentially. They can’t merge incoming prompts or optimize token-level execution.
- No Streaming or Latency Control: Generating large responses can lead to blocking delays. There’s no control over token streaming or scheduling.
- Missing API Flexibility: Most out-of-the-box pipelines lack OpenAI-compatible endpoints, which limits their use in real-world frontend or LangChain integrations.
Why Vanilla Approaches Fall Short
Libraries such as transformers.pipeline() are excellent for experimentation — but they don’t expose enough control for efficient deployment:
- No token-level memory planning
- No adaptive batching of image + text prompts
- No built-in model parallelism or scheduling logic
- No OpenAI API compatibility without writing custom server code
In other words, vanilla solutions work just enough for demos, but fail under real-world production workloads.
How vLLM Solves Real-World Production Workloads
vLLM (Virtual LLM) changes the game by rethinking how inference is served — especially for large models and multimodal workloads.
Here’s how it tackles the challenges head-on:
Advanced Memory Efficiency (PagedAttention)
vLLM uses a memory management algorithm called PagedAttention that:
- Reduces GPU fragmentation
- Reuses memory blocks across requests
- Avoids wasteful padding in token batches
This is especially useful when serving vision-language prompts, where images vary in size and token lengths.
Continuous Batching for Maximum Throughput
vLLM dynamically merges multiple incoming requests — even with varying prompt lengths and image content — into efficient token-level batches.
This allows you to:
- Handle multiple users simultaneously
- Improve latency without sacrificing accuracy
- Avoid the bottlenecks of sequential processing
Multimodal Support with OpenAI-Compatible Endpoints
vLLM now natively supports models (e.g., LLaVA) through:
- CLI-based serving (
vllm-serve) - Python-based offline inference (
from vllm import LLM) - OpenAI-compatible APIs that “just work” with LangChain, Gradio, Streamlit, etc.
This means you don’t need to build your own server, write adapters, or change frontend logic — just swap the endpoint.
Designed for Production
Whether you’re building a chatbot, a developer tool, or a document reasoning assistant, vLLM offers:
- Blazing-fast inference even with multimodal inputs
- GPU-aware scheduling to avoid crashes and maximize usage
- Customizable configs for the number of images, max prompt length, model trust, and more
In short: if you’re serious about deploying LLaVA, BakLLaVA, or any vision-language model — vLLM is not just helpful, it’s essential.
In the next section, we’ll walk through installing vLLM with CUDA support and get everything set up for serving LLaVA with the vLLM framework.
Would you like immediate access to 3,457 images curated and labeled with hand gestures to train, explore, and experiment with … for free? Head over to Roboflow and get a free account to grab these hand gesture images.
Configuring Your Development Environment
To follow this guide, you’ll need a machine with an NVIDIA GPU and a compatible CUDA setup. Today’s lesson is tested on an NVIDIA A100 GPU with CUDA 11.8, which provides excellent throughput for multimodal inference.
Step 1: Checking Your CUDA Version
To determine your local CUDA version, you can run:
$ nvcc --version
This should print something like:
Cuda compilation tools, release 11.8, V11.8.89
If you don’t have nvcc, another way is via PyTorch:
import torch
print(torch.version.cuda)
Make note of your CUDA version — you’ll need it for the next step.
Step 2: Installing vLLM with CUDA Support
Now that you know your CUDA version, you can install the appropriate vLLM build. As of now, vLLM supports CUDA versions up to 11.8. CUDA 12.x is not officially supported yet — so if you’re on a newer CUDA version, consider downgrading or using a virtual environment with the appropriate setup.
To install vLLM with CUDA 11.8 support:
$ pip install "vllm[torch, cuda11.8]"
This will install:
- The vLLM engine
- A compatible PyTorch version (built for CUDA 11.8)
- All other dependencies required for both offline and OpenAI-compatible inference
Step 3: Verifying Installation
To make sure everything is installed correctly, run:
$ python -c "import vllm; print(vllm.__version__)"
This should print a version number like:
0.9.2
And you’re good to go!
Need Help Configuring Your Development Environment?

All that said, are you:
- Short on time?
- Learning on your employer’s administratively locked system?
- Wanting to skip the hassle of fighting with the command line, package managers, and virtual environments?
- Ready to run the code immediately on your Windows, macOS, or Linux system?
Then join PyImageSearch University today!
Gain access to Jupyter Notebooks for this tutorial and other PyImageSearch guides pre-configured to run on Google Colab’s ecosystem right in your web browser! No installation required.
And best of all, these Jupyter Notebooks will run on Windows, macOS, and Linux!
Project Structure
We first need to review our project directory structure.
Start by accessing this tutorial’s “Downloads” section to retrieve the source code and example images.
From there, take a look at the directory structure:
llava-vllm-streamlit-demo/
├── streamlit_app.py              # Main Streamlit web application
├── requirements.txt              # Python package dependencies
├── README.md                    # Project documentation and setup guide
└── pyimagesearch/               # Core Python package
    ├── __init__.py              # Package initialization and exports
    ├── config.py                # Centralized configuration management
    ├── client.py                # LLaVA client wrapper for API interactions
    ├── image_utils.py           # Image processing and validation utilities
    ├── utils.py                 # General utilities and helper functions
    ├── test_chat_completion.py  # OpenAI-compatible API testing
    └── test_direct_api.py       # Direct vLLM server API testing
Let’s break down the purpose of each file in our organized project structure.
Main Application Files
streamlit_app.py: The primary web interface built with Streamlit that provides an interactive chat interface for users to upload images and ask questions about themrequirements.txt: Lists all Python dependencies needed to run the project, including Streamlit, OpenAI client, PIL for image processing, and more
The pyimagesearch Package
Our core functionality is organized into a proper Python package with clear separation of concerns:
__init__.py: Makes the directory a Python package and defines what gets imported when someone usesfrom pyimagesearch import …config.py: Contains all configuration settings in one place, including:- Server URLs and API endpoints
- Model names and parameters
- Image processing settings
- UI configuration options
- Environment variable handling
client.py: Provides a unified interface for interacting with the LLaVA vLLM server:LLaVAClientclass that wraps both OpenAI-compatible and direct API calls- Error handling and retry logic
- Support for different model variants
- Automatic base64 image encoding
image_utils.py: Handles all image-related operations:- Processing uploaded Streamlit files
- Converting images to base64 format
- Image validation and format checking
- Resizing and optimization functions
utils.py: Contains general utility functions:- Server connectivity validation
- Model information retrieval
- Sample prompt generation
- Directory searching capabilities
Testing Modules
test_chat_completion.py: Tests the OpenAI-compatible/v1/chat/completionsendpointtest_direct_api.py: Tests the direct vLLM/generateendpoint
Offline Python-Based Inference with vLLM
While most people associate vLLM with high-performance API servers, it also offers a Python-native interface that lets you run inference entirely offline — without launching a server or sending HTTP requests.
This is ideal for:
- Local testing and debugging
- Batch generation pipelines
- Prototyping workflows before production deployment
Let’s walk through how it works and why it’s so powerful.
What Is Offline Inference?
Offline inference in vLLM refers to directly calling the model from Python using the LLM.generate() interface, similar to what you might do with transformers. But unlike vanilla pipelines, vLLM’s offline engine:
- Leverages its PagedAttention memory management
- Uses the same CUDA-efficient backend as the server mode
- Provides full control over sampling and batch behavior
So you get near-production performance even in script-based workflows.
Why Use Offline Mode?
Offline inference gives you:
- Faster iteration loops: no need to spin up a server
- Lower overhead: useful for notebooks or one-off tasks
- Consistent interface: same API as server-based vllm-serve
- Direct control: load models, prompts, and multimodal inputs in pure Python
This is especially useful when you’re building pipelines or running evaluation scripts.
Running LLaVA via Python: Code Walkthrough
Absolutely! Here’s a breakdown of the offline LLaVA inference code into five logically separated chunks — each followed by a short, clear explanation in paragraph style:
Step 1: Importing Required Modules
from vllm import LLM, SamplingParams
from PIL import Image
import requests
We begin by importing the necessary libraries.
LLMandSamplingParamscome from thevllmlibrary — these are the core interfaces for running inference and configuring generation behavior (e.g., max tokens, temperature, etc.).PIL.Image(from the Pillow library) is used to load and manipulate the input image.requestshelps us fetch the image from a remote URL. If you’re working with a local file instead, you can simply load it usingImage.open("your_image.jpg")without needing requests.
Step 2: Loading the Multimodal Model (LLaVA)
llm = LLM(model="llava-hf/llava-1.5-7b-hf", trust_remote_code=True)
We now initialize the LLM instance using the llava-hf/llava-1.5-7b-hf model hosted on Hugging Face.
trust_remote_code=Trueis required because LLaVA uses custom model components not part of the standard Hugging Face architecture.- This line downloads and prepares the model for inference, using the optimized vLLM backend.
Step 3: Preparing the Image and Prompt
image_url = "https://huggingface.co/datasets/huggingface/documentation-images/resolve/main/transformers/tasks/ai2d-demo.jpg"
image = Image.open(requests.get(image_url, stream=True).raw)
prompt = (
    "USER: <image>\n"
    "What does the label 15 represent? (1) lava (2) core (3) tunnel (4) ash cloud\n"
    "ASSISTANT:"
)
Here, we prepare the input image and the corresponding prompt.
- The image is loaded from a URL using
requests.get()and opened as a PIL image. - The prompt contains the
<image>token, which is important — this tells vLLM where to inject the visual input during tokenization.
You can also use a local image like this:
image = Image.open("/path/to/your/image.jpg")
Step 4: Running the Inference
outputs = llm.generate(
    prompt=prompt,
    sampling_params=SamplingParams(temperature=0.2, max_tokens=200),
    multimodal_data={"images": [image]}
)
We now pass the prompt and image into the generate() function.
sampling_paramslets us control generation behavior — here, we use low temperature (0.2) for deterministic output and allow up to 200 tokens.- The
multimodal_datadictionary accepts a list of images. vLLM will internally align this with the<image>placeholder in the prompt.
Step 5: Displaying the Output
print(outputs[0].outputs[0].text)
Finally, we print the model’s response.
- The
generate()function returns a list of results (even if you pass one prompt), and each result can contain multiple output candidates. - In this case, we extract the first completion and print the generated answer.
When Should You Use This?
Use offline inference when:
- You want to test quickly without the latency of an HTTP server
- You’re debugging prompt/image handling
- You’re developing internal tools that don’t require API calls
In the next section, we’ll scale up this workflow by launching a vLLM server and interacting with it via OpenAI-compatible APIs — unlocking real-time applications and frontend integration.
Launching the vLLM OpenAI-Compatible API Server
Once your offline inference is working, the next step is spinning up a fully fledged API server that’s OpenAI-compatible. This lets you interact with LLaVA (or BakLLaVA) using the same API format as GPT-4, opening the door to seamless integration with tools such as Streamlit, LangChain, or any service that expects an OpenAI-style /v1/chat/completions endpoint.
At the heart of this is the vllm-serve CLI — a production-grade serving command that wraps your model into a fast, batched, image+text-compatible backend.
What Is vllm serve Doing Internally?
Under the hood, vllm-serve performs several key tasks to enable efficient multimodal inference:
- Initializes the model and tokenizer using Hugging Face Transformers APIs — extended with vLLM’s custom backend hooks for fast generation.
- Dynamically injects multimodal support when running models (e.g., LLaVA or BakLLaVA) — loading the appropriate vision encoder and projection layers (e.g., CLIP → Vicuna).
- Starts a FastAPI server that exposes OpenAI-compatible endpoints (
/v1/chat/completions,/v1/models, etc.) for seamless integration with existing tools. - Handles concurrent image + text prompts efficiently using vLLM’s runtime optimizations (e.g., CUDA kernel fusion, prefill token caching, and speculative decoding).
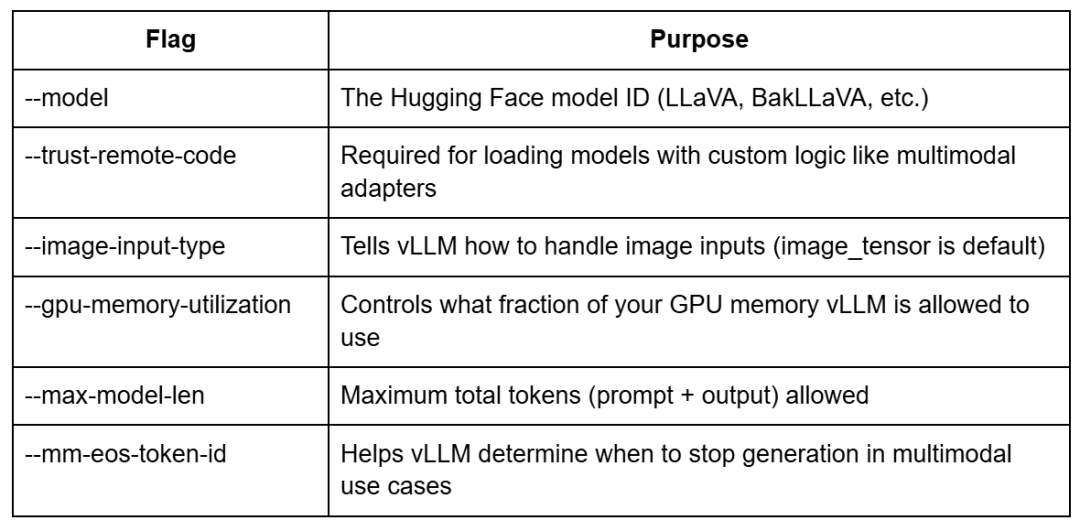
- Manages GPU memory effectively, offering fine-grained control over:
- GPU memory utilization (
--gpu-memory-utilization) - Max tokens (
--max-model-len) - Number of images per request (
--mm-image-limit) - And other server-level limits
- GPU memory utilization (
In short, vllm-serve transforms your local LLaVA or BakLLaVA checkpoint into a production-ready multimodal API — no custom wrappers, third-party inference servers, or Docker hacks required.
Starting the Server
Here’s how to launch the server for LLaVA 1.5 7B:
vllm serve \
  --model llava-hf/llava-1.5-7b-hf \
  --trust-remote-code \
  --image-input-type image_tensor \
  --gpu-memory-utilization 0.90 \
  --max-model-len 2048 \
  --mm-eos-token-id 32021
Explanation of Key Flags
How to See All Available Flags
To discover all the CLI arguments supported by vllm-serve, simply run:
vllm serve --help
This will print a comprehensive list of flags, grouped by functionality — including:
- Batch sizes and concurrency control
- Logging verbosity
- Tokenizer config
- CUDA behavior
- OpenAI API schema options
- Multimodal overrides
This is especially useful if you want to fine-tune performance or deploy in production scenarios.
Verifying Server Health
Once launched, you can check if the server is ready using a simple curl or browser request:
curl http://localhost:8000/v1/models
Expected output (example):
{
  "object": "list",
  "data": [{"id": "llava-hf/llava-1.5-7b-hf", "object": "model"}]
}
Tips
- You can also serve BakLLaVA by changing the model ID to
llava-hf/bakLlava-v1-hf - You can pass
--host 0.0.0.0 --port 8080if deploying on cloud or Docker - For production use, consider using
nohuporpm2to keep the server running
With your server up and running, we’ll now test it with real multimodal prompts using the /v1/chat/completions endpoint — just like GPT-4V. This will confirm your backend is ready to plug into real-world apps.
Let’s do that in the next section.
Testing Multimodal Inference via OpenAI-Compatible APIs
Once your vllm serve server is up and running, you can interact with it just like the official OpenAI API. This lets you test image + text prompts seamlessly — whether you’re building a prototype or integrating with production tools such as LangChain, Streamlit, or your own UI.
Let’s walk through how to send a multimodal prompt using Python.
Step 1: Defining Your API Endpoint
By default, vllm serve exposes an OpenAI-style endpoint at:
API_URL = "http://localhost:8000/v1/chat/completions"
If you’re running vLLM remotely, replace localhost with your server’s IP or domain.
Step 2: Preparing the Input Payload
Let’s break this into three parts: required imports, image loading + base64 encoding, and prompt construction.
Importing Required Libraries
import requests
import base64
from PIL import Image
from io import BytesIO
We begin by importing the necessary libraries:
requestsfor fetching the image from a URLPIL.Imageto process the imagebase64andBytesIOto convert the image to a format compatible with OpenAI’s image upload API (data:image/...;base64,...).
Loading and Encoding the Image
image_url = "http://images.cocodataset.org/val2017/000000039769.jpg"
raw_image = Image.open(requests.get(image_url, stream=True).raw)
buffered = BytesIO()
raw_image.save(buffered, format="JPEG")
img_b64 = base64.b64encode(buffered.getvalue()).decode("utf-8")
Here, we fetch the image from a remote URL and convert it into a base64-encoded JPEG. This allows the image to be embedded inline within the request payload, eliminating the need for external hosting or uploads.
Tip: If you have a local image, replace the URL loading logic with Image.open("your_image.jpg").
Constructing the Prompt Payload
payload = {
    "model": "llava-hf/llava-1.5-7b-hf",  # or "llava-hf/bakLlava-v1-hf"
    "messages": [
        {"role": "user", "content": [
            {"type": "text", "text": "What is happening in this image?"},
            {"type": "image_url", "image_url": {"url": f"data:image/jpeg;base64,{img_b64}"}}
        ]}
    ],
    "temperature": 0.2,
    "max_tokens": 512
}
We now build a standard OpenAI-style chat payload. The messages field holds the user’s message, combining a text question and the inline image. The model can be switched between LLaVA and BakLLaVA variants.
You can also customize generation parameters such as temperature and max_tokens.
Step 3: Sending the Request and Viewing the Response
headers = {"Content-Type": "application/json"}
response = requests.post(API_URL, headers=headers, json=payload)

print(response.json())
We send a POST request to the /v1/chat/completions endpoint with the payload. The response will contain the assistant’s multimodal answer, which you can print or integrate into your app’s UI.
Optional: Using curl, Postman, or LangChain
You can test the same endpoint using tools such as:
- curl from the terminal
- Postman or Thunder Client (for GUI-based testing)
- LangChain’s ChatOpenAI wrapper (just set openai_base_url)
What's next? We recommend PyImageSearch University.

86+ total classes • 115+ hours hours of on-demand code walkthrough videos • Last updated: April 2026
★★★★★ 4.84 (128 Ratings) • 16,000+ Students Enrolled
I strongly believe that if you had the right teacher you could master computer vision and deep learning.
Do you think learning computer vision and deep learning has to be time-consuming, overwhelming, and complicated? Or has to involve complex mathematics and equations? Or requires a degree in computer science?
That’s not the case.
All you need to master computer vision and deep learning is for someone to explain things to you in simple, intuitive terms. And that’s exactly what I do. My mission is to change education and how complex Artificial Intelligence topics are taught.
If you're serious about learning computer vision, your next stop should be PyImageSearch University, the most comprehensive computer vision, deep learning, and OpenCV course online today. Here you’ll learn how to successfully and confidently apply computer vision to your work, research, and projects. Join me in computer vision mastery.
Inside PyImageSearch University you'll find:
- ✓ 86+ courses on essential computer vision, deep learning, and OpenCV topics
- ✓ 86 Certificates of Completion
- ✓ 115+ hours hours of on-demand video
- ✓ Brand new courses released regularly, ensuring you can keep up with state-of-the-art techniques
- ✓ Pre-configured Jupyter Notebooks in Google Colab
- ✓ Run all code examples in your web browser — works on Windows, macOS, and Linux (no dev environment configuration required!)
- ✓ Access to centralized code repos for all 540+ tutorials on PyImageSearch
- ✓ Easy one-click downloads for code, datasets, pre-trained models, etc.
- ✓ Access on mobile, laptop, desktop, etc.
Summary
In this lesson, you learned how to serve powerful open-source multimodal models such as LLaVA using the high-performance vLLM engine — all without cloning any repositories.
We started by understanding why vLLM is ideal for scalable image + text inference, thanks to its advanced features (e.g., CUDA-optimized execution, GPU memory control, and OpenAI-compatible API endpoints).
You then installed vLLM with CUDA support via pip, configured your environment, and explored two ways to run multimodal inference:
- Offline Python-based inference, ideal for local testing or integration in notebooks and custom pipelines.
- OpenAI-compatible API serving, making it easy to connect vLLM with tools such as Streamlit, LangChain, or your production infrastructure.
By the end of this tutorial, you now have a fast, flexible backend ready to power real-world multimodal applications.
In the next lesson, we’ll build a Streamlit-based UI that brings your LLaVA server to life with an interactive user experience.
Citation Information
Singh, V. “Setting Up LLaVA/BakLLaVA with vLLM: Backend and API Integration,” PyImageSearch, P. Chugh, S. Huot, A. Sharma, and P. Thakur, eds., 2025, https://pyimg.co/2zei0
@incollection{Singh_2025_setting-up-llava-bakllava-vllm-backend-api-integration,
  author = {Vikram Singh},
  title = {{Setting Up LLaVA/BakLLaVA with vLLM: Backend and API Integration}},
  booktitle = {PyImageSearch},
  editor = {Puneet Chugh and Susan Huot and Aditya Sharma and Piyush Thakur},
  year = {2025},
  url = {https://pyimg.co/2zei0},
}
To download the source code to this post (and be notified when future tutorials are published here on PyImageSearch), simply enter your email address in the form below!

Download the Source Code and FREE 17-page Resource Guide
Enter your email address below to get a .zip of the code and a FREE 17-page Resource Guide on Computer Vision, OpenCV, and Deep Learning. Inside you'll find my hand-picked tutorials, books, courses, and libraries to help you master CV and DL!

Comment section
Hey, Adrian Rosebrock here, author and creator of PyImageSearch. While I love hearing from readers, a couple years ago I made the tough decision to no longer offer 1:1 help over blog post comments.
At the time I was receiving 200+ emails per day and another 100+ blog post comments. I simply did not have the time to moderate and respond to them all, and the sheer volume of requests was taking a toll on me.
Instead, my goal is to do the most good for the computer vision, deep learning, and OpenCV community at large by focusing my time on authoring high-quality blog posts, tutorials, and books/courses.
If you need help learning computer vision and deep learning, I suggest you refer to my full catalog of books and courses — they have helped tens of thousands of developers, students, and researchers just like yourself learn Computer Vision, Deep Learning, and OpenCV.
Click here to browse my full catalog.