Table of Contents
- People Tracker with YOLOv12 and Centroid Tracker
- Introduction
- Why People Tracker Monitoring Matters
- How YOLOv12 Enables Real-Time Applications
- Configuring Your Development Environment
- Downloading the Input Video
- Visualizing the Inference and Tracking Pipeline
- Implementing the Centroid Tracker
- Class Initialization
- Register and Deregister
- Update Logic (Matching, Registering, Deregistering)
- Centroid Tracker: FAQs
- Running YOLOv12 on Video Frames
- Load Model and OpenCV Video Objects
- Set Up Tracking and Counting
- Frame-by-Frame Inference and Tracking
- Update Tracker and Count Movement
- Draw Output and Save Frame
- Clean Up
- Visualizing People Tracker Monitoring with YOLOv12 and Centroid Tracking
- Summary
People Tracker with YOLOv12 and Centroid Tracker
In this tutorial, you will learn how to monitor real-time people trackers using YOLOv12 for object detection and Centroid Tracker for movement tracking. We will walk through setting up the system to track people entering and exiting a defined area (e.g., mall entrance) and demonstrate how to visualize and effectively count the flow of people.
This lesson is the 2nd of a 3-part series on YOLOv12:
- Breaking the CNN Mold: YOLOv12 Brings Attention to Real-Time Object Detection
- People Tracker with YOLOv12 and Centroid Tracker (this tutorial)
- Lesson 3
To learn how to monitor a people tracker in real-time using YOLOv12 and Centroid Tracker, just keep reading.
Introduction
In this lesson, we continue to explore YOLOv12, the first YOLO model to incorporate attention mechanisms — including innovations such as RELAN, Area Attention, and optional FlashAttention support for fast inference. As we covered in our previous tutorial, YOLOv12 introduces a flexible architecture that supports all major tasks offered by prior versions (e.g., YOLOv11 and YOLOv8), including object detection, segmentation, classification, and pose estimation.
We also walked through how to run YOLOv12 in two ways:
- From the official GitHub repo with FlashAttention support (using the Gradio demo or CLI)
- Using the Ultralytics pip package for an easier, plug-and-play experience
In this tutorial, we go beyond static inference and demonstrate how to apply YOLOv12 in a real-world, camera-based application: People Tracker Monitoring.
Whether it’s a shopping mall, subway station, or campus gate, tracking the number of people entering and exiting a space in real-time can provide valuable operational insights. We’ll show how to:
- Use YOLOv12 to detect people from a bird’s eye view video
- Implement a lightweight centroid-based object tracker
- Count how many people cross a virtual line (in or out)
- Export the results with overlaid annotations and real-time FPS display
What You’ll Build
By the end of this lesson, you’ll have a complete pipeline that combines YOLOv12 and a custom Centroid Tracker to monitor people moving through a defined space — all from a single overhead video.
👇 Figure 1 is a preview of the output you’ll create:

Using only an input video, your system will:
- Detect and assign IDs to individual people
- Track their movement across a virtual line
- Count how many entered or exited
- Overlay this info on video with FPS (frames per second) stats
Let’s build it from scratch.
Why People Tracker Monitoring Matters
In Figure 2, an overhead camera setup is used for monitoring people flow in malls and commercial spaces.
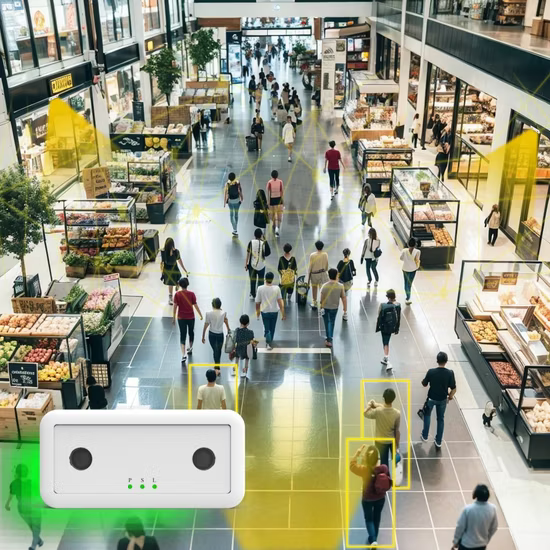
Counting how many people move in and out of a space isn’t just a fun computer vision project — it has real-world impact across multiple industries.
In shopping malls, understanding peak hours and footfall trends helps retailers optimize store layouts, plan promotions, and manage staffing more effectively. Office buildings and campuses can use entry and exit counts to ensure occupancy compliance and reduce energy waste. At metro stations, airports, and large event venues, real-time crowd monitoring is essential for both operational efficiency and public safety.
Traditionally, these systems required expensive sensors or manual logging. But with powerful models (e.g., YOLOv12) and simple camera setups, we can now build an accurate and scalable solution using just Python, OpenCV, and deep learning.
Before we dive into the implementation, let’s take a brief look at the system’s structure.
How It All Fits Together
Figure 3 provides a high-level overview of how the core components in our people tracker monitoring system interact with one another.

YOLOv12 handles person detection, the Centroid Tracker manages object identity across frames, and the line-crossing logic keeps count of people entering and exiting.
In a later section, we’ll break this flow down in more detail — including how centroid matching works, how IDs are assigned, and how we decide if someone has moved “in” or “out.”
How YOLOv12 Enables Real-Time Applications
YOLOv12 isn’t just another iteration in the YOLO family — it’s the first to break away from the traditional CNN-only design by integrating attention mechanisms while still maintaining the blazing speed YOLO is known for.
Earlier YOLO versions (e.g., YOLOv11 and YOLOv8) relied heavily on convolutional backbones. While fast, these models lacked global reasoning capabilities, which limited their performance in more complex and cluttered scenes. YOLOv12 changes that by introducing:
- RELAN (Residual Efficient Layer Aggregation Network): a new backbone architecture that improves feature reuse while keeping the model lightweight and stable.
- Area Attention: a simplified, efficient attention mechanism tailored for spatial understanding in vision tasks.
- FlashAttention (optional): a GPU-optimized attention kernel that reduces memory access overhead and accelerates inference on supported hardware (e.g., A100, T4, RTX 30/40 series).
This combination gives YOLOv12 the best of both worlds — transformer-like context awareness with YOLO-grade speed.
What’s more, YOLOv12 retains support for all major computer vision tasks you’d expect from modern YOLO variants, including:
- Object detection
- Oriented object detection
- Instance segmentation
- Pose estimation
- Classification
That’s why it’s an excellent fit for real-time video applications (e.g., the one we’re building in this tutorial). Whether you’re counting people at a campus gate or tracking footfall in a retail store, YOLOv12 ensures you get accurate detections fast, even on edge or cloud GPUs.
Configuring Your Development Environment
To get started with our people tracker monitoring system, you’ll need to install a few essential libraries and load the YOLOv12 model. We will use the Ultralytics library for running inference. It supports YOLOv12 and offers a simple interface for model loading and prediction.
The good news? You don’t need to worry about FlashAttention or building from source in this tutorial. The Ultralytics pip package is fast, clean, and runs smoothly even on a Colab GPU or your local machine, without attention acceleration.
Run the following cell to install everything we’ll need:
$ pip install -q ultralytics opencv-python matplotlib
Load the YOLOv12 Model
Once installed, you can load the YOLOv12 model from the Ultralytics package. We will use the YOLOv12-Small variant (yolo12s.pt) as it offers a good balance of speed and accuracy for real-time applications:
from ultralytics import YOLO

# Load the YOLOv12-small model
model = YOLO("yolo12s.pt")
Ensure the yolo12s.pt file is present in your current working directory. We’ll download it later in the notebook if it’s not already available.
Once your environment is set up, we’ll fetch the input video and start building the detection and tracking pipeline.
Need Help Configuring Your Development Environment?

All that said, are you:
- Short on time?
- Learning on your employer’s administratively locked system?
- Wanting to skip the hassle of fighting with the command line, package managers, and virtual environments?
- Ready to run the code immediately on your Windows, macOS, or Linux system?
Then join PyImageSearch University today!
Gain access to Jupyter Notebooks for this tutorial and other PyImageSearch guides pre-configured to run on Google Colab’s ecosystem right in your web browser! No installation required.
And best of all, these Jupyter Notebooks will run on Windows, macOS, and Linux!
Downloading the Input Video
To demonstrate people tracker monitoring in action, we’ll use a pre-recorded overhead surveillance-style video — ideal for tracking how people move across a fixed scene.
This input video will serve as the base for our detection and tracking pipeline.
Install gdown
$ pip install gdown
Download the Video
After retrieving the file ID from the University portal, plug it into the command below:
# Replace FILE_ID with the actual file ID from the download link
!gdown --id YOUR_FILE_ID_HERE -O example_02.mp4
Once the video is ready, we’ll walk through how the detection and tracking system works before diving into the code.
Visualizing the Inference and Tracking Pipeline
Before diving into code, it’s important to understand how the various components of our system interact.
Our people tracker monitoring pipeline is built using YOLOv12 for person detection and a Centroid Tracker for ID-based tracking. Together, they power a simple but effective real-time system to count people entering and exiting a space.
Let’s explore this system at two levels:
- High-level overview showing major interactions
- Detailed breakdown of the tracking logic
High-Level Overview
Figure 4 illustrates the high-level flow of how YOLOv12, OpenCV, and the Centroid Tracker interact within each video frame.
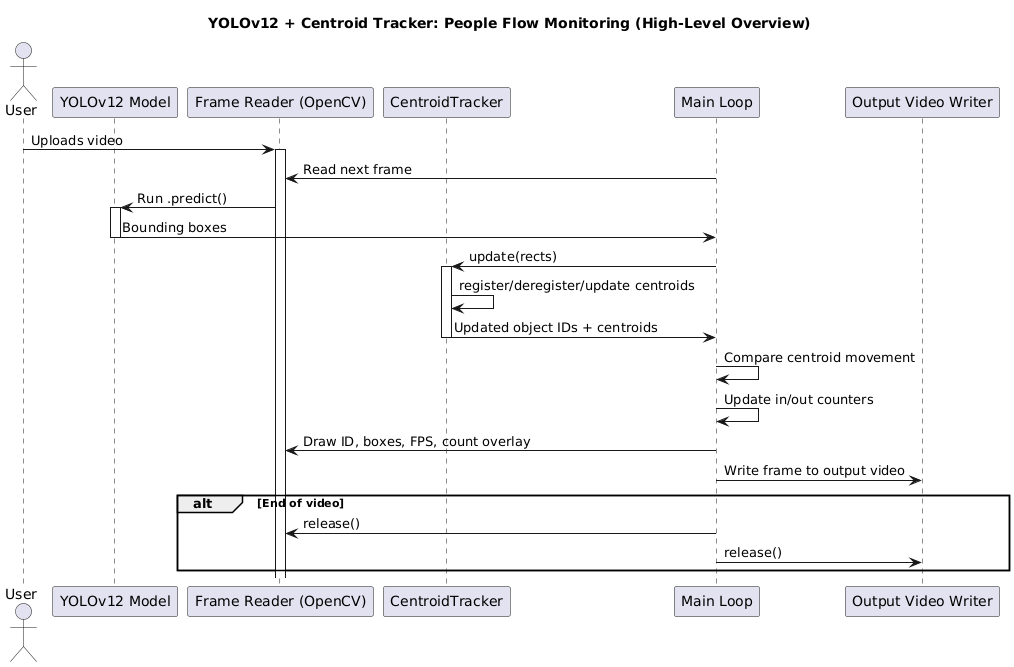
At a glance:
- YOLOv12 detects people frame-by-frame.
- The Centroid Tracker assigns IDs and tracks movement.
- Movement direction is analyzed to increment “in” or “out” counters.
- Each frame is annotated and written to the output video.
This structure ensures real-time performance and modularity, providing flexibility and adaptability.
Detailed Tracker Breakdown
Figure 5 provides a detailed examination of the per-frame tracking logic, including centroid matching and ID management.
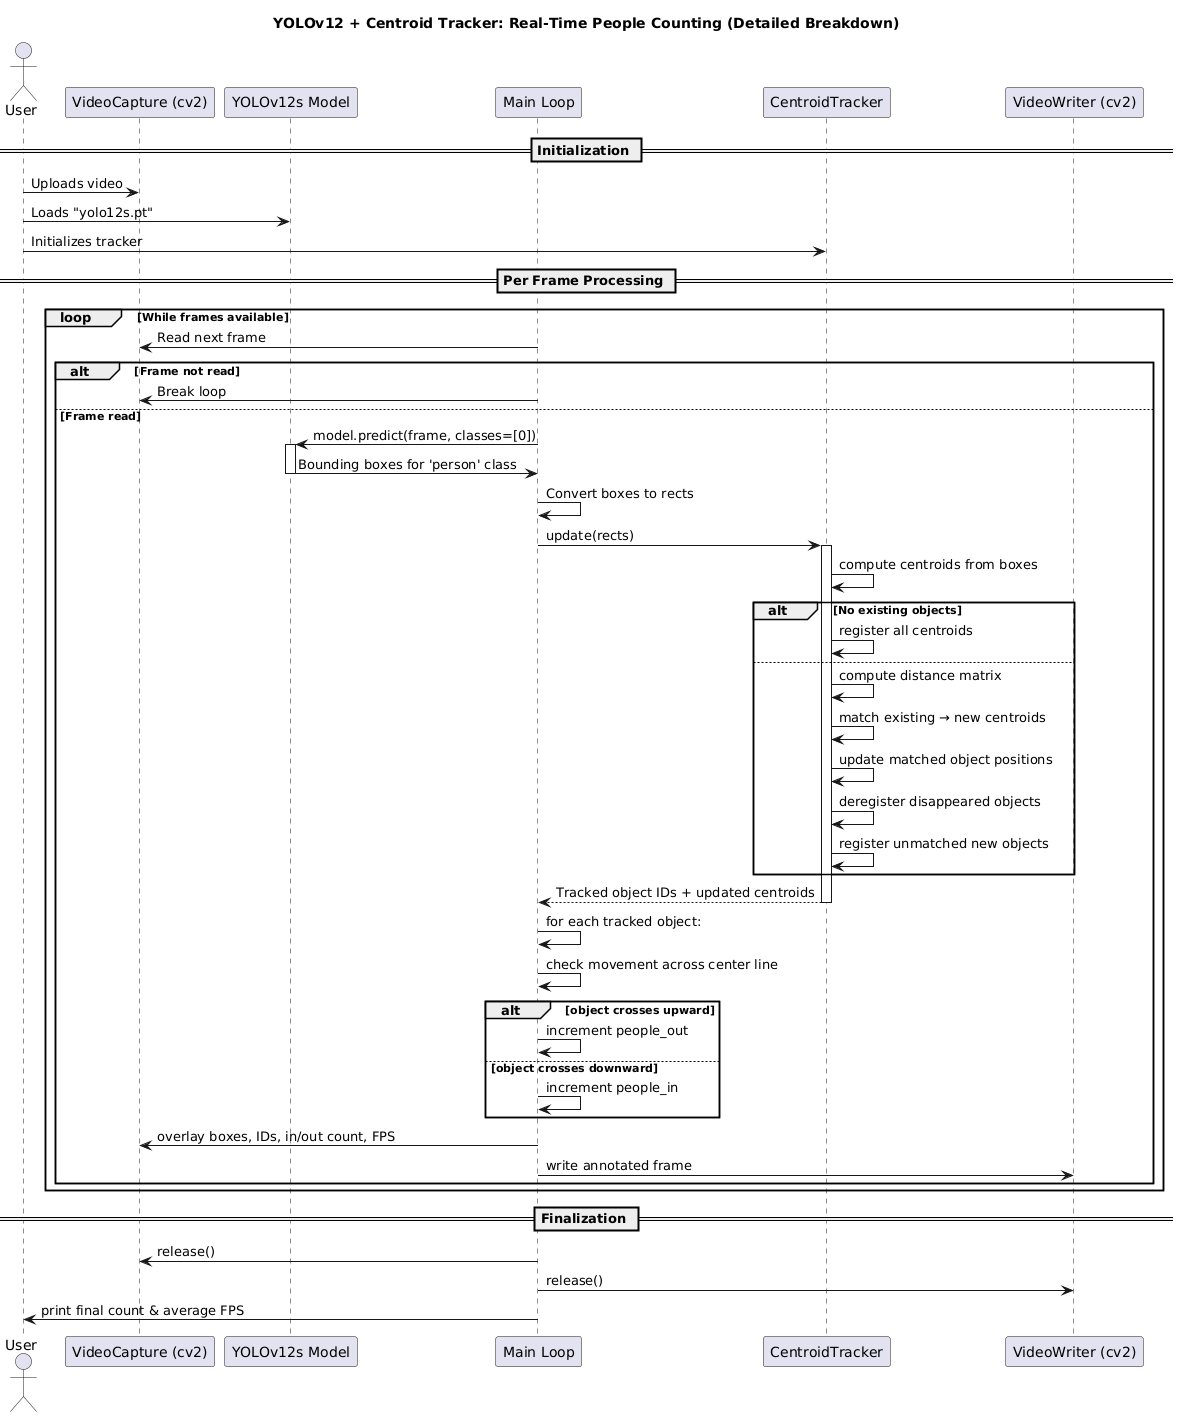
Here is what’s happening in more detail:
Frame Input and Detection
- Frames are read using OpenCV.
- YOLOv12s is used with
classes=[0]to detect only people. - The resulting bounding boxes are converted to
(x1, y1, x2, y2)rects.
Centroid Calculation
- Each bounding box is converted to a centroid
(x, y). - If no objects are being tracked yet, all centroids are registered.
Matching Logic
- A distance matrix is calculated between the current centroids and existing tracked objects.
- The closest matches are updated; unmatched ones are registered as new.
- Disappeared objects are tracked and removed after a specified threshold is reached.
Direction Check and Counting
- For each tracked object, we compare its current and previous centroid position relative to a horizontal line.
- If someone crosses upward → count as out.
- If someone crosses downward → count as in.
Finalization
- The system overlays FPS, bounding boxes, object IDs, and in/out counts on the frame.
- The final results (annotated video and logs) are saved.
These two diagrams provide a visual intuition of what we’ll soon translate into code, so you’re never just copy-pasting mindlessly.
Implementing the Centroid Tracker
At the core of our tracking system lies a lightweight but powerful object tracker: the Centroid Tracker.
It doesn’t require any learning or model training. Instead, it uses the simple logic of assigning a unique ID to each detected object (in our case, a person) and then tracking the object’s centroid across frames.
This makes it ideal for real-time applications where:
- You want quick deployment
- The object class doesn’t change
- And you only care about short-term identity continuity
Let’s break down the tracker into logical blocks.
Class Initialization
class CentroidTracker:
    def __init__(self, max_disappeared=40):
        self.next_object_id = 0
        self.objects = OrderedDict()
        self.disappeared = OrderedDict()
        self.max_disappeared = max_disappeared
        self.track_history = {}
This block initializes the CentroidTracker class, which handles assigning and maintaining unique IDs for detected objects (in our case, people). It sets up internal dictionaries to track each object’s centroid position (self.objects), how many consecutive frames it has disappeared for (self.disappeared), and its full movement history (self.track_history). The max_disappeared parameter defines how many frames an object can go undetected before it’s removed from tracking.
Register and Deregister
def register(self, centroid):
    self.objects[self.next_object_id] = centroid
    self.disappeared[self.next_object_id] = 0
    self.track_history[self.next_object_id] = [centroid]
    self.next_object_id += 1

def deregister(self, object_id):
    del self.objects[object_id]
    del self.disappeared[object_id]
    del self.track_history[object_id]
The register function is called whenever a new object appears in the frame. It assigns a new unique ID to the object, initializes its disappearance counter to 0, and starts recording its centroid history. This ensures that each object can be individually tracked across frames.
On the other hand, the deregister function is used to clean up an object once it’s no longer visible for a set number of frames. It removes the object’s ID and all associated tracking data from the internal dictionaries.
Update Logic (Matching, Registering, Deregistering)
def update(self, rects):
    # Step 1: Handle empty detection
    if len(rects) == 0:
        for object_id in list(self.disappeared.keys()):
            self.disappeared[object_id] += 1
            if self.disappeared[object_id] > self.max_disappeared:
                self.deregister(object_id)
        return self.objects
This portion of the update method handles the case where no detections are found in the current frame (e.g., when all people temporarily leave the camera’s field of view). In such cases, the tracker assumes that the previously tracked objects have disappeared. It increments a disappearance counter for each object. If any object’s disappearance count exceeds the max_disappeared threshold, it is deregistered and removed from tracking. The function then returns the current state of tracked objects.
   # Step 2: Compute new centroids
    input_centroids = np.array([
        ((x1 + x2) // 2, (y1 + y2) // 2)
        for (x1, y1, x2, y2) in rects
    ])
In this step, the tracker processes the current frame’s detections. Each bounding box (rects) is converted into a centroid by averaging its top-left (x1, y1) and bottom-right (x2, y2) coordinates. This produces a list of central (x, y) points — one for each detected object — which is stored in the input_centroids array. These centroids will later be used to match the new detections with existing tracked objects.
   # Step 3: If no tracked objects, register all centroids
    if len(self.objects) == 0:
        for i in range(0, len(input_centroids)):
            self.register(input_centroids[i])
This step handles the case when no objects are currently being tracked (e.g., at the start of the video or after all objects have disappeared). In this situation, every newly detected centroid is treated as a new object and registered with a unique ID using the register method. This initializes the tracking process for all detected objects in the current frame.
   # Step 4: Match input centroids to existing objects using distance matrix
    else:
        object_ids = list(self.objects.keys())
        object_centroids = list(self.objects.values())
        D = dist.cdist(np.array(object_centroids), input_centroids)
        rows = D.min(axis=1).argsort()
        cols = D.argmin(axis=1)[rows]
In this step, if there are already tracked objects, the tracker attempts to match each new centroid to an existing object using a distance-based approach. It first extracts the IDs and current centroids of all tracked objects.
Then, it computes a distance matrix D using the Euclidean distance between each pair of existing and new centroids. The tracker then sorts the rows (existing objects) by their closest matches and identifies the best-matching column (new centroid) for each row.
This sets up a greedy matching strategy to associate new detections with previously tracked objects based on proximity.
       # Step 5: Update matched objects
        used_rows, used_cols = set(), set()
        for (row, col) in zip(rows, cols):
            if row in used_rows or col in used_cols:
                continue
            object_id = object_ids[row]
            self.objects[object_id] = input_centroids[col]
            self.track_history[object_id].append(input_centroids[col])
            self.disappeared[object_id] = 0
            used_rows.add(row)
            used_cols.add(col)
In this step, the tracker updates existing objects that were successfully matched to new centroids. It iterates through the matched row-column pairs (i.e., existing objects and their closest new detections), ensuring that each object and centroid is used only once.
For each valid match, the object’s position is updated with the new centroid, its movement history is extended, and its disappearance counter is reset to 0, indicating it has been seen again. The matched rows and columns are then marked as used to prevent duplicate assignments.
        # Step 6: Handle unmatched rows and columns
        unused_rows = set(range(0, D.shape[0])).difference(used_rows)
        unused_cols = set(range(0, D.shape[1])).difference(used_cols)

        for row in unused_rows:
            object_id = object_ids[row]
            self.disappeared[object_id] += 1
            if self.disappeared[object_id] > self.max_disappeared:
                self.deregister(object_id)

        for col in unused_cols:
            self.register(input_centroids[col])
In this final step, the tracker deals with unmatched objects and detections. unused_rows represents existing objects that weren’t matched to any new centroid (possibly because the object exited the frame or was occluded). Their disappearance counters are incremented, and if the counter exceeds the max_disappeared threshold, they are deregistered.
Conversely, unused_cols represents new detections that didn’t match any existing object (likely new entries into the scene). These are registered as new objects with fresh IDs. This ensures that the tracker stays adaptive as people enter or leave the frame.
With this class in place, you can now track people across frames using only bounding box centroids. In the next section, we’ll combine this with YOLOv12 detections to build a full pipeline.
Centroid Tracker: FAQs
Q1: What would happen if multiple objects crossed paths? Could the Centroid Tracker lose track of IDs?
Yes, if two people come very close to each other or occlude each other, the distance matrix matching might reassign IDs. This tracker is simple and does not include re-ID or motion prediction. It is best used in scenes with moderate movement and spacing.
Q2: Why don’t we use Kalman Filters or SORT here instead?
Those are great options, too! However, the Centroid Tracker is easy to understand, requires no training or motion modeling, and performs well when the FPS is stable and object overlap is minimal, making it perfect for educational and lightweight use cases.
Q3: Could we extend this tracker to work with multiple classes (e.g., count cars and people)?
Yes, but you’d have to maintain separate trackers per class or tag each detection with a label. This adds complexity, but is totally doable if the use case demands multi-class tracking.
Running YOLOv12 on Video Frames
With our Centroid Tracker implemented and the YOLOv12 model loaded, it’s time to bring the pipeline to life. In this section, we’ll process the video frame-by-frame, detect people using YOLOv12, and track their movement across the scene using unique IDs.
We’ll also visualize their trajectories and count the number of people moving in or out across a virtual reference line (e.g., an entrance or exit zone).
Load Model and OpenCV Video Objects
model = YOLO("yolo12s.pt")  # Load YOLOv12-small model

cap = cv2.VideoCapture("inp_people_monitor_01.mp4")
width = int(cap.get(cv2.CAP_PROP_FRAME_WIDTH))
height = int(cap.get(cv2.CAP_PROP_FRAME_HEIGHT))
fps = cap.get(cv2.CAP_PROP_FPS)

fourcc = cv2.VideoWriter_fourcc(*"mp4v")
out = cv2.VideoWriter("people_counter.mp4", fourcc, fps, (width, height))
In this block, we load the YOLOv12-small model (yolo12s.pt) to perform person detection. We then open the input video (inp_people_monitor_01.mp4) using OpenCV and extract its key properties (e.g., frame width, height, and frames per second (FPS)).
Using these parameters, we configure a VideoWriter object to save our annotated output as a new video file called people_counter.mp4, preserving the original video’s resolution and playback speed.
Set Up Tracking and Counting
line_y = height // 2  # Horizontal counting line
people_in = 0
people_out = 0
already_counted = set()  # To prevent double-counting

ct = CentroidTracker()
Here, we define the core variables needed for people counting. We set up a horizontal reference line (line_y) at the center of the video frame to detect when people cross it. Two counters (i.e., people_in and people_out) are initialized to track the number of individuals moving across the line in each direction. We also create an already_counted set to ensure the same person isn’t counted multiple times. Finally, we initialize our CentroidTracker instance, which will be responsible for assigning and maintaining unique IDs for each detected person across frames.
Frame-by-Frame Inference and Tracking
while cap.isOpened():
    ret, frame = cap.read()
    if not ret:
        break

    results = model.predict(frame, classes=[0], conf=0.4, verbose=False)
    boxes = results[0].boxes.xyxy.cpu().numpy() if results and results[0].boxes else []
    rects = [(int(x1), int(y1), int(x2), int(y2)) for (x1, y1, x2, y2) in boxes]
In this loop, we begin processing the video frame by frame. For each iteration, we read a new frame from the video using OpenCV. If the frame isn’t successfully read (i.e., end of video), the loop breaks. Otherwise, we run the YOLOv12 model on the frame to detect people by specifying classes=[0], which corresponds to the “person” class in COCO (common objects in context). We also apply a confidence threshold of 0.4 to filter weak detections.
The resulting bounding boxes are extracted in (x1, y1, x2, y2) format and converted into a list of integer rectangles (rects) that will be passed to the tracker in the next step.
Update Tracker and Count Movement
    objects = ct.update(rects)

    cv2.line(frame, (0, line_y), (width, line_y), (0, 255, 255), 2)  # draw the line

    for object_id, centroid in objects.items():
        track = ct.track_history[object_id]
        if len(track) >= 2:
            prev_y = track[-2][1]
            curr_y = track[-1][1]

            if object_id not in already_counted:
                if prev_y < line_y and curr_y >= line_y:
                    people_in += 1
                    already_counted.add(object_id)
                elif prev_y > line_y and curr_y <= line_y:
                    people_out += 1
                    already_counted.add(object_id)
In this block, we pass the current frame’s bounding boxes (rects) to our CentroidTracker, which returns the updated set of tracked objects with their latest centroids. We then draw a horizontal reference line (line_y) across the frame to visually separate the “in” and “out” zones. For each tracked object, we retrieve its movement history and compare the y-coordinates of its last two positions. If the object crosses the line from top to bottom, it’s counted as “in”; if it crosses from bottom to top, it’s counted as “out.” To prevent double-counting, we verify whether the object ID has already been processed and update the counters accordingly.
Draw Output and Save Frame
        cv2.circle(frame, tuple(centroid), 4, (0, 255, 0), -1)
        cv2.putText(frame, f"ID {object_id}", (centroid[0] - 10, centroid[1] - 10),
                    cv2.FONT_HERSHEY_SIMPLEX, 0.5, (255, 255, 255), 2)

    # display counters
    cv2.putText(frame, f"In: {people_in}", (10, 30),
                cv2.FONT_HERSHEY_SIMPLEX, 1.0, (0, 255, 0), 2)
    cv2.putText(frame, f"Out: {people_out}", (10, 70),
                cv2.FONT_HERSHEY_SIMPLEX, 1.0, (0, 0, 255), 2)

    out.write(frame)
In this final visualization step, we annotate the frame with real-time tracking information. For each detected person, we draw a small green circle at their centroid and label them with a unique ID using cv2.putText. We also overlay the running totals of how many people have moved “In” and “Out” across the reference line.
These stats appear in the top-left corner of the frame. Once all annotations are added, the frame is written to the output video using out.write(frame), preserving both the visualizations and counting logic in the final saved video.
Clean Up
cap.release()
out.release()
cv2.destroyAllWindows()

print(f"Done! Saved as people_counter.mp4")
This final step releases the video objects and completes the processing.
Visualizing People Tracker Monitoring with YOLOv12 and Centroid Tracking
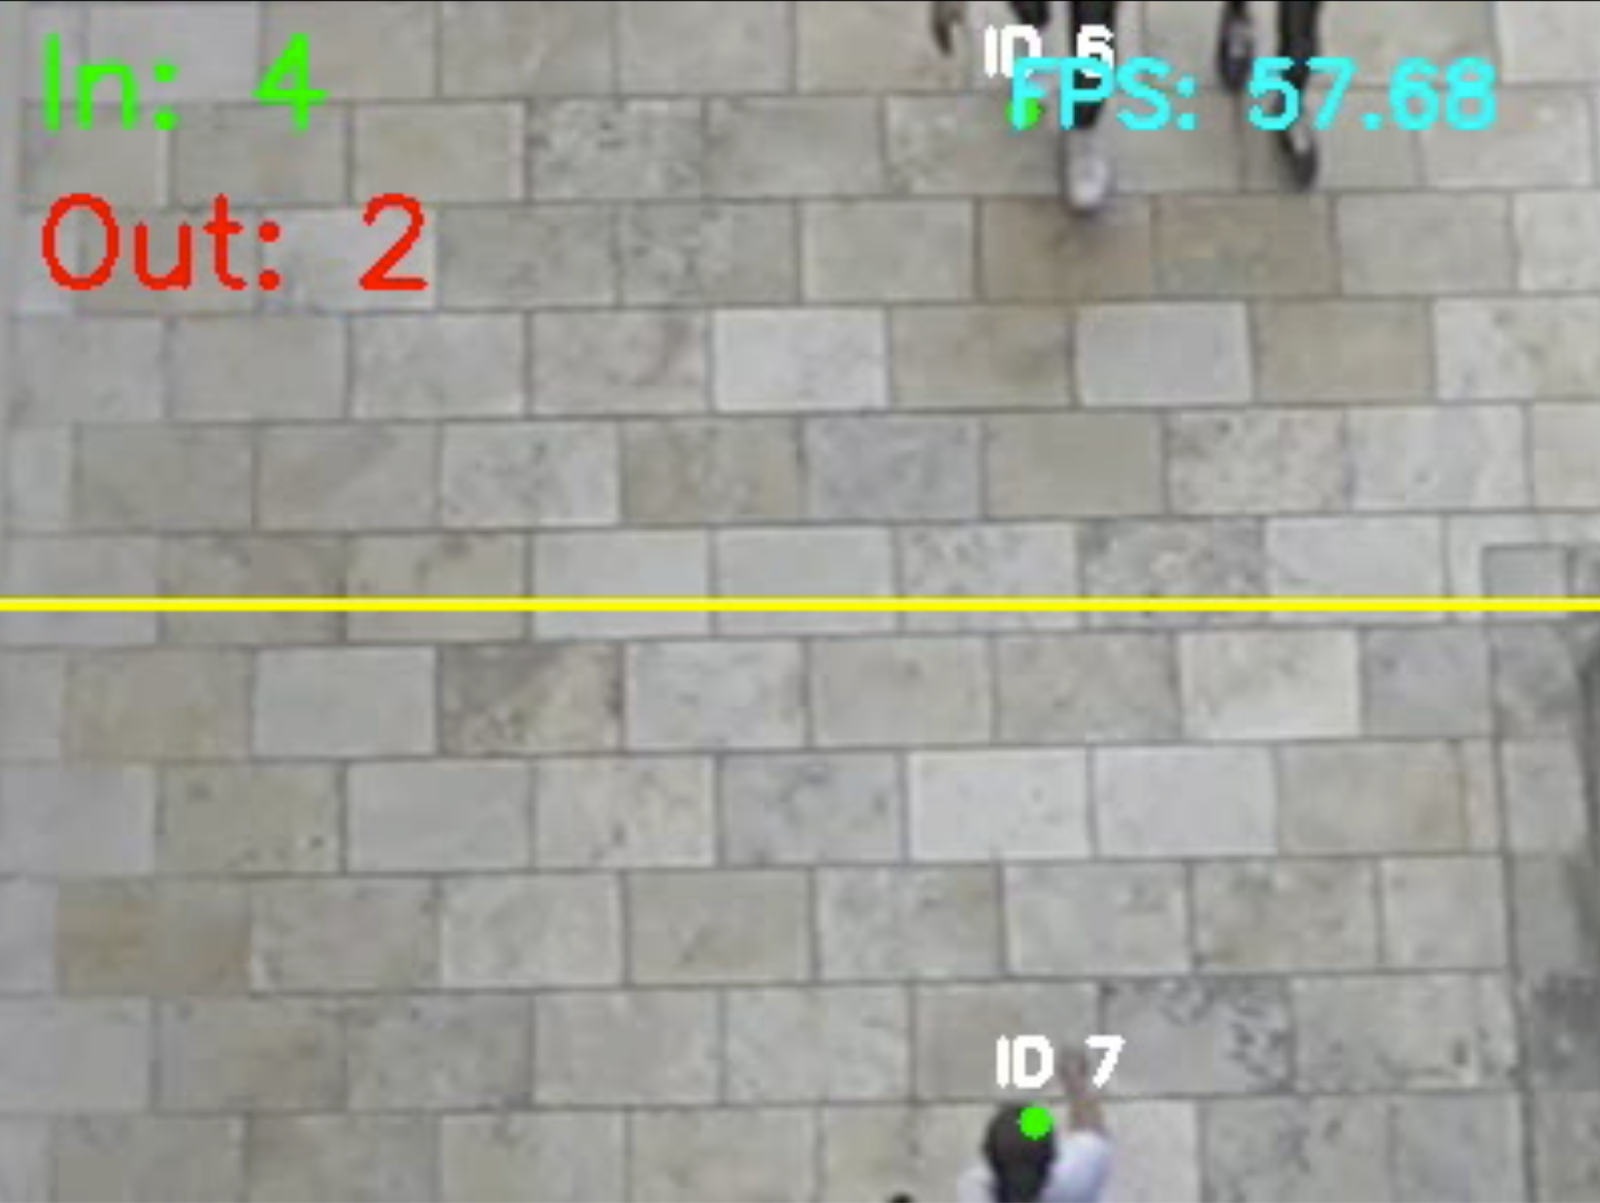
In Figure 6, you can see our real-time people counting system in action, combining YOLOv12 for detection and a centroid tracker for identity management and movement analysis.
In this demo:
- Three individuals are detected moving through the frame.
- Two people are entering (moving from top to bottom), and one person is exiting (moving from bottom to top).
- Notably,
ID 6is moving downward, andID 7is moving upward.
An interesting observation: the person walking closely beside ID 6 has not yet been assigned an ID. This happens because YOLOv12 has not detected them with high enough confidence at that specific frame, possibly due to occlusion or only partial visibility. Meanwhile, ID 7, which is farther away but fully visible, is detected and registered earlier.
This behavior is also visible in Figure 7. The individual next to ID 6 has no ID yet, indicating detection hasn’t occurred for them yet.
Such scenarios highlight the dynamic nature of real-time detection systems, where IDs are assigned based on when a full, confident detection occurs, rather than simply proximity. This capability ensures robust tracking and accurate people counting, even under real-world conditions (e.g., occlusions and staggered visibility).
What's next? We recommend PyImageSearch University.

86+ total classes • 115+ hours hours of on-demand code walkthrough videos • Last updated: March 2026
★★★★★ 4.84 (128 Ratings) • 16,000+ Students Enrolled
I strongly believe that if you had the right teacher you could master computer vision and deep learning.
Do you think learning computer vision and deep learning has to be time-consuming, overwhelming, and complicated? Or has to involve complex mathematics and equations? Or requires a degree in computer science?
That’s not the case.
All you need to master computer vision and deep learning is for someone to explain things to you in simple, intuitive terms. And that’s exactly what I do. My mission is to change education and how complex Artificial Intelligence topics are taught.
If you're serious about learning computer vision, your next stop should be PyImageSearch University, the most comprehensive computer vision, deep learning, and OpenCV course online today. Here you’ll learn how to successfully and confidently apply computer vision to your work, research, and projects. Join me in computer vision mastery.
Inside PyImageSearch University you'll find:
- ✓ 86+ courses on essential computer vision, deep learning, and OpenCV topics
- ✓ 86 Certificates of Completion
- ✓ 115+ hours hours of on-demand video
- ✓ Brand new courses released regularly, ensuring you can keep up with state-of-the-art techniques
- ✓ Pre-configured Jupyter Notebooks in Google Colab
- ✓ Run all code examples in your web browser — works on Windows, macOS, and Linux (no dev environment configuration required!)
- ✓ Access to centralized code repos for all 540+ tutorials on PyImageSearch
- ✓ Easy one-click downloads for code, datasets, pre-trained models, etc.
- ✓ Access on mobile, laptop, desktop, etc.
Summary
In this tutorial, we explored how to build a real-time people tracker monitoring system using YOLOv12 for detection and a custom Centroid Tracker for tracking and counting. We began by breaking down the core tracking logic, implementing line-crossing-based counting, and annotating each detected person with a unique ID.
We then demonstrated how to run YOLOv12 on video input, track individuals across frames, and count the number of people entering or exiting a defined zone. By combining detection and tracking, we created a complete end-to-end pipeline that’s ideal for scenarios such as mall entrances, public transit stations, or event monitoring.
With just one video input, you now have a fully working people-counting system, powered by the latest attention-based YOLOv12 model.
Citation Information
Singh, V. “People Tracker with YOLOv12 and Centroid Tracker,” PyImageSearch, P. Chugh, S. Huot, A. Sharma, and P. Thakur, eds., 2025, https://pyimg.co/hntsv
@incollection{Singh_2025_people-tracker-with-yolov12-and-centroid-tracker,
  author = {Vikram Singh},
  title = {{People Tracker with YOLOv12 and Centroid Tracker}},
  booktitle = {PyImageSearch},
  editor = {Puneet Chugh and Susan Huot and Aditya Sharma and Piyush Thakur},
  year = {2025},
  url = {https://pyimg.co/hntsv},
}
To download the source code to this post (and be notified when future tutorials are published here on PyImageSearch), simply enter your email address in the form below!

Download the Source Code and FREE 17-page Resource Guide
Enter your email address below to get a .zip of the code and a FREE 17-page Resource Guide on Computer Vision, OpenCV, and Deep Learning. Inside you'll find my hand-picked tutorials, books, courses, and libraries to help you master CV and DL!

Comment section
Hey, Adrian Rosebrock here, author and creator of PyImageSearch. While I love hearing from readers, a couple years ago I made the tough decision to no longer offer 1:1 help over blog post comments.
At the time I was receiving 200+ emails per day and another 100+ blog post comments. I simply did not have the time to moderate and respond to them all, and the sheer volume of requests was taking a toll on me.
Instead, my goal is to do the most good for the computer vision, deep learning, and OpenCV community at large by focusing my time on authoring high-quality blog posts, tutorials, and books/courses.
If you need help learning computer vision and deep learning, I suggest you refer to my full catalog of books and courses — they have helped tens of thousands of developers, students, and researchers just like yourself learn Computer Vision, Deep Learning, and OpenCV.
Click here to browse my full catalog.