In this tutorial, you will learn how to perform automatic age detection/prediction using OpenCV, Deep Learning, and Python.
Age detection models need a vast range of facial data across all age groups. A curated dataset library would provide the necessary diversity, ensuring your models can accurately predict ages from various demographics.
Roboflow has free tools for each stage of the computer vision pipeline that will streamline your workflows and supercharge your productivity.
Sign up or Log in to your Roboflow account to access state of the art dataset libaries and revolutionize your computer vision pipeline.
You can start by choosing your own datasets or using our PyimageSearch’s assorted library of useful datasets.
Bring data in any of 40+ formats to Roboflow, train using any state-of-the-art model architectures, deploy across multiple platforms (API, NVIDIA, browser, iOS, etc), and connect to applications or 3rd party tools.
With a few images, you can train a working computer vision model in an afternoon. For example, bring data into Roboflow from anywhere via API, label images with the cloud-hosted image annotation tool, kickoff a hosted model training with one-click, and deploy the model via a hosted API endpoint. This process can be executed in a code-centric way, in the cloud-based UI, or any mix of the two.
Over 250,000 developers and machine learning engineers from companies such as Cardinal Health, Walmart, USG, Rivian, Intel, and Medtronic build computer vision pipelines with Roboflow. Get started today, no credit card required.
By the end of this tutorial, you will be able to automatically predict age in static image files and real-time video streams with reasonably high accuracy.
To learn how to perform age detection with OpenCV and Deep Learning, just keep reading!
OpenCV Age Detection with Deep Learning
In the first part of this tutorial, you’ll learn about age detection, including the steps required to automatically predict the age of a person from an image or a video stream (and why age detection is best treated as a classification problem rather than a regression problem).
From there, we’ll discuss our deep learning-based age detection model and then learn how to use the model for both:
- Age detection in static images
- Age detection in real-time video streams
We’ll then review the results of our age prediction work.
What is age detection?
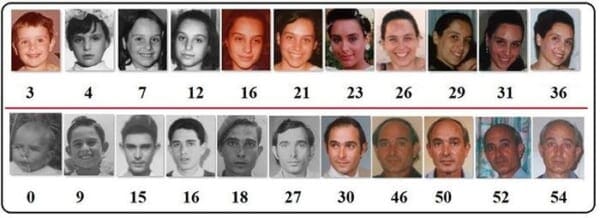
Age detection is the process of automatically discerning the age of a person solely from a photo of their face.
Typically, you’ll see age detection implemented as a two-stage process:
- Stage #1: Detect faces in the input image/video stream
- Stage #2: Extract the face Region of Interest (ROI), and apply the age detector algorithm to predict the age of the person
For Stage #1, any face detector capable of producing bounding boxes for faces in an image can be used, including but not limited to Haar cascades, HOG + Linear SVM, Single Shot Detectors (SSDs), etc.
Exactly which face detector you use depends on your project:
- Haar cascades will be very fast and capable of running in real-time on embedded devices — the problem is that they are less accurate and highly prone to false-positive detections
- HOG + Linear SVM models are more accurate than Haar cascades but are slower. They also aren’t as tolerant with occlusion (i.e., not all of the face visible) or viewpoint changes (i.e., different views of the face)
- Deep learning-based face detectors are the most robust and will give you the best accuracy, but require even more computational resources than both Haar cascades and HOG + Linear SVMs
When choosing a face detector for your application, take the time to consider your project requirements — is speed or accuracy more important for your use case? I also recommend running a few experiments with each of the face detectors so you can let the empirical results guide your decisions.
Once your face detector has produced the bounding box coordinates of the face in the image/video stream, you can move on to Stage #2 — identifying the age of the person.
Given the bounding box (x, y)-coordinates of the face, you first extract the face ROI, ignoring the rest of the image/frame. Doing so allows the age detector to focus solely on the person’s face and not any other irrelevant “noise” in the image.
The face ROI is then passed through the model, yielding the actual age prediction.
There are a number of age detector algorithms, but the most popular ones are deep learning-based age detectors — we’ll be using such a deep learning-based age detector in this tutorial.
Our age detector deep learning model

The deep learning age detector model we are using here today was implemented and trained by Levi and Hassner in their 2015 publication, Age and Gender Classification Using Convolutional Neural Networks.
In the paper, the authors propose a simplistic AlexNet-like architecture that learns a total of eight age brackets:
- 0-2
- 4-6
- 8-12
- 15-20
- 25-32
- 38-43
- 48-53
- 60-100
You’ll note that these age brackets are noncontiguous — this done on purpose, as the Adience dataset, used to train the model, defines the age ranges as such (we’ll learn why this is done in the next section).
We’ll be using a pre-trained age detector model in this post, but if you are interested in learning how to train it from scratch, be sure to read Deep Learning for Computer Vision with Python, where I show you how to do exactly that.
Why aren’t we treating age prediction as a regression problem?
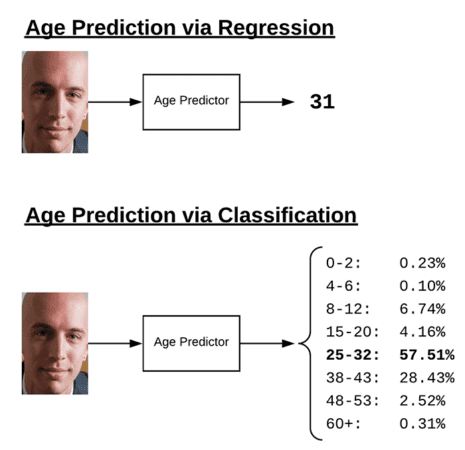
You’ll notice from the previous section that we have discretized ages into “buckets,” thereby treating age prediction as a classification problem — why not frame it as a regression problem instead (the way we did in our house price prediction tutorial)?
Technically, there’s no reason why you can’t treat age prediction as a regression task. There are even some models that do just that.
The problem is that age prediction is inherently subjective and based solely on appearance.
A person in their mid-50s who has never smoked in their life, always wore sunscreen when going outside, and took care of their skin daily will likely look younger than someone in their late-30s who smokes a carton a day, works manual labor without sun protection, and doesn’t have a proper skin care regime.
And let’s not forget the most important driving factor in aging, genetics — some people simply age better than others.
For example, take a look at the following image of Matthew Perry (who played Chandler Bing on the TV sitcom, Friends) and compare it to an image of Jennifer Aniston (who played Rachel Green, alongside Perry):
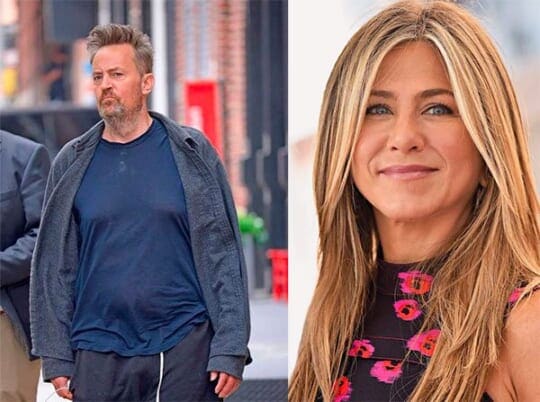
Could you guess that Matthew Perry (50) is actually a year younger than Jennifer Aniston (51)?
Unless you have prior knowledge about these actors, I doubt it.
But, on the other hand, could you guess that these actors were 48-53?
I’m willing to bet you probably could.
While humans are inherently bad at predicting a single age value, we are actually quite good at predicting age brackets.
This is a loaded example, of course.
Jennifer Aniston’s genetics are near perfect, and combined with an extremely talented plastic surgeon, she seems to never age.
But that goes to show my point — people purposely try to hide their age.
And if a human struggles to accurately predict the age of a person, then surely a machine will struggle as well.
Once you start treating age prediction as a regression problem, it becomes significantly harder for a model to accurately predict a single value representing that person’s image.
However, if you treat it as a classification problem, defining buckets/age brackets for the model, our age predictor model becomes easier to train, often yielding substantially higher accuracy than regression-based prediction alone.
Simply put: Treating age prediction as classification “relaxes” the problem a bit, making it easier to solve — typically, we don’t need the exact age of a person; a rough estimate is sufficient.
Project structure
Be sure to grab the code, models, and images from the “Downloads” section of this blog post. Once you extract the files, your project will look like this:
$ tree --dirsfirst
.
├── age_detector
│   ├── age_deploy.prototxt
│   └── age_net.caffemodel
├── face_detector
│   ├── deploy.prototxt
│   └── res10_300x300_ssd_iter_140000.caffemodel
├── images
│   ├── adrian.png
│   ├── neil_patrick_harris.png
│   └── samuel_l_jackson.png
├── detect_age.py
└── detect_age_video.py

3 directories, 9 files
The first two directories consist of our age predictor and face detector. Each of these deep learning models is Caffe-based.
I’ve provided three testing images for age prediction; you can add your own images as well.
In the remainder of this tutorial, we will review two Python scripts:
detect_age.py: Single image age predictiondetect_age_video.py: Age prediction in video streams
Each of these scripts detects faces in an image/frame and then performs age prediction on them using OpenCV.
Implementing our OpenCV age detector for images
Let’s get started by implementing age detection with OpenCV in static images.
Open up the detect_age.py file in your project directory, and let’s get to work:
# import the necessary packages
import numpy as np
import argparse
import cv2
import os

# construct the argument parse and parse the arguments
ap = argparse.ArgumentParser()
ap.add_argument("-i", "--image", required=True,
	help="path to input image")
ap.add_argument("-f", "--face", required=True,
	help="path to face detector model directory")
ap.add_argument("-a", "--age", required=True,
	help="path to age detector model directory")
ap.add_argument("-c", "--confidence", type=float, default=0.5,
	help="minimum probability to filter weak detections")
args = vars(ap.parse_args())
To kick off our age detector script, we import NumPy and OpenCV. I recommend using my pip install opencv tutorial to configure your system.
Additionally, we need to import Python’s built-in os module for joining our model paths.
And finally, we import argparse to parse command line arguments.
Our script requires four command line arguments:
--image: Provides the path to the input image for age detection--face: The path to our pre-trained face detector model directory--age: Our pre-trained age detector model directory--confidence: The minimum probability threshold in order to filter weak detections
As we learned above, our age detector is a classifier that predicts a person’s age using their face ROI according to predefined buckets — we aren’t treating this as a regression problem. Let’s define those age range buckets now:
# define the list of age buckets our age detector will predict
AGE_BUCKETS = ["(0-2)", "(4-6)", "(8-12)", "(15-20)", "(25-32)",
	"(38-43)", "(48-53)", "(60-100)"]
Our ages are defined in buckets (i.e., class labels) for our pre-trained age detector. We’ll use this list and an associated index to grab the age bucket to annotate on the output image.
Given our imports, command line arguments, and age buckets, we’re now ready to load our two pre-trained models:
# load our serialized face detector model from disk
print("[INFO] loading face detector model...")
prototxtPath = os.path.sep.join([args["face"], "deploy.prototxt"])
weightsPath = os.path.sep.join([args["face"],
	"res10_300x300_ssd_iter_140000.caffemodel"])
faceNet = cv2.dnn.readNet(prototxtPath, weightsPath)

# load our serialized age detector model from disk
print("[INFO] loading age detector model...")
prototxtPath = os.path.sep.join([args["age"], "age_deploy.prototxt"])
weightsPath = os.path.sep.join([args["age"], "age_net.caffemodel"])
ageNet = cv2.dnn.readNet(prototxtPath, weightsPath)
Here, we load two models:
- Our face detector finds and localizes faces in the image (Lines 25-28)
- The age classifier determines which age range a particular face belongs to (Lines 32-34)
Each of these models was trained with the Caffe framework. I cover how to train Caffe classifiers inside the PyImageSearch Gurus course.
Now that all of our initializations are taken care of, let’s load an image from disk and detect face ROIs:
# load the input image and construct an input blob for the image
image = cv2.imread(args["image"])
(h, w) = image.shape[:2]
blob = cv2.dnn.blobFromImage(image, 1.0, (300, 300),
	(104.0, 177.0, 123.0))

# pass the blob through the network and obtain the face detections
print("[INFO] computing face detections...")
faceNet.setInput(blob)
detections = faceNet.forward()
Lines 37-40 load and preprocess our input --image. We use OpenCV’s blobFromImage method — be sure to read more about blobFromImage in my tutorial.
To detect faces in our image, we send the blob through our CNN, resulting in a list of detections. Let’s loop over the face ROI detections now:
# loop over the detections
for i in range(0, detections.shape[2]):
	# extract the confidence (i.e., probability) associated with the
	# prediction
	confidence = detections[0, 0, i, 2]

	# filter out weak detections by ensuring the confidence is
	# greater than the minimum confidence
	if confidence > args["confidence"]:
		# compute the (x, y)-coordinates of the bounding box for the
		# object
		box = detections[0, 0, i, 3:7] * np.array([w, h, w, h])
		(startX, startY, endX, endY) = box.astype("int")

		# extract the ROI of the face and then construct a blob from
		# *only* the face ROI
		face = image[startY:endY, startX:endX]
		faceBlob = cv2.dnn.blobFromImage(face, 1.0, (227, 227),
			(78.4263377603, 87.7689143744, 114.895847746),
			swapRB=False)
As we loop over the detections, we filter out weak confidence faces (Lines 51-55).
For faces that meet the minimum confidence criteria, we extract the ROI coordinates (Lines 58-63). At this point, we have a small crop from the image containing only a face. We go ahead and create a blob from this ROI (i.e., faceBlob) via Lines 64-66.
And now we’ll perform age detection:
		# make predictions on the age and find the age bucket with
		# the largest corresponding probability
		ageNet.setInput(faceBlob)
		preds = ageNet.forward()
		i = preds[0].argmax()
		age = AGE_BUCKETS[i]
		ageConfidence = preds[0][i]

		# display the predicted age to our terminal
		text = "{}: {:.2f}%".format(age, ageConfidence * 100)
		print("[INFO] {}".format(text))

		# draw the bounding box of the face along with the associated
		# predicted age
		y = startY - 10 if startY - 10 > 10 else startY + 10
		cv2.rectangle(image, (startX, startY), (endX, endY),
			(0, 0, 255), 2)
		cv2.putText(image, text, (startX, y),
			cv2.FONT_HERSHEY_SIMPLEX, 0.45, (0, 0, 255), 2)

# display the output image
cv2.imshow("Image", image)
cv2.waitKey(0)
Using our face blob, we make age predictions (Lines 70-74) resulting in an age bucket and ageConfidence. We use these data points along with the coordinates of the face ROI to annotate the original input --image (Lines 77-86) and display results (Lines 89 and 90).
In the next section, we’ll analyze our results.
OpenCV age detection results
Let’s put our OpenCV age detector to work.
Start by using the “Downloads” section of this tutorial to download the source code, pre-trained age detector model, and example images.
From there, open up a terminal, and execute the following command:
$ python detect_age.py --image images/adrian.png --face face_detector --age age_detector
[INFO] loading face detector model...
[INFO] loading age detector model...
[INFO] computing face detections...
[INFO] (25-32): 57.51%
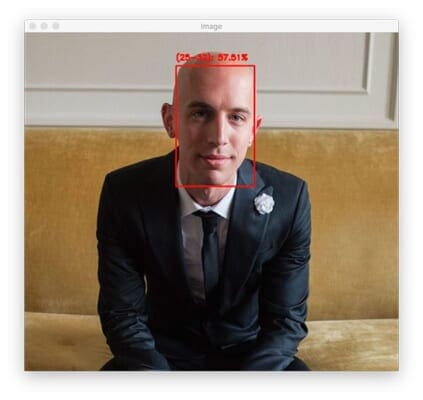
Here, you can see that our OpenCV age detector has predicted my age to be 25-32 with 57.51% confidence — indeed, the age detector is correct (I was 30 when that picture was taken).
Let’s try another example, this one of the famous actor, Neil Patrick Harris when he was a kid:
$ python detect_age.py --image images/neil_patrick_harris.png --face face_detector --age age_detector
[INFO] loading face detector model...
[INFO] loading age detector model...
[INFO] computing face detections...
[INFO] (8-12): 85.72%
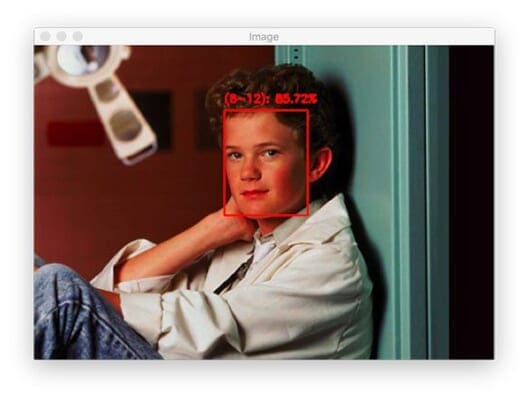
Our age predictor is one again correct — Neil Patrick Harris certainly looked to be somewhere in the 8-12 age group when this photo was taken.
Let’s try another image; this image is of one of my favorite actors, the infamous Samuel L. Jackson:
$ python detect_age.py --image images/samuel_l_jackson.png --face face_detector --age age_detector
[INFO] loading face detector model...
[INFO] loading age detector model...
[INFO] computing face detections...
[INFO] (48-53): 69.38%
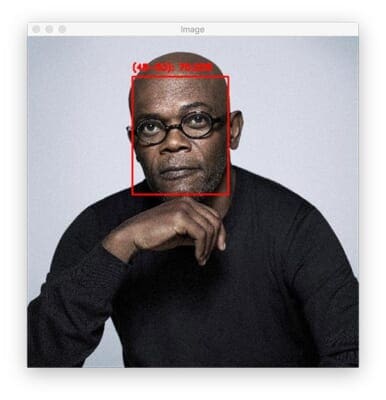
Here our OpenCV age detector is incorrect — Samuel L. Jackson is ~71 years old, making our age prediction off by approximately 18 years.
That said, look at the photo — does Mr. Jackson actually look to be 71?
My guess would have been late 50s to early 60s. At least to me, he certainly doesn’t look like a man in his early 70s.
But that just goes to show my point earlier in this post:
The process of visual age prediction is difficult, and I’d consider it subjective when either a computer or a person tries to guess someone’s age.
In order to evaluate an age detector, you cannot rely on the person’s actual age. Instead, you need to measure the accuracy between the predicted age and the perceived age.
Implementing our OpenCV age detector for real-time video streams
At this point, we can perform age detection in static images, but what about real-time video streams?
Can we do that as well?
You bet we can. Our video script very closely aligns with our image script. The difference is that we need to set up a video stream and perform age detection on each and every frame in a loop. This review will focus on the video features, so be sure to refer to the walkthrough above as needed.
To see how to perform age recognition in video, let’s take a look at detect_age_video.py.
# import the necessary packages
from imutils.video import VideoStream
import numpy as np
import argparse
import imutils
import time
import cv2
import os
We have three new imports: (1) VideoStream, (2) imutils, and (3) time. Each of these imports allow us to set up and use our webcam for our video stream.
I’ve decided to define a convenience function for accepting a frame, localizing faces, and predicting ages. By putting the detect and predict logic here, our frame processing loop will be less bloated (you could also offload this function to a separate file). Let’s dive into this utility now:
def detect_and_predict_age(frame, faceNet, ageNet, minConf=0.5):
	# define the list of age buckets our age detector will predict
	AGE_BUCKETS = ["(0-2)", "(4-6)", "(8-12)", "(15-20)", "(25-32)",
		"(38-43)", "(48-53)", "(60-100)"]

	# initialize our results list
	results = []

	# grab the dimensions of the frame and then construct a blob
	# from it
	(h, w) = frame.shape[:2]
	blob = cv2.dnn.blobFromImage(frame, 1.0, (300, 300),
		(104.0, 177.0, 123.0))

	# pass the blob through the network and obtain the face detections
	faceNet.setInput(blob)
	detections = faceNet.forward()
Our detect_and_predict_age helper function accepts the following parameters:
frame: A single frame from your webcam video streamfaceNet: The initialized deep learning face detectorageNet: Our initialized deep learning age classifierminConf: The confidence threshold to filter weak face detections
These parameters draw parallels from the command line arguments of our single image age detector script.
Again, our AGE_BUCKETS are defined (Lines 12 and 13).
We then initialize an empty list to hold the results of face localization and age detection.
Lines 20-26 handle performing face detection.
Next, we’ll process each of the detections:
	# loop over the detections
	for i in range(0, detections.shape[2]):
		# extract the confidence (i.e., probability) associated with
		# the prediction
		confidence = detections[0, 0, i, 2]

		# filter out weak detections by ensuring the confidence is
		# greater than the minimum confidence
		if confidence > minConf:
			# compute the (x, y)-coordinates of the bounding box for
			# the object
			box = detections[0, 0, i, 3:7] * np.array([w, h, w, h])
			(startX, startY, endX, endY) = box.astype("int")

			# extract the ROI of the face
			face = frame[startY:endY, startX:endX]

			# ensure the face ROI is sufficiently large
			if face.shape[0] < 20 or face.shape[1] < 20:
				continue
You should recognize Lines 29-43 — they loop over detections, ensure high confidence, and extract a face ROI.
Lines 46 and 47 are new — they ensure that a face ROI is sufficiently large in our stream for two reasons:
- First, we want to filter out false-positive face detections in the frame.
- Second, age classification results won’t be accurate for faces that are far away from the camera (i.e., perceivably small).
To finish out our helper utility, we’ll perform age recognition and return our results:
			# construct a blob from *just* the face ROI
			faceBlob = cv2.dnn.blobFromImage(face, 1.0, (227, 227),
				(78.4263377603, 87.7689143744, 114.895847746),
				swapRB=False)

			# make predictions on the age and find the age bucket with
			# the largest corresponding probability
			ageNet.setInput(faceBlob)
			preds = ageNet.forward()
			i = preds[0].argmax()
			age = AGE_BUCKETS[i]
			ageConfidence = preds[0][i]

			# construct a dictionary consisting of both the face
			# bounding box location along with the age prediction,
			# then update our results list
			d = {
				"loc": (startX, startY, endX, endY),
				"age": (age, ageConfidence)
			}
			results.append(d)

	# return our results to the calling function
	return results
Here, we predict the age of the face and extract the age bucket and ageConfidence (Lines 56-60).
Lines 65-68 arrange face localization and predicted age in a dictionary. The last step of the detection processing loop is to add the dictionary to the results list (Line 69).
Once all detections have been processed and any results are ready, we return the results to the caller.
With our helper function defined, now we can get back to working with our video stream. But first, we need to define command line arguments:
# construct the argument parse and parse the arguments
ap = argparse.ArgumentParser()
ap.add_argument("-f", "--face", required=True,
	help="path to face detector model directory")
ap.add_argument("-a", "--age", required=True,
	help="path to age detector model directory")
ap.add_argument("-c", "--confidence", type=float, default=0.5,
	help="minimum probability to filter weak detections")
args = vars(ap.parse_args())
Our script requires three command line arguments:
--face: The path to our pre-trained face detector model directory--age: Our pre-trained age detector model directory--confidence: The minimum probability threshold in order to filter weak detections
From here, we’ll load our models and initialize our video stream:
# load our serialized face detector model from disk
print("[INFO] loading face detector model...")
prototxtPath = os.path.sep.join([args["face"], "deploy.prototxt"])
weightsPath = os.path.sep.join([args["face"],
	"res10_300x300_ssd_iter_140000.caffemodel"])
faceNet = cv2.dnn.readNet(prototxtPath, weightsPath)

# load our serialized age detector model from disk
print("[INFO] loading age detector model...")
prototxtPath = os.path.sep.join([args["age"], "age_deploy.prototxt"])
weightsPath = os.path.sep.join([args["age"], "age_net.caffemodel"])
ageNet = cv2.dnn.readNet(prototxtPath, weightsPath)

# initialize the video stream and allow the camera sensor to warm up
print("[INFO] starting video stream...")
vs = VideoStream(src=0).start()
time.sleep(2.0)
Lines 86-89 load and initialize our face detector, while Lines 93-95 load our age detector.
We then use the VideoStream class to initialize our webcam (Lines 99 and 100).
Once our webcam is warmed up, we’ll begin processing frames:
# loop over the frames from the video stream
while True:
	# grab the frame from the threaded video stream and resize it
	# to have a maximum width of 400 pixels
	frame = vs.read()
	frame = imutils.resize(frame, width=400)

	# detect faces in the frame, and for each face in the frame,
	# predict the age
	results = detect_and_predict_age(frame, faceNet, ageNet,
		minConf=args["confidence"])

	# loop over the results
	for r in results:
		# draw the bounding box of the face along with the associated
		# predicted age
		text = "{}: {:.2f}%".format(r["age"][0], r["age"][1] * 100)
		(startX, startY, endX, endY) = r["loc"]
		y = startY - 10 if startY - 10 > 10 else startY + 10
		cv2.rectangle(frame, (startX, startY), (endX, endY),
			(0, 0, 255), 2)
		cv2.putText(frame, text, (startX, y),
			cv2.FONT_HERSHEY_SIMPLEX, 0.45, (0, 0, 255), 2)

	# show the output frame
	cv2.imshow("Frame", frame)
	key = cv2.waitKey(1) & 0xFF

	# if the `q` key was pressed, break from the loop
	if key == ord("q"):
		break

# do a bit of cleanup
cv2.destroyAllWindows()
vs.stop()
Inside our loop, we:
- Grab the next
frame, and resize it to a known width (Lines 106 and 107) - Send the
framethrough ourdetect_and_predict_ageconvenience function to (1) detect faces and (2) determine ages (Lines 111 and 112) - Annotate the
resultson theframe(Lines 115-124) - Display and capture keypresses (Lines 127 and 128)
- Exit and clean up if the
qkey was pressed (Lines 131-136)
In the next section, we’ll fire up our age detector and see if it works!
Real-time age detection with OpenCV results
Let’s now apply age detection with OpenCV to real-time video stream.
Make sure you’ve used the “Downloads” section of this tutorial to download the source code and pre-trained age detector.
From there, open up a terminal, and issue the following command:
$ python detect_age_video.py --face face_detector --age age_detector
[INFO] loading face detector model...
[INFO] loading age detector model...
[INFO] starting video stream...
Here, you can see that our OpenCV age detector is accurately predicting my age range as 25-32 (I am currently 31 at the time of this writing).
How can I improve age prediction results?
One of the biggest issues with the age prediction model trained by Levi and Hassner is that it’s heavily biased toward the age group 25-32, as shown by the following confusion matrix table from their original publication:
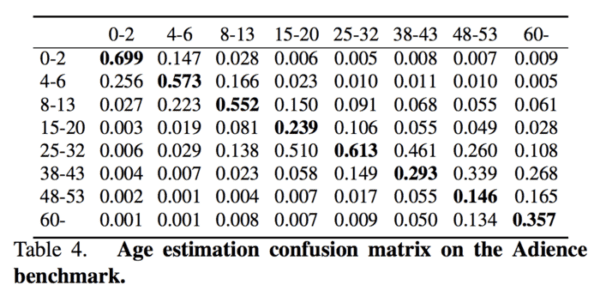
That unfortunately means that our model may predict the 25-32 age group when in fact the actual age belongs to a different age bracket — I noticed this a handful of times when gathering results for this tutorial as well as in my own applications of age prediction.
You can combat this bias by:
- Gathering additional training data for the other age groups to help balance out the dataset
- Applying class weighting to handle class imbalance
- Being more aggressive with data augmentation
- Implementing additional regularization when training the model
Secondly, age prediction results can typically be improved by using face alignment.
Face alignment identifies the geometric structure of faces and then attempts to obtain a canonical alignment of the face based on translation, scale, and rotation.
In many cases (but not always), face alignment can improve face application results, including face recognition, age prediction, etc.
As a matter of simplicity, we did not apply face alignment in this tutorial, but you can follow this tutorial to learn more about face alignment and then apply it to your own age prediction applications.
What about gender prediction?
I have chosen to purposely not cover gender prediction in this tutorial.
While using computer vision and deep learning to identify the gender of a person may seem like an interesting classification problem, it’s actually one wrought with moral implications.
Just because someone visually looks, dresses, or appears a certain way does not imply they identify with that (or any) gender.
Software that attempts to distill gender into binary classification only further chains us to antiquated notions of what gender is. Therefore, I would encourage you to not utilize gender recognition in your own applications if at all possible.
If you must perform gender recognition, make sure you are holding yourself accountable, and ensure you are not building applications that attempt to conform others to gender stereotypes (e.g., customizing user experiences based on perceived gender).
There is little value in gender recognition, and it truly just causes more problems than it solves. Try to avoid it if at all possible.
What's next? We recommend PyImageSearch University.
86+ total classes • 115+ hours hours of on-demand code walkthrough videos • Last updated: January 2026
★★★★★ 4.84 (128 Ratings) • 16,000+ Students Enrolled
I strongly believe that if you had the right teacher you could master computer vision and deep learning.
Do you think learning computer vision and deep learning has to be time-consuming, overwhelming, and complicated? Or has to involve complex mathematics and equations? Or requires a degree in computer science?
That’s not the case.
All you need to master computer vision and deep learning is for someone to explain things to you in simple, intuitive terms. And that’s exactly what I do. My mission is to change education and how complex Artificial Intelligence topics are taught.
If you're serious about learning computer vision, your next stop should be PyImageSearch University, the most comprehensive computer vision, deep learning, and OpenCV course online today. Here you’ll learn how to successfully and confidently apply computer vision to your work, research, and projects. Join me in computer vision mastery.
Inside PyImageSearch University you'll find:
- ✓ 86+ courses on essential computer vision, deep learning, and OpenCV topics
- ✓ 86 Certificates of Completion
- ✓ 115+ hours hours of on-demand video
- ✓ Brand new courses released regularly, ensuring you can keep up with state-of-the-art techniques
- ✓ Pre-configured Jupyter Notebooks in Google Colab
- ✓ Run all code examples in your web browser — works on Windows, macOS, and Linux (no dev environment configuration required!)
- ✓ Access to centralized code repos for all 540+ tutorials on PyImageSearch
- ✓ Easy one-click downloads for code, datasets, pre-trained models, etc.
- ✓ Access on mobile, laptop, desktop, etc.
Summary
In this tutorial, you learned how to perform age detection with OpenCV and Deep Learning.
To do so, we utilized a pre-trained model from Levi and Hassner in their 2015 publication, Age and Gender Classification using Convolutional Neural Networks. This model allowed us to predict eight different age groups with reasonably high accuracy; however, we must recognize that age prediction is a challenging problem.
There are a number of factors that determine how old a person visually appears, including their lifestyle, work/job, smoking habits, and most importantly, genetics. Secondly, keep in mind that people purposely try to hide their age — if a human struggles to accurately predict someone’s age, then surely a machine learning model will struggle as well.
Therefore, you must assess all age prediction results in terms of perceived age rather than actual age. Keep this in mind when implementing age detection into your own computer vision projects.
I hope you enjoyed this tutorial!
To download the source code to this post (including the pre-trained age detector model), just enter your email address in the form below!

Download the Source Code and FREE 17-page Resource Guide
Enter your email address below to get a .zip of the code and a FREE 17-page Resource Guide on Computer Vision, OpenCV, and Deep Learning. Inside you'll find my hand-picked tutorials, books, courses, and libraries to help you master CV and DL!

