PyImageSearch reader José asks:
Hey Adrian, thanks for putting together Deep Learning for Computer Vision with Python. This is by far the best resource I’ve seen for deep learning.
My question is this:
I’m working on a project where I need to classify the scenes of outdoor photographs into four distinct categories: cities, beaches, mountains, and forests.
I’ve found a small dataset (~100 images per class), but my models are quick to overfit and far from accurate.
I’m confident I can solve this project, but I need more data.
What do you suggest?
José has a point — without enough training data, your deep learning and machine learning models can’t learn the underlying, discriminative patterns required to make robust classifications.
Which begs the question:
How in the world do you gather enough images when training deep learning models?
Deep learning algorithms, especially Convolutional Neural Networks, can be data hungry beasts.
And to make matters worse, manually annotating an image dataset can be a time consuming, tedious, and even expensive process.
So is there a way to leverage the power of Google Images to quickly gather training images and thereby cut down on the time it takes to build your dataset?
You bet there is.
In the remainder of today’s blog post I’ll be demonstrating how you can use Google Images to quickly (and easily) gather training data for your deep learning models.
Updated April 20, 2020: The JavaScript in this post has been updated because the previous method was no-longer working. Please refer to the updated code below.
Deep learning and Google Images for training data
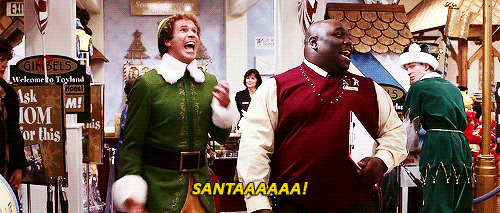
Today’s blog post is part one of a three part series on a building a Not Santa app, inspired by the Not Hotdog app in HBO’s Silicon Valley (Season 4, Episode 4).
As a kid Christmas time was my favorite time of the year — and even as an adult I always find myself happier when December rolls around.
Looking back on my childhood, my dad always went out well of his way to ensure Christmas was a magical time.
Without him I don’t think this time of year would mean as much to me (and I certainly wouldn’t be the person I am today).
In order to keep the magic of ole’ Saint Nicholas alive, we’re going to spend the next three blog posts building our Not Santa detector using deep learning:
- Part #1: Gather Santa Clause training data using Google Images (this post).
- Part #2: Train our Not Santa detector using deep learning, Python, and Keras.
- Part #3: Deploy our trained deep learning model to the Raspberry Pi.
Let’s go ahead and get started!
Using Google Images for training data and machine learning models
The method I’m about to share with you for gathering Google Images for deep learning is from a fellow deep learning practitioner and friend of mine, Michael Sollami.
He discussed the exact same technique I’m about to share with you in a blog post of his earlier this year.
Updated April 20, 2020: Michael’s method no longer works with updates to both web browsers and the HTML/CSS used by Google Images to serve search results. I thank Michael for the original inspiration of this blog post. A “Real Big” thanks goes out to my friends and JavaScript experts at RealBigMarketing. RBM’s team developed the code update for this blog post. Thanks!
I’m going to elaborate on these steps and provide further instructions on how you can use this technique to quickly gather training data for deep learning models using Google Images, JavaScript, and a bit of Python.
The first step in using Google Images to gather training data for our Convolutional Neural Network is to head to Google Images and enter a query.
In this case we’ll be using the query term “santa clause”:
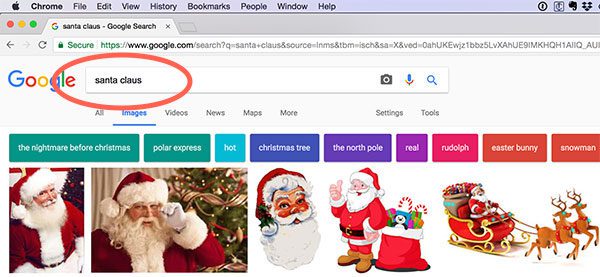
As you can see from the example image above we have our search results.
The next step is to use a tiny bit of JavaScript to gather the image URLs (which we can then download using Python later in this tutorial).
Fire up the JavaScript console (I’ll assume you are using the Chrome web browser, but you can use Firefox as well) by clicking View => Developer => JavaScript Console
:
From there, click the Console
tab:
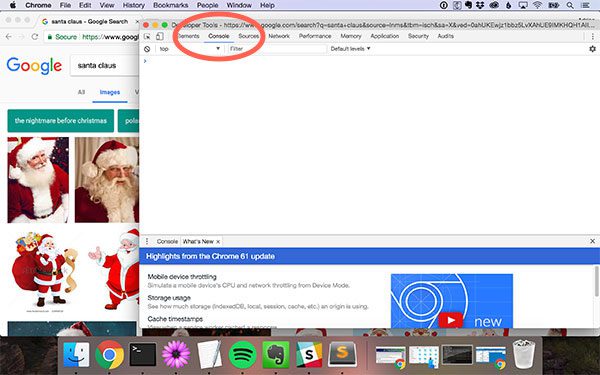
This will enable you to execute JavaScript in a REPL-like manner. The next step is to start scrolling!
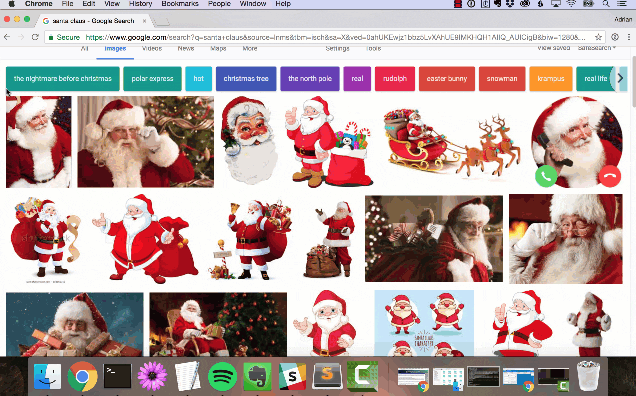
Keep scrolling until you have found all relevant images to your query.
From there, we manually intervene with JavaScript. Switch back to the JavaScript console and copy + paste the following function into the console to simulate a right click on an image:
/** * simulate a right-click event so we can grab the image URL using the * context menu alleviating the need to navigate to another page * * attributed to @jmiserez: http://pyimg.co/9qe7y * * @param {object} element DOM Element * * @return {void} */ function simulateRightClick( element ) { var event1 = new MouseEvent( 'mousedown', { bubbles: true, cancelable: false, view: window, button: 2, buttons: 2, clientX: element.getBoundingClientRect().x, clientY: element.getBoundingClientRect().y } ); element.dispatchEvent( event1 ); var event2 = new MouseEvent( 'mouseup', { bubbles: true, cancelable: false, view: window, button: 2, buttons: 0, clientX: element.getBoundingClientRect().x, clientY: element.getBoundingClientRect().y } ); element.dispatchEvent( event2 ); var event3 = new MouseEvent( 'contextmenu', { bubbles: true, cancelable: false, view: window, button: 2, buttons: 0, clientX: element.getBoundingClientRect().x, clientY: element.getBoundingClientRect().y } ); element.dispatchEvent( event3 ); }
This function effectively simulates right clicking on an image shown in your browser. Notice how the click involves dispatching both a mousedown
and mouseup
event followed by activating the context menu.
Next we’ll define a function to extract the URL:
/** * grabs a URL Parameter from a query string because Google Images * stores the full image URL in a query parameter * * @param {string} queryString The Query String * @param {string} key The key to grab a value for * * @return {string} value */ function getURLParam( queryString, key ) { var vars = queryString.replace( /^\?/, '' ).split( '&' ); for ( let i = 0; i < vars.length; i++ ) { let pair = vars[ i ].split( '=' ); if ( pair[0] == key ) { return pair[1]; } } return false; }
Each image URL is stored in a query string. The snippet above pulls the URL out of the query.
Our next function assembles all the URLs in a convenient text file:
/** * Generate and automatically download a txt file from the URL contents * * @param {string} contents The contents to download * * @return {void} */ function createDownload( contents ) { var hiddenElement = document.createElement( 'a' ); hiddenElement.href = 'data:attachment/text,' + encodeURI( contents ); hiddenElement.target = '_blank'; hiddenElement.download = 'urls.txt'; hiddenElement.click(); }
Each of our URLs will be in the contents
parameter passed to our createDownload
function. Here we first create a hiddenElement
. We then populate it with the contents
, create a destination link with a filename of urls.txt
, and simulate a click of the element.
Ultimately when the createDownload
function runs, your browser will trigger a download. Depending on your browser settings, your download may go to your default download location or you may be prompted to select a name and location for your image URLs file download.
Our last function brings the components together:
/** * grab all URLs va a Promise that resolves once all URLs have been * acquired * * @return {object} Promise object */ function grabUrls() { var urls = []; return new Promise( function( resolve, reject ) { var count = document.querySelectorAll( '.isv-r a:first-of-type' ).length, index = 0; Array.prototype.forEach.call( document.querySelectorAll( '.isv-r a:first-of-type' ), function( element ) { // using the right click menu Google will generate the // full-size URL; won't work in Internet Explorer // (http://pyimg.co/byukr) simulateRightClick( element.querySelector( ':scope img' ) ); // Wait for it to appear on the <a> element var interval = setInterval( function() { if ( element.href.trim() !== '' ) { clearInterval( interval ); // extract the full-size version of the image let googleUrl = element.href.replace( /.*(\?)/, '$1' ), fullImageUrl = decodeURIComponent( getURLParam( googleUrl, 'imgurl' ) ); if ( fullImageUrl !== 'false' ) { urls.push( fullImageUrl ); } // sometimes the URL returns a "false" string and // we still want to count those so our Promise // resolves index++; if ( index == ( count - 1 ) ) { resolve( urls ); } } }, 10 ); } ); } ); }
Our grabUrls
function creates what JavaScript calls a Promise
. Given that this is a Python blog, I’ll draw parallels from JavaScript’s Promise
to Python’s async
/ await
— a similar concept which RealPython discusses and provides template for (for the inquisitive few).
The promise is that all image URLs will be obtained via the right-click context menu simulation.
Our final snippet which you need to paste into the Javascript console is what calls our grabUrls
function:
/** * Call the main function to grab the URLs and initiate the download */ grabUrls().then( function( urls ) { urls = urls.join( '\n' ); createDownload( urls ); } );
Our main entry point to start execution is this call to grabUrls
. Notice how each URL is joined by a newline character so that each URL is on its own line in the text file. As you can see, the createDownload
function is called from here as the final step.
While this method calls our functions we defined in the JavaScript console directly, alternatively, you could use the logic to create a Chrome Browser plugin without too much hassle. This is left as an exercise for you to complete.
After executing the above snippet you’ll have a file named urls.txt
in your default Downloads directory.
If you are having trouble following this guide, please see the video at the very top of this blog post where I provide step-by-step instructions. And as another reminder, the code shown above is an update to this blog post. The YouTube video at the top of this post will not and does not match this updated code, but the manual JavaScript console intervention is the same. Simply paste each snippet into the console until you have your URLs text file.
Downloading Google Images using Python
Now that we have our urls.txt
file, we need to download each of the individual images.
Using Python and the requests library, this is quite easy.
If you don’t already have requests installed on your machine you’ll want to install it now (taking care to use the workon
command first if you are using Python virtual environments):
$ workon cv $ pip install requests
From there, open up a new file, name it download_images.py
, and insert the following code:
# import the necessary packages from imutils import paths import argparse import requests import cv2 import os
Here we are just importing required packages. Notice requests
on Line 4 — this will be the package we use for downloading the image content.
Next, we’ll parse command line arguments and load our urls
from disk into memory:
# construct the argument parse and parse the arguments ap = argparse.ArgumentParser() ap.add_argument("-u", "--urls", required=True, help="path to file containing image URLs") ap.add_argument("-o", "--output", required=True, help="path to output directory of images") args = vars(ap.parse_args()) # grab the list of URLs from the input file, then initialize the # total number of images downloaded thus far rows = open(args["urls"]).read().strip().split("\n") total = 0
Command line argument parsing is handled on Lines 9-14 — we only require two:
--urls
: The path to the file containing image URLs generated by the Javascript trick above.--output
: The path to the output directory where we’ll store our images downloaded from Google Images.
From there, we load each URL from the file into a list on Line 18. We also initialize a counter, total
, to count the files we’ve downloaded.
Next we’ll loop over the URLs and attempt to download each image:
# loop the URLs for url in rows: try: # try to download the image r = requests.get(url, timeout=60) # save the image to disk p = os.path.sep.join([args["output"], "{}.jpg".format( str(total).zfill(8))]) f = open(p, "wb") f.write(r.content) f.close() # update the counter print("[INFO] downloaded: {}".format(p)) total += 1 # handle if any exceptions are thrown during the download process except: print("[INFO] error downloading {}...skipping".format(p))
Using requests
, we just need to specify the url
and a timeout for the download. We attempt to download the image file into a variable, r
, which holds the binary file (along with HTTP headers, etc.) in memory temporarily (Line 25).
Let’s go ahead and save the image to disk.
The first thing we’ll need is a valid path and filename. Lines 28 and 29 generate a path + filename, p
, which will count up incrementally from 00000000.jpg
.
We then create a file pointer, f
, specifying our path, p
, and indicating that we want write mode in binary format ("wb"
) on Line 30.
Subsequently, we write our files contents (r.content
) and then close the file (Lines 31 and 32).
And finally, we update our total count of downloaded images.
If any errors are encountered along the way (and there will be some errors — you should expect them whenever trying to automatically download unconstrained images/pages on the web), the exception is handled and a message is printed to the terminal (Lines 39 and 40).
Now we’ll do a step that shouldn’t be left out!
We’ll loop through all files we’ve just downloaded and try to open them with OpenCV. If the file can’t be opened with OpenCV, we delete it and move on. This is covered in our last code block:
# loop over the image paths we just downloaded for imagePath in paths.list_images(args["output"]): # initialize if the image should be deleted or not delete = False # try to load the image try: image = cv2.imread(imagePath) # if the image is `None` then we could not properly load it # from disk, so delete it if image is None: delete = True # if OpenCV cannot load the image then the image is likely # corrupt so we should delete it except: print("Except") delete = True # check to see if the image should be deleted if delete: print("[INFO] deleting {}".format(imagePath)) os.remove(imagePath)
As we loop over each file, we’ll initialize a delete
flag to False
(Line 45).
Then we’ll try
to load the image file on Line 49.
If the image
is loaded as None
, or if there’s an exception, we’ll set delete = True
(Lines 53 and 54 and Lines 58-60).
Common reasons for an image being unable to load include an error during the download (such as a file not downloading completely), a corrupt image, or an image file format that OpenCV cannot read.
Lastly if the delete
flag was set, we call os.remove
to delete the image on Lines 63-65.
That’s all there is to the Google Images downloader script — it’s pretty self-explanatory.
To download our example images, make sure you use the “Downloads” section of this blog post to download the script and example urls.txt
file.
From there, open up a terminal and execute the following command:
$ python download_images.py --urls urls.txt --output images/santa [INFO] downloaded: images/santa/00000000.jpg [INFO] downloaded: images/santa/00000001.jpg [INFO] downloaded: images/santa/00000002.jpg [INFO] downloaded: images/santa/00000003.jpg ... [INFO] downloaded: images/santa/00000519.jpg [INFO] error downloading images/santa/00000519.jpg...skipping [INFO] downloaded: images/santa/00000520.jpg ... [INFO] deleting images/santa/00000211.jpg [INFO] deleting images/santa/00000199.jpg ...
As you can see, example images from Google Images are being downloaded to my machine as training data.
The error you see in the output is normal — you should expect these. You should also expect some images to be corrupt and unable to open — these images get deleted from our dataset.
Pruning irrelevant images from our dataset
Of course, not every image we downloaded is relevant.
To resolve this, we need to do a bit of manual inspection.
My favorite way to do this is to use the default tools on my macOS machine. I can open up Finder and browse the images in the “Cover Flow” view:
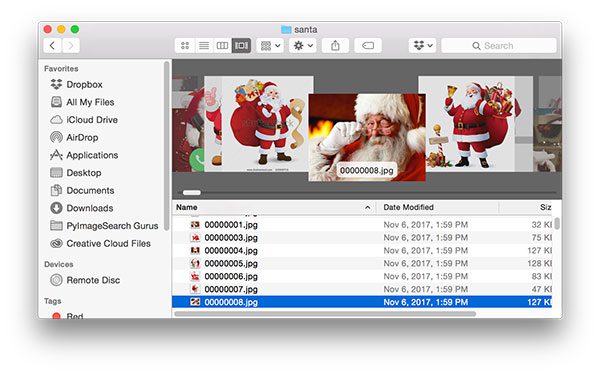
I can then easily scroll through my downloaded images.
Images that are not relevant can easily moved to the Trash using <cmd> + <delete>
— similar shortcuts exist on other operating systems as well. After pruning my downloaded images I have a total of 461 images as training to our Not Santa app.
In next week’s blog post I’ll demonstrate how we can use Python and Keras to train a Convolutional Neural Network to detect if Santa Clause is in an input image.
The complete Google Images + deep learning pipeline
I have put together a step-by-step video that demonstrates me performing the above steps to gather deep learning training data using Google Images.
Be sure to take a look!
Note: Keep in mind that this video was created in 2017 to accompany the original article; however, this blog post has now been updated in April 2020. While the methodology using your browser’s javascript console is the same, the JavaScript slightly different, new, and improved.
Wondering about duplicate images in your dataset?
As you scroll through your new local dataset you’re probably thinking:
So how do I get rid of all these duplicate images? Will they affect my deep learning model at training time?
There will be duplicate images in your dataset using the Google Images method. There’s no way around it.
And if you leave them in for your training exercise, your model may form a bias towards a particular image it sees multiple times.
At this point you need to de-duplicate your dataset.
You could, of course, manually remove the duplicates, but that would take time that most of us don’t have.
Therefore, head on over to my tutorial on how to Detect and remove duplicate images from a dataset for deep learning. There, you will learn what image hashing is and how it will help you to automatically remove duplicates with a simple Python script.
What's next? We recommend PyImageSearch University.
86+ total classes • 115+ hours hours of on-demand code walkthrough videos • Last updated: February 2025
★★★★★ 4.84 (128 Ratings) • 16,000+ Students Enrolled
I strongly believe that if you had the right teacher you could master computer vision and deep learning.
Do you think learning computer vision and deep learning has to be time-consuming, overwhelming, and complicated? Or has to involve complex mathematics and equations? Or requires a degree in computer science?
That’s not the case.
All you need to master computer vision and deep learning is for someone to explain things to you in simple, intuitive terms. And that’s exactly what I do. My mission is to change education and how complex Artificial Intelligence topics are taught.
If you're serious about learning computer vision, your next stop should be PyImageSearch University, the most comprehensive computer vision, deep learning, and OpenCV course online today. Here you’ll learn how to successfully and confidently apply computer vision to your work, research, and projects. Join me in computer vision mastery.
Inside PyImageSearch University you'll find:
- ✓ 86+ courses on essential computer vision, deep learning, and OpenCV topics
- ✓ 86 Certificates of Completion
- ✓ 115+ hours hours of on-demand video
- ✓ Brand new courses released regularly, ensuring you can keep up with state-of-the-art techniques
- ✓ Pre-configured Jupyter Notebooks in Google Colab
- ✓ Run all code examples in your web browser — works on Windows, macOS, and Linux (no dev environment configuration required!)
- ✓ Access to centralized code repos for all 540+ tutorials on PyImageSearch
- ✓ Easy one-click downloads for code, datasets, pre-trained models, etc.
- ✓ Access on mobile, laptop, desktop, etc.
Summary
In today’s blog post you learned how to:
- Use Google Images to search for example images.
- Grab the image URLs via a small amount of JavaScript.
- Download the images using Python and the requests library.
Using this method we downloaded ~550 images.
We then manually inspected the images and removed non-relevant ones, trimming the dataset down to ~460 images.
In next week’s blog post we’ll learn how to train a deep learning model that will be used in our Not Santa app.
To be notified when the next post in this series goes live, be sure to enter your email address in the form below!
Download the Source Code and FREE 17-page Resource Guide
Enter your email address below to get a .zip of the code and a FREE 17-page Resource Guide on Computer Vision, OpenCV, and Deep Learning. Inside you'll find my hand-picked tutorials, books, courses, and libraries to help you master CV and DL!
Thanks Adrian for sharing the awesome trick!
It’s my pleasure to share, Anam! 🙂
Sweet post Adrian! In my projects I use bing’s image search API which is less of a hack (and also less creative ;)). However, it costs you a small amount of money and you need an Azure account.
I’ve actually been playing around with Bing’s image search API. It’s really good and I hope to do a dedicated blog post on it soon.
Selenium is also good for tricks like that. I have found a very good google scrapper, modified it and now it’s power full!
And one more thing. You don’t have to make ulr list files and also using “js” is not neded! Selenium can automatically find tags than urls on google image searcher and download big list of photos. It can also clisk “Show more photos” and scroll more to have MORE! And MORE in CNNs is always better :).
Selenium is fantastic for stuff like this, I totally agree. Using the tags is a great way to expand the search as well. If other readers want to try this I would suggest that you manually look at the tags (to ensure the images are relevant) before doing this. Otherwise you’ll end up downloading non-relevant images. You can of course prune them out later but one of the goals here is to reduce the human intervention.
I assume that human intervention is always “must to happen” after downloading images from google. The case here is to make as little and as fast as possible.
I like to make it quick and automatic. And It’s very good to make it the way you once told me in our conversation. Use https://pyimagesearch.com/2017/09/11/object-detection-with-deep-learning-and-opencv/ for problem which is only classnames list :(. This script can return objects coordinates. Add little modification and you can crop your previously downloaded google images and store it.
I checked “dogs” use case. I downloaded dogs per specious. Than localize them (on 98% of images dogs coordinates were found correctly), crop them and save. When human’s review is needed, just look at cropped thumbnails to be 100% sure that one dogs’ specious is good. And that is done. You reduced human intervention to minimum.
The biggest drawback of this approach is that it is reduced only to classnames on caffemodel.
Any way. Good job. I hope you don’t mind this little add on to your article.
I’m always happy when readers contribute to the conversation 🙂
Thanks code is working now with selenium, these was some import issues
Actually the Chrome Fatkun batch download image app is also great for downloading large numbers of images after a Google image search. First search in Google for your images and scroll down for as long as you need. You can click off the irrelevant images and preselect image size preferences (e.g. minimal size) and rename the images before download. Works generally rather well and fast.
Very cool, thanks for sharing Harald!
Essentially, this gathering technique is called ‘scrapeing’.
As mentioned in a comment, Selenium can do it in a convenient manner. If you want to script from the command line with JavaScript, I can recommend you Nightwatch. Nightwatchjs.org
Indeed, this is called scraping. I actually used Scrapy Python library, but it can be a real pain to automate the loading of all images (i.e., “scroll to see more”) via strict Python. As you noted, Selenium is great for those.
Scrapy was indeed a pain when I last tried it few months back. Adrian! If you ever get time, could you please upload a blog/video/both to do the same with Selenium. And, can’t thank you enough for this blog 🙂
Thanks Adrian (and Michael) – I’ve wanted exactly this script for a while !
One concern I had was about infringing copyright by using the images. Poking around, the consensus seems to be that downloading the images for the purpose of training a network is covered under ‘fair use’. The images cannot be reconstructed from the trained network. If I were to redistribute the images then it would be a different story.
Now, if I were producing a commercial product then talking to an attorney would be prudent…
Your understanding is correct. As long as you are not republishing the images and they cannot be reconstructed from the network (which is actually something that researchers are diving into now) then as it stands, you are okay. HOWEVER, when I say “you are okay” I’m saying as in the current interpretation of the law. I am not an attorney and you should seek proper legal counsel (I legally have to say that).
I know this may not be the most ethical thing to say, but I’ll just play devils advocate here. Let’s say the use of the images for training was not covered under ‘fair use’ and was prohibited.
Would there be any way at all to prove that you used any particular image for training? What if any signature would be left by any individual image in the model? I could be wrong but I think that it would be next to impossible to prove.
It really depends on the machine learning model. With CNNs there is a concern that we can actually reconstruct training images from specific sets of nodes in the network. It’s an area of research and we’ll see if it yields anything, but yes it could be concern 5-10 years from now.
I use Fatkun batch download as a Google Chrome extension and it works rather well. I think the only issue with both methods is removing irrelevant images. You should create a blog post on how to faster remove them.
Sometimes one out of four images is irrelevant and it becomes quite laborious to manually delete them all.
I think this extension solves the problem easily !!
https://chrome.google.com/webstore/detail/fatkun-batch-download-ima/nnjjahlikiabnchcpehcpkdeckfgnohf?hl=en
Dear Dr Adrian,
Are there APIs which allow one to examine photos in: “Facebook”, “Twitter”, “SnapChat”, “ebay” and “amazon” as you demonstrated with Google?
Thank you,
Anthony, Sydney Australia
You would need to look at the APIs provided by the companies you listed. Facebook, Twitter, eBay, etc. have their own APIs.
That’s a nifty trick Adrian. Thanks for sharing!! I will try this out in my next project.
Btw I wonder if the precision and recall of the detector trained over this data be bounded by Google’s vision algorithms.
i’m getting like
[INFO] error downloading {given path.jpg}…skipping
Are you getting that warning for every single image?
I am also getting this error for all images:
INFO error downloading {path} ….skipping
Hi,
Same problem — getting that warning for every single images.
Hi Adrian,
I get the same error:
[INFO] error downloading {given path.jpg}…skipping
Silly mistakes by me :’‑)
Not create the FOLDER of images
Hurm…
Thanks Adrian!
This trick would help me a lot in my current experiment in transfer learning.
It certainly would help with transfer learning, you’re absolutely correct. Best of luck with the project!
where is the imutils.py file?
You need to install it via pip:
$ pip install imutils
The above command will install the imutils package for you.
Hello Adrian,
Just wanted to suggest the icrawler Python library which has built-in classes to crawl Google, Bing, and Baidu images as well as aiding in creating custom crawlers.
https://github.com/hellock/icrawler
I’ve been using it lately to collect images for training.
Thanks
Thank you for the suggestion, Brian!
Thank You for this wonderful suggestion, Brian!
Anyone else who wants to try it can install it using pip install icrawler or conda install -c hellock icrawler.
And for extended usage, tutorials are available at http://icrawler.readthedocs.io/en/latest/usage.html#write-your-own
This is actually a brilliant extension, after having tried number of scripts, a chrome extension and failed I came to find this one. Within minutes of copying the script from their example I was able to download images of higher resolution that I wanted.
Everyone must try this
Hello Adrian,
Thanks for this post that clarifies some of the things I was searching too. In your example, you look for Santa Claus which is a “whole” element.
I am wondering if you have any experience or opinion on the ratio of pictures we should take where the concept is part of the picture or isolated on the picture. Let me try to explain: let us suppose you want to recognize the concept of dress, have you ever experienced some differences on the training whether the dress is on a uniform background or on a person? Should we take for instance 70% of pictures where the concept is alone and 30% of pictures in context? Thanks for your opinion
Regards,
mph
I’m not fully sure I understand your question, but if I think you want to create an object detector that can detect a dress on a person along with a dress on a uniform background, such as in a product shot? I would suggest you gather as much training data as possible for each scenario.
That’s it. Said differently, I want to recognise the concept of dress. My opinion is if I only have dress on uniform background I could have trouble to recognise them when the dress is on a person. Isn’t it? I was wondering if there are so tips on deciding about the ratio between pictures for a concept on a uniform background and pictures for a concept in situation.
Thanks fior your answer
mph
Potentially yes, if you train your system on standard product-shot images your system may fail to fail to generalize to real-world images where there is a person walking on the street wearing a dress. You should include both sets of images in your training set. As for the aspect ratio, that really depends on what type of object detection framework you are using.
*I had autocorrect errors in my previous reply, please ignore that.*
Hi, Dr Adrian*. 3 years down the line and I am still grateful for this article. I am also curious about Marc-Philipe’s question about the aspect ratio to ensure effective and efficient coverage in the data.
In your reply here, when you mean “object detection framework”, do you mean those like Keras, TF? Please clarify me on this. Thank you.
How do you get the not santa pics? What query do you use? Apologies if I’d missed something key in the post.
Please see the ‘Our “Santa” and “Not Santa” dataset’ section of the blog post. In particular this paragraph:
“I then randomly sampled 461 images that do not contain Santa (Figure 1, right) from the UKBench dataset, a collection of ~10,000 images used for building and evaluating Content-based Image Retrieval (CBIR) systems (i.e., image search engines).”
There is a link to the UK data Set. It’s from it’s derived.
Hi Dr Adrian,
When i run “python3.5 download_images.py –urls urls.txt –output images/santa”, I am getting error as “import cv2
ImportError: No module named ‘cv2’ ”
But if I go to “/usr/local/lib/python3.5/dist-packages”, I could see “cv2.so”. OpenCV version I intalled is 3.1.0.
Can you please guide me.
I would suggest opening up a Python shell and typing “import cv2” to confirm that you have OpenCV properly installed. How did you install OpenCV on your system? Did you use one of the PyImageSearch tutorials?
Sir, How to do the same in windows?
Hi Hari — this code will work in Windows. Are you getting a particular error?
Hey,why not try Fatkun Batch Downloader (Google chrome extension) to download images from google search.
This is great, thank you for sharing!! Do you have any strategies/scripts for making these the same size/resolution (the next step in image pre-processing for Deep Learning)?
Hey Ryan, thanks for the comment. I cover all of my preprocessors (including implementations), efficiently storing the images for faster training, and my best practices inside Deep Learning for Computer Vision with Python. I would suggest starting there if you want to learn more about my strategies for preprocessing. I hope that helps!
Hi Adrian, when i put this line ‘var urls = $(‘.rg_di .rg_meta’).map(function() { return JSON.parse($(this).text()).ou; });’ to the chorme console i get this error ‘Uncaught TypeError: $(…).map is not a function’. what’s wrong?
Hi Adrian, great stuff, I am looking forward to learning more. One peculiarity though: I wrote everything out as you have done, and none of the images load just a long list of error downloading images…) So I downloaded your code, and when I run it, everything works. My code is word for word the same (I even copied it from your file to mine) but the downloaded file works, mine doesn’t…
Any ideas as to why?
Thanks.
Hi Jim — unfortunately I’m not sure what the error would be. The
try
comment in my code would catch all errors, including any syntax errors you may have in your code. Delete thetry/except
and run the code again. I’m willing to bet there is some error in your code or in your development environment.Adrian:
Turns out I was using Atom, which doesn’t seem to work very well with the code. I used notepad instead run through powershell and that’s much better. I’m working on another problem as well; if I don’t get it fixed I might be back asking another question. (I’ll also try deleting the try except for the other problem….)
Thanks.
hello sir, I must say that you blogs are best.Sir there is a extension named FATKUN which can download all the images on the page.
Hi Adrian, Great article. I found that the hard-coded “.jpg” in the code caused issues since other image formats like PNG still got written as 0000001.jpg and there were gaps in the numbering where files were not images. I’ve modified your code to address this and used generators to make it a bit more modular. You can find my version here: https://gist.github.com/davesnowdon/2016d4e9f069ff1788ede4f2902bd198
Thanks for sharing, Dave!
Thank you both for great code! I wish I saw also this comment before I went and used a much more QAD approach to change the Adrian’s code:)
# try to download the image
r = requests.get(url, timeout=60)
# save the image to disk
if r._content[0] == 0x89:
p = os.path.sep.join([args[“output”], “{}.png”.format(str(total).zfill(8))])
else:
p = os.path.sep.join([args[“output”], “{}.jpg”.format(str(total).zfill(8))])
f = open(p, “wb”)
Hello Adrian,
Nice series of articles thank you 🙂 Getting data automatically can really save a lot of time…
Your article inspired me to initiate a small python library, I made the search on Google and scrolling part with selenium driver.
https://github.com/tomahim/py-image-dataset-generator
In the future enhancements I plan to make Data augmentation possible like you suggest in your second article. And maybe take image from multiple sources, not only Google to have fallback options.
Keep the good work
Awesome, thanks so much for sharing!
Adrian
I believe I am doing something wrong I replaced the –urls and the –output with my filepaths. But I keep getting errors. Am I inserting the file paths correctly?
ap = argparse.ArgumentParser()
ap.add_argument(“-u”, “–C:\Users\bobc\Downloads\urls.txt”, required=True,
help=”path to file containing image URLs”)
ap.add_argument(“-o”, “–D:\people_detection_images”, required=True,
help=”path to output directory of images”)
args = vars(ap.parse_args())
You do not need to update the code at all. The command line arguments are supplied when you execute the script. See the example usage of the command:
python download_images.py --urls urls.txt --output images/santa
Notice how I am not editing the code. I’m just executing the script via the command line and supplying the command line values at runtime. If you are new to command line arguments, that’s okay, but you should read up on them to help give you a better understanding.
I hope that helps!
What are the best practices for creating an object detection dataset for example only detecting (no ocr plain detection) if image contains business cards or not?
Hey Tejas — I provide best practices for deep learning and object detection, including how to structure your dataset, inside my book, Deep Learning for Computer Vision with Python. I would suggest starting there.
Can I use this technique to get pictures of faces of people?
I want to develop a neural network that identifies human faces, I thought to get images from Google Images, but a doubt arose. Do I need permission to use them or can I get pictures of human faces taken from google at will to train a neural network?
You can use this method to get faces; however, that’s only step 1. You still need to apply a face detector or manually annotate the bounding box surrounding the face before you can train a recognizer.
As far as permission/legality goes, you would need to consult a lawyer. I’m not an attorney/lawyer and under no circumstance can I give legal advice.
Hi,
I am creating a large data set for machine learning in an automated way. I put a sample data here: http://www.amnis.ai/machine-learning-image-database/
You can download this data and try it out. A feedback would be important for me – what can I do better?
Based on the sample I see 10 sample images of screws? What other types of objects are there? And how many? My feedback would be to provide more information on:
1. The number of different objects (including a list of classes)
2. The number of total images in the dataset
Hi, thank you for your comment. Every image is a link to 30 – 40 similar pictures (a link to an archive file), I should show it in a better way… I started with 10 datasets of different “Phillips” screws but I am going to put many more types of screws and bolts. And then other objects.
Hi,
I’m having trouble getting the ‘urls.txt’ file. The ‘hiddenElement.click()’ doesn’t seem to be doing anything. I’m using Firefox Quantum (59.0.2), on Ubuntu 17.10. Is there any workaround to retrieve the URLs?
Thanks for these useful resources!
Regards,
Claudio Y.
If you’re having trouble with the Google Images method you may want to try my method for the Bing Image Search API.
google recently updated their, web elements so te script might be failing, consider using this script for a different search engine https://gist.github.com/imneonizer/23d2faa12833716e22830f807b082a58
We just developed some internal code that seems to be working — we’ll be releasing it soon 🙂
How to install cv2 in windows?
PyImageSearch is primarily a Linux (mostly Ubuntu/Debian based), macOS and Raspberry Pi blog. In general I do not support Windows. If you would like to install OpenCV on Windows make sure you consult OpenCV’s official website.
anaconda is the best way when it comes to doing these projects on windows.
thanks Adrian for this tutorial and sharing knowledge
but i get error when i try to download cars images
[INFO] error downloading /images/cars\00000000.jpg…skipping
[INFO] error downloading /images/cars\00000000.jpg…skipping
thanks for help
My guess here is that you are on a Windows system and you are confusing your path separators. Unix uses “/” and Windows uses “\”. You’ll want to keep your path separators consistent.
Thanks Adrian for this tutorial but i get error when i try to download eyes images
[INFO] error downloading images/ojo/00000000.jpg…skipping
[INFO] error downloading images/ojo/00000000.jpg…skipping
[INFO] error downloading images/ojo/00000000.jpg…skipping
[INFO] error downloading images/ojo/00000000.jpg…skipping
[INFO] error downloading images/ojo/00000000.jpg…skipping
I’m using Ubuntu 16.04
Double check your output directories. Either “images” or “images/ojo” does not exist. Double-check that they do.
Yes, I had the same trouble with you, but just make sure that the image file path “images/ojo” is pre-exist !
hello,Adrian Rosebrock , first of all I want to thank you for sharing your project with us.
I have a problem :
ImportError: can not import name to_categorical
knowing that I installed keras. Help me please
Which blog post are you following? This post does not utilize Keras.
Hi Adrian, why don’t you use icrawler ?
Thanks !
I don’t have any experience with icrawler but I’ll certainly check it out.
Hello Adrian Rosebrock,
as I enter the lines into the console to download the image urls it seems like the urls are gathered, however, after entering the last line ‘hiddenElement.click()’ nothing happens, it just says undefined and nothing is downloaded, do you have any suggestions?
Hey Ramces — it sounds like your URLs were not properly parsed. Try again, this time taking care to ensure you open your JavaScript console on the Google Images page.
Hey Adrian,
I downloaded a bunch of images of starbucks logos. But the data consists of some images that have been modified somehow (i.e. people doing their own version based on the original logo, an image of the evolution of starbucks logos over time, and more). And there are a bunch. How would this affect the next parts of this series (I’ll probably experience this before you get back since, I’m doing those parts now lol! But, thought I’d ask your point of view)? Are there any ways to make sure my images are more consistent or account for these mods done to the logo?
Cheers,
Hey Vik — typically we use object detection instead of image classification to detect and localize logos. This is typically because many logos are only part of the context of the overall image. If you’re just trying to get the ropes of image classification I wouldn’t start with logo detection and recognition, it’s simply too challenging. If you want to proceed though, you’ll need to annotate your images to have the bounding box coordinates of the logos for object detection. For what it’s worth, I cover deep learning-based object detection in detail inside my book, Deep Learning for Computer Vision with Python.
Is this one of the best solutions??? No !!! It’s the best!! Thank you very much, it’s awesome!
Thanks Hu Xixi, I’m so happy that you enjoyed it! 🙂
Adrian,
Congrat! Jeremy Howard mentioned this post in his new deep learning Fast.ai course tonight.
Oh really? That’s awesome! Thanks for letting me know 🙂
Excelent tutorial, very thankful for leaving it open to everyone, congratulations Adrian.
Thanks Zeldric, I really appreciate that 🙂
Hi Adrian which python version are you using to run this code? 2.7 or 3.6? I want to transfer the neural net to my raspberry pi which has python version 2.7 installed. Can classifier/model created using python 3 be used for python 2.7?
I used Python 3 for this tutorial but you could use Python 2.7 as well.
Can we use this method in ubuntu 18.04?
Yes, this method will work for Ubuntu 18.04.
IS it doable for non google sites ?
Yes, but you would need to modify the JavaScript used to parse the HTML and grab the image URLs.
Hai Adrian. This is awesome. I have a doubt, is there is any problem with a dataset having images with considerable difference in resolution(height and width) if I am using CNN? I believes Google images gives images with different height and width.
Hi Adrian,
Thanks for putting together this wonderful tutorial. This was definitely of good help.
Regards,
Aashish Chaubey
Thanks Aashish, I’m glad you found it helpful 🙂
Hi Adrian,
I was trying to do the same thing but I the CSS selector is returning length: 0 and at last blank url.txt is getting downloaded. Can you help me with this.
Thanks
Unfortunately the js jquery URL grabber doesn’t seem to work anymore, it violates the directives. Putting a nonce in the script makes it executable in the console, but it returns and empty URLs.txt file.