In last week’s blog post, I demonstrated how to perform facial landmark detection in real-time in video streams.
Today, we are going to build upon this knowledge and develop a computer vision application that is capable of detecting and counting blinks in video streams using facial landmarks and OpenCV.
To build our blink detector, we’ll be computing a metric called the eye aspect ratio (EAR), introduced by Soukupová and Čech in their 2016 paper, Real-Time Eye Blink Detection Using Facial Landmarks.
Unlike traditional image processing methods for computing blinks which typically involve some combination of:
- Eye localization.
- Thresholding to find the whites of the eyes.
- Determining if the “white” region of the eyes disappears for a period of time (indicating a blink).
The eye aspect ratio is instead a much more elegant solution that involves a very simple calculation based on the ratio of distances between facial landmarks of the eyes.
This method for eye blink detection is fast, efficient, and easy to implement.
To learn more about building a computer vision system to detect blinks in video streams using OpenCV, Python, and dlib, just keep reading.
Looking for the source code to this post?
Jump Right To The Downloads SectionEye blink detection with OpenCV, Python, and dlib
Our blink detection blog post is divided into four parts.
In the first part we’ll discuss the eye aspect ratio and how it can be used to determine if a person is blinking or not in a given video frame.
From there, we’ll write Python, OpenCV, and dlib code to (1) perform facial landmark detection and (2) detect blinks in video streams.
Based on this implementation we’ll apply our method to detecting blinks in example webcam streams along with video files.
Finally, I’ll wrap up today’s blog post by discussing methods to improve our blink detector.
Understanding the “eye aspect ratio” (EAR)
As we learned from our previous tutorial, we can apply facial landmark detection to localize important regions of the face, including eyes, eyebrows, nose, ears, and mouth:
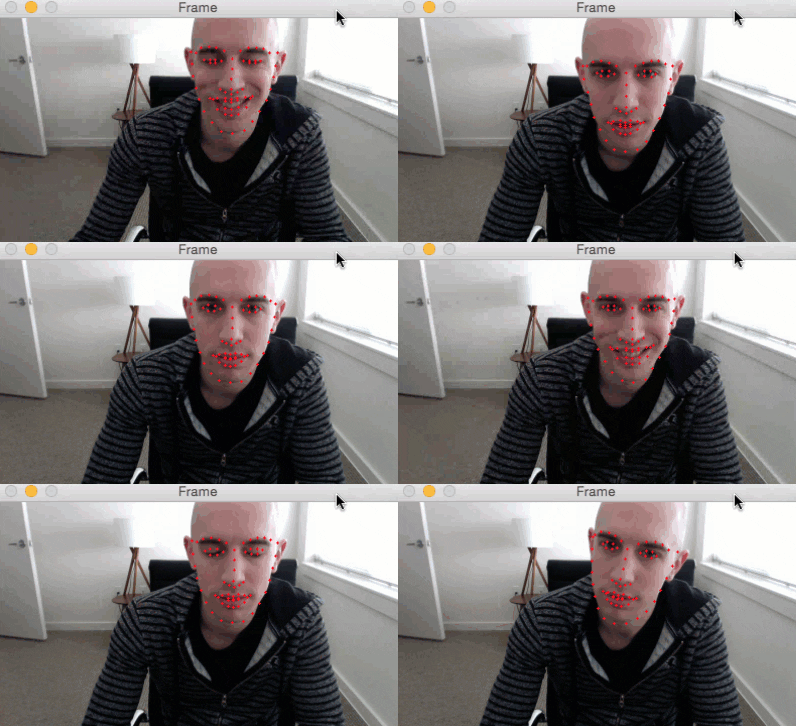
This also implies that we can extract specific facial structures by knowing the indexes of the particular face parts:
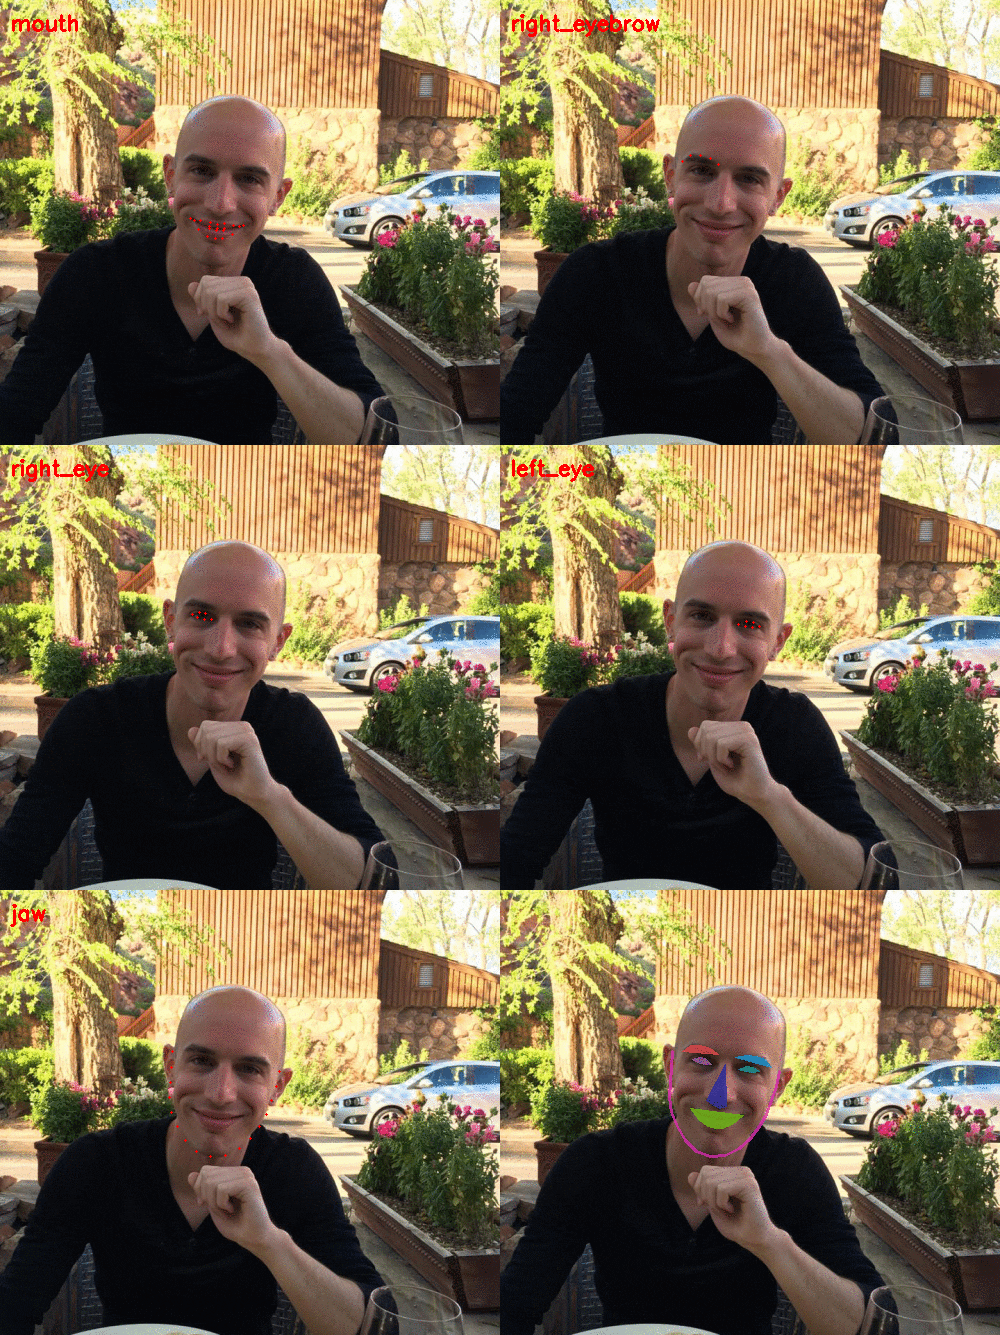
In terms of blink detection, we are only interested in two sets of facial structures — the eyes.
Each eye is represented by 6 (x, y)-coordinates, starting at the left-corner of the eye (as if you were looking at the person), and then working clockwise around the remainder of the region:
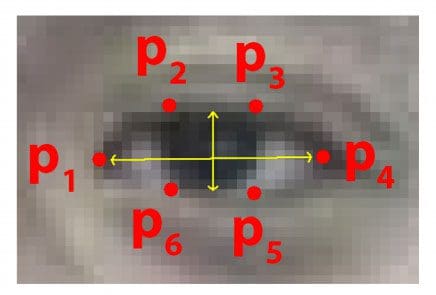
Based on this image, we should take away on key point:
There is a relation between the width and the height of these coordinates.
Based on the work by Soukupová and Čech in their 2016 paper, Real-Time Eye Blink Detection using Facial Landmarks, we can then derive an equation that reflects this relation called the eye aspect ratio (EAR):
Where p1, …, p6 are 2D facial landmark locations.
The numerator of this equation computes the distance between the vertical eye landmarks while the denominator computes the distance between horizontal eye landmarks, weighting the denominator appropriately since there is only one set of horizontal points but two sets of vertical points.
Why is this equation so interesting?
Well, as we’ll find out, the eye aspect ratio is approximately constant while the eye is open, but will rapidly fall to zero when a blink is taking place.
Using this simple equation, we can avoid image processing techniques and simply rely on the ratio of eye landmark distances to determine if a person is blinking.
To make this more clear, consider the following figure from Soukupová and Čech:
On the top-left we have an eye that is fully open — the eye aspect ratio here would be large(r) and relatively constant over time.
However, once the person blinks (top-right) the eye aspect ratio decreases dramatically, approaching zero.
The bottom figure plots a graph of the eye aspect ratio over time for a video clip. As we can see, the eye aspect ratio is constant, then rapidly drops close to zero, then increases again, indicating a single blink has taken place.
In our next section, we’ll learn how to implement the eye aspect ratio for blink detection using facial landmarks, OpenCV, Python, and dlib.
Detecting blinks with facial landmarks and OpenCV
To get started, open up a new file and name it detect_blinks.py
. From there, insert the following code:
# import the necessary packages from scipy.spatial import distance as dist from imutils.video import FileVideoStream from imutils.video import VideoStream from imutils import face_utils import numpy as np import argparse import imutils import time import dlib import cv2
To access either our video file on disk (FileVideoStream
) or built-in webcam/USB camera/Raspberry Pi camera module (VideoStream
), we’ll need to use my imutils library, a set of convenience functions to make working with OpenCV easier.
If you do not have imutils
installed on your system (or if you’re using an older version), make sure you install/upgrade using the following command:
$ pip install --upgrade imutils
Note: If you are using Python virtual environments (as all of my OpenCV install tutorials do), make sure you use the workon
command to access your virtual environment first and then install/upgrade imutils
.
Otherwise, most of our imports are fairly standard — the exception is dlib, which contains our implementation of facial landmark detection.
If you haven’t installed dlib on your system, please follow my dlib install tutorial to configure your machine.
Next, we’ll define our eye_aspect_ratio
function:
def eye_aspect_ratio(eye): # compute the euclidean distances between the two sets of # vertical eye landmarks (x, y)-coordinates A = dist.euclidean(eye[1], eye[5]) B = dist.euclidean(eye[2], eye[4]) # compute the euclidean distance between the horizontal # eye landmark (x, y)-coordinates C = dist.euclidean(eye[0], eye[3]) # compute the eye aspect ratio ear = (A + B) / (2.0 * C) # return the eye aspect ratio return ear
This function accepts a single required parameter, the (x, y)-coordinates of the facial landmarks for a given eye
.
Lines 16 and 17 compute the distance between the two sets of vertical eye landmarks while Line 21 computes the distance between horizontal eye landmarks.
Finally, Line 24 combines both the numerator and denominator to arrive at the final eye aspect ratio, as described in Figure 4 above.
Line 27 then returns the eye aspect ratio to the calling function.
Let’s go ahead and parse our command line arguments:
# construct the argument parse and parse the arguments ap = argparse.ArgumentParser() ap.add_argument("-p", "--shape-predictor", required=True, help="path to facial landmark predictor") ap.add_argument("-v", "--video", type=str, default="", help="path to input video file") args = vars(ap.parse_args())
Our detect_blinks.py
script requires a single command line argument, followed by a second optional one:
--shape-predictor
: This is the path to dlib’s pre-trained facial landmark detector. You can download the detector along with the source code + example videos to this tutorial using the “Downloads” section of the bottom of this blog post.--video
: This optional switch controls the path to an input video file residing on disk. If you instead want to work with a live video stream, simply omit this switch when executing the script.
We now need to set two important constants that you may need to tune for your own implementation, along with initialize two other important variables, so be sure to pay attention to this explantation:
# define two constants, one for the eye aspect ratio to indicate # blink and then a second constant for the number of consecutive # frames the eye must be below the threshold EYE_AR_THRESH = 0.3 EYE_AR_CONSEC_FRAMES = 3 # initialize the frame counters and the total number of blinks COUNTER = 0 TOTAL = 0
When determining if a blink is taking place in a video stream, we need to calculate the eye aspect ratio.
If the eye aspect ratio falls below a certain threshold and then rises above the threshold, then we’ll register a “blink” — the EYE_AR_THRESH
is this threshold value. We default it to a value of 0.3
as this is what has worked best for my applications, but you may need to tune it for your own application.
We then have an important constant, EYE_AR_CONSEC_FRAME
— this value is set to 3
to indicate that three successive frames with an eye aspect ratio less than EYE_AR_THRESH
must happen in order for a blink to be registered.
Again, depending on the frame processing throughput rate of your pipeline, you may need to raise or lower this number for your own implementation.
Lines 44 and 45 initialize two counters. COUNTER
is the total number of successive frames that have an eye aspect ratio less than EYE_AR_THRESH
while TOTAL
is the total number of blinks that have taken place while the script has been running.
Now that our imports, command line arguments, and constants have been taken care of, we can initialize dlib’s face detector and facial landmark detector:
# initialize dlib's face detector (HOG-based) and then create # the facial landmark predictor print("[INFO] loading facial landmark predictor...") detector = dlib.get_frontal_face_detector() predictor = dlib.shape_predictor(args["shape_predictor"])
The dlib library uses a pre-trained face detector which is based on a modification to the Histogram of Oriented Gradients + Linear SVM method for object detection.
We then initialize the actual facial landmark predictor on Line 51.
You can learn more about dlib’s facial landmark detector (i.e., how it works, what dataset it was trained on, etc., in this blog post).
The facial landmarks produced by dlib follow an indexable list, as I describe in this tutorial:
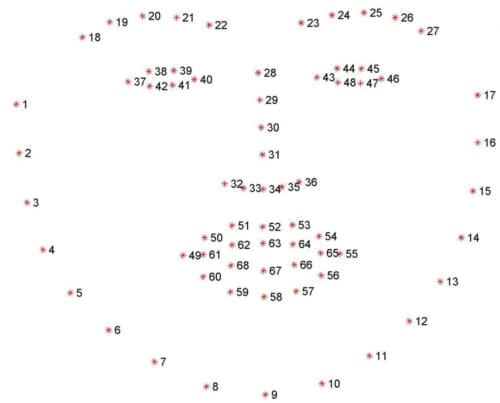
We can therefore determine the starting and ending array slice index values for extracting (x, y)-coordinates for both the left and right eye below:
# grab the indexes of the facial landmarks for the left and # right eye, respectively (lStart, lEnd) = face_utils.FACIAL_LANDMARKS_IDXS["left_eye"] (rStart, rEnd) = face_utils.FACIAL_LANDMARKS_IDXS["right_eye"]
Using these indexes we’ll be able to extract eye regions effortlessly.
Next, we need to decide if we are working with a file-based video stream or a live USB/webcam/Raspberry Pi camera video stream:
# start the video stream thread print("[INFO] starting video stream thread...") vs = FileVideoStream(args["video"]).start() fileStream = True # vs = VideoStream(src=0).start() # vs = VideoStream(usePiCamera=True).start() # fileStream = False time.sleep(1.0)
If you’re using a file video stream, then leave the code as is.
Otherwise, if you want to use a built-in webcam or USB camera, uncomment Line 62.
For a Raspberry Pi camera module, uncomment Line 63.
If you have uncommented either Line 62 or Line 63, then uncomment Line 64 as well to indicate that you are not reading a video file from disk.
Finally, we have reached the main loop of our script:
# loop over frames from the video stream while True: # if this is a file video stream, then we need to check if # there any more frames left in the buffer to process if fileStream and not vs.more(): break # grab the frame from the threaded video file stream, resize # it, and convert it to grayscale # channels) frame = vs.read() frame = imutils.resize(frame, width=450) gray = cv2.cvtColor(frame, cv2.COLOR_BGR2GRAY) # detect faces in the grayscale frame rects = detector(gray, 0)
On Line 68 we start looping over frames from our video stream.
If we are accessing a video file stream and there are no more frames left in the video, we break from the loop (Lines 71 and 72).
Line 77 reads the next frame from our video stream, followed by resizing it and converting it to grayscale (Lines 78 and 79).
We then detect faces in the grayscale frame on Line 82 via dlib’s built-in face detector.
We now need to loop over each of the faces in the frame and then apply facial landmark detection to each of them:
# loop over the face detections for rect in rects: # determine the facial landmarks for the face region, then # convert the facial landmark (x, y)-coordinates to a NumPy # array shape = predictor(gray, rect) shape = face_utils.shape_to_np(shape) # extract the left and right eye coordinates, then use the # coordinates to compute the eye aspect ratio for both eyes leftEye = shape[lStart:lEnd] rightEye = shape[rStart:rEnd] leftEAR = eye_aspect_ratio(leftEye) rightEAR = eye_aspect_ratio(rightEye) # average the eye aspect ratio together for both eyes ear = (leftEAR + rightEAR) / 2.0
Line 89 determines the facial landmarks for the face region, while Line 90 converts these (x, y)-coordinates to a NumPy array.
Using our array slicing techniques from earlier in this script, we can extract the (x, y)-coordinates for both the left and right eye, respectively (Lines 94 and 95).
From there, we compute the eye aspect ratio for each eye on Lines 96 and 97.
Following the suggestion of Soukupová and Čech, we average the two eye aspect ratios together to obtain a better blink estimate (making the assumption that a person blinks both eyes at the same time, of course).
Our next code block simply handles visualizing the facial landmarks for the eye regions themselves:
# compute the convex hull for the left and right eye, then # visualize each of the eyes leftEyeHull = cv2.convexHull(leftEye) rightEyeHull = cv2.convexHull(rightEye) cv2.drawContours(frame, [leftEyeHull], -1, (0, 255, 0), 1) cv2.drawContours(frame, [rightEyeHull], -1, (0, 255, 0), 1)
You can read more about extracting and visualizing individual facial landmark regions in this post.
At this point we have computed our (averaged) eye aspect ratio, but we haven’t actually determined if a blink has taken place — this is taken care of in the next section:
# check to see if the eye aspect ratio is below the blink # threshold, and if so, increment the blink frame counter if ear < EYE_AR_THRESH: COUNTER += 1 # otherwise, the eye aspect ratio is not below the blink # threshold else: # if the eyes were closed for a sufficient number of # then increment the total number of blinks if COUNTER >= EYE_AR_CONSEC_FRAMES: TOTAL += 1 # reset the eye frame counter COUNTER = 0
Line 111 makes a check to see if the eye aspect ratio is below our blink threshold — if it is, we increment the number of consecutive frames that indicate a blink is taking place (Line 112).
Otherwise, Line 116 handles the case where the eye aspect ratio is not below the blink threshold.
In this case, we make another check on Line 119 to see if a sufficient number of consecutive frames contained an eye blink ratio below our pre-defined threshold.
If the check passes, we increment the TOTAL
number of blinks (Line 120).
We then reset the number of consecutive blinks COUNTER
(Line 123).
Our final code block simply handles drawing the number of blinks on our output frame, as well as displaying the current eye aspect ratio:
# draw the total number of blinks on the frame along with # the computed eye aspect ratio for the frame cv2.putText(frame, "Blinks: {}".format(TOTAL), (10, 30), cv2.FONT_HERSHEY_SIMPLEX, 0.7, (0, 0, 255), 2) cv2.putText(frame, "EAR: {:.2f}".format(ear), (300, 30), cv2.FONT_HERSHEY_SIMPLEX, 0.7, (0, 0, 255), 2) # show the frame cv2.imshow("Frame", frame) key = cv2.waitKey(1) & 0xFF # if the `q` key was pressed, break from the loop if key == ord("q"): break # do a bit of cleanup cv2.destroyAllWindows() vs.stop()
To see our eye blink detector in action, proceed to the next section.
Blink detection results
Before executing any of these examples, be sure to use the “Downloads” section of this guide to download the source code + example videos + pre-trained dlib facial landmark predictor. From there, you can unpack the archive and start playing with the code.
Over this past weekend I was traveling out to Las Vegas for a conference. While I was waiting for my plane to board, I sat at the gate and put together the code for this blog post — this involved recording a simple video of myself that I could use to evaluate the blink detection software.
To apply our blink detector to the example video, just execute the following command:
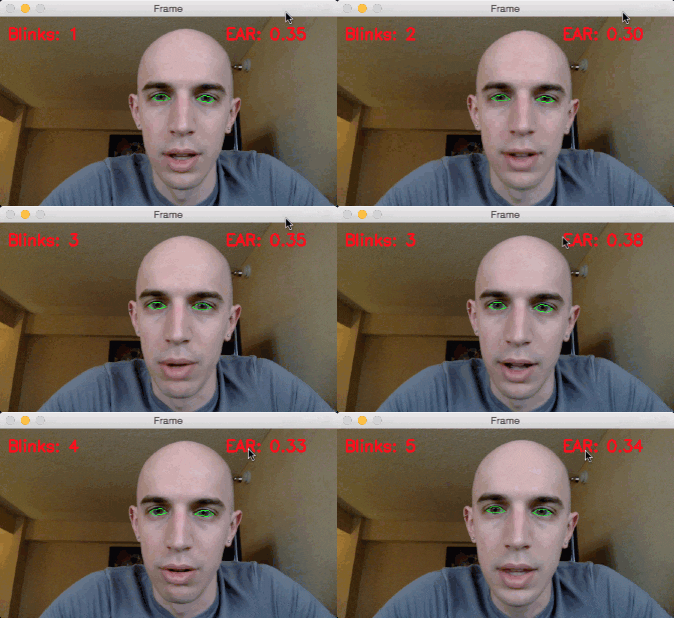
$ python detect_blinks.py \ --shape-predictor shape_predictor_68_face_landmarks.dat \ --video blink_detection_demo.mp4
And as you’ll see, we can successfully count the number of blinks in the video using OpenCV and facial landmarks:
Later, at my hotel, I recorded a live stream of the blink detector in action and turned it into a screencast.
To access my built-in webcam I executed the following command (taking care to uncomment the correct VideoStream
class, as detailed above):
$ python detect_blinks.py \ --shape-predictor shape_predictor_68_face_landmarks.dat
Here is the output of the live blink detector along with my commentary:
Improving our blink detector
This blog post focused solely on using the eye aspect ratio as a quantitative metric to determine if a person has blinked in a video stream.
However, due to noise in a video stream, subpar facial landmark detections, or fast changes in viewing angle, a simple threshold on the eye aspect ratio could produce a false-positive detection, reporting that a blink had taken place when in reality the person had not blinked.
To make our blink detector more robust to these challenges, Soukupová and Čech recommend:
- Computing the eye aspect ratio for the N-th frame, along with the eye aspect ratios for N – 6 and N + 6 frames, then concatenating these eye aspect ratios to form a 13 dimensional feature vector.
- Training a Support Vector Machine (SVM) on these feature vectors.
Soukupová and Čech report that the combination of the temporal-based feature vector and SVM classifier helps reduce false-positive blink detections and improves the overall accuracy of the blink detector.
What's next? We recommend PyImageSearch University.
86 total classes • 115+ hours of on-demand code walkthrough videos • Last updated: October 2024
★★★★★ 4.84 (128 Ratings) • 16,000+ Students Enrolled
I strongly believe that if you had the right teacher you could master computer vision and deep learning.
Do you think learning computer vision and deep learning has to be time-consuming, overwhelming, and complicated? Or has to involve complex mathematics and equations? Or requires a degree in computer science?
That’s not the case.
All you need to master computer vision and deep learning is for someone to explain things to you in simple, intuitive terms. And that’s exactly what I do. My mission is to change education and how complex Artificial Intelligence topics are taught.
If you're serious about learning computer vision, your next stop should be PyImageSearch University, the most comprehensive computer vision, deep learning, and OpenCV course online today. Here you’ll learn how to successfully and confidently apply computer vision to your work, research, and projects. Join me in computer vision mastery.
Inside PyImageSearch University you'll find:
- ✓ 86 courses on essential computer vision, deep learning, and OpenCV topics
- ✓ 86 Certificates of Completion
- ✓ 115+ hours of on-demand video
- ✓ Brand new courses released regularly, ensuring you can keep up with state-of-the-art techniques
- ✓ Pre-configured Jupyter Notebooks in Google Colab
- ✓ Run all code examples in your web browser — works on Windows, macOS, and Linux (no dev environment configuration required!)
- ✓ Access to centralized code repos for all 540+ tutorials on PyImageSearch
- ✓ Easy one-click downloads for code, datasets, pre-trained models, etc.
- ✓ Access on mobile, laptop, desktop, etc.
Summary
In this blog post I demonstrated how to build a blink detector using OpenCV, Python, and dlib.
The first step in building a blink detector is to perform facial landmark detection to localize the eyes in a given frame from a video stream.
Once we have the facial landmarks for both eyes, we compute the eye aspect ratio for each eye, which gives us a singular value, relating the distances between the vertical eye landmark points to the distances between the horizontal landmark points.
Once we have the eye aspect ratio, we can threshold it to determine if a person is blinking — the eye aspect ratio will remain approximately constant when the eyes are open and then will rapidly approach zero during a blink, then increase again as the eye opens.
To improve our blink detector, Soukupová and Čech recommend constructing a 13-dim feature vector of eye aspect ratios (N-th frame, N – 6 frames, and N + 6 frames), followed by feeding this feature vector into a Linear SVM for classification.
Of course, a natural extension of blink detection is drowsiness detection which we’ll be covering in the next two weeks here on the PyImageSearch blog.
To be notified when the drowsiness detection tutorial is published, be sure to enter your email address in the form below!
Download the Source Code and FREE 17-page Resource Guide
Enter your email address below to get a .zip of the code and a FREE 17-page Resource Guide on Computer Vision, OpenCV, and Deep Learning. Inside you'll find my hand-picked tutorials, books, courses, and libraries to help you master CV and DL!
Marc Boudreau
Hi Adrian,
Looks very interesting as usual!
I saw on Twitter that you got dlib working on Raspi.
Are you planning a tutorial on installing dlib on Raspi?
Adrian Rosebrock
Correct — the dlib + Raspberry Pi install blog post will go live next week (May 1st, 2017).
Eric Sobczak
This looks great. I like the fact that you explain the science behind it all. Should we be using Python 2.7 or 3.0?
Adrian Rosebrock
You can use either Python 2.7 or Python 3.
RAVIVARMAN RAJENDIRAN
Hi, Thanks for the code.
When i run the code, i get following two lines in output and not opening any video.
[INFO] loading facial landmark predictor…
[INFO] starting video stream thread…
Adrian Rosebrock
What type of camera are you using?
haili
Hi Adrian,Very thanks for you code.
But when i run the code,i I also can’t open any video.I use the USB camera of Logitech…
Adrian Rosebrock
It sounds like your version of OpenCV was compiled without video support. I would suggest re-compiling and re-installing OpenCV using one of my tutorials.
Rachna Chadha
Hi – I had used the same link for installing openCV 4 but using the provided mp4 makes pi hang . I am
not sure what I am missing
Jorge
Hi Adrian. I have the same issue with the blink detection:
[INFO] loading facial landmark predictor…
[INFO] starting video stream thread…
and then the prompt.
(The code for “real-time-facial-landmarks” works fine)
Adrian Rosebrock
Hi Jorge — please check my reply to “haili” above. You’ll want to compile OpenCV with video support so you can access your webcam.
Jorge
Hi Adrian. Thanks for your great job!!
I found the cause of the issue. I missed to uncomment two lines of code:
66: vs = VideoStream(src=0).start()
and
68: fileStream = False
(So we can use the built-in webcam or USB cam, as you say in the blog (in your instructions are lines 63 and 64 but in the downloaded code are 66 and 68)
I Hope this could help HAILI and RAVIVARMAN RAJENDIRAN
Thanks a lot for this blog
Adrian Rosebrock
Congrats on resolving the issue Jorge, thank you for sharing.
Nurulhasan
Really great job..
Face recognition also possible??.
Adrian Rosebrock
You typically wouldn’t use facial landmarks directly for face recognition. Instead you would try Eigenfaces, Fisherfaces, and LBPs for face recognition (covered inside the PyImageSearch Gurus course. Otherwise, you would look into OpenFace.
faeze
Hi.Thanks for this post.so useful.
I have a question.openface just install on linux or we can install it on windows??
Christian
Very cool! Great post. Thanks!!
Adrian Rosebrock
Thanks Christian, I’m glad you enjoyed it!
JBeale
Great article, this is really impressive. In my case, my eye aspect ratio never goes much above 0.3 no matter how wide I open my eyes. Also, I missed some blinks with the 3 frame setting, maybe your frame rate is higher than mine. This is what works better on my system:
EYE_AR_THRESH = 0.23 # was 0.3
EYE_AR_CONSEC_FRAMES = 2
Adrian Rosebrock
Thanks for sharing! As I mentioned in the post, it might take a little tweaking depending on the frame processing rate of the system.
JBeale
It is interesting to note that the green outlines around my eye always seem to show both eyes are roughly the same amount open, even when one eye is completely wide open and the other eye is entirely shut. Looks like the facial landmark detector (HOG) is making some assumption that the face should be symmetric, so both eyes should be about the same.
Adrian Rosebrock
The face detector is HOG-based. The facial landmark predictor is NOT HOG-based. Instead it interprets these landmarks as probabilities and attempts to fit a model to it. You can read more about the facial landmark detector here.
Arzoo
Hi Adrian,
thanks for the detailed tutorial!
I downloaded the zip file and executed the required command in terminal.
I got this error:
RuntimeError: Unable to open shape_predictor_68_face_landmarks.dat
I’m using a macOS Sierra.
can you please help me figure this out.
Adrian Rosebrock
Make sure you are executing your Python script from the same directory as the
.dat
file. Based on your error message, it seems like your paths are incorrect.Arzoo
Got it. Thank you!
Jack
Hi Adrian
thanks for the detailed turorial!
I have the same error like Arzoo,but I work on win10,dlib18.17,opencv3.1,python3.4.5
now I do not know how to solve it.
can you please help me solve the problem.
Adrian Rosebrock
Hi Jack — I don’t officially support Windows here on the PyImageSearch blog, I highly recommend you use a Unix-based environment such as Linux or macOS to study computer vision. In either case it looks like your path to the shape prediction model is incorrect. Double-check your paths and ensure you are using Windows path separators (‘\’) instead of Unix path separators (‘/’).
wallace
Hi Adrian Rosebrock
Thanks for your great work. But I’m using a windows OS. So how can I install the dlib library correctly for the facial landmark detection?
Adrian Rosebrock
Hi Wallace — I don’t cover Windows here on the PyImageSearch blog. I recommend using Unix-based operating systems such as macOS and Ubuntu for computer vision development. IF you would like to install dlib on Windows, please refer to the official dlib site.
Tarun
Hi wallace,
I used pip install dlib and that worked. I am able to use dlib in my code
Tarun
Hi Adrian,
Firstly, thank you so much. Your blog is of immense help for a computer vision enthusiast like me.
A bit off topic – now days I am playing with YOLO to get real time object detection. I am trying to implement this in Python but without any success. Do you plan to cover this up?
Adrian Rosebrock
I’ll be covering YOLO along with Faster R-CNNs and SSDs inside Deep Learning for Computer Vision with Python. Object detection with deep learning is still a very volatile field of research. I’ll be discussing how these frameworks work and how to use them, but a pure Python implementation will be outside the scope of the book.
Keep in mind that many state-of-the-art deep learning frameworks for object detections are based on forks of libraries like Caffe or mxnet. The authors then implement custom layers. It will likely be a few years until we see these types of object detectors (or even the building blocks) naturally existing in a stable state inside Keras, mxnet, etc.
Gökhan Aras
Thanks Adrian,
you are a wonderful man
this blog very good
Adrian Rosebrock
Thank you Gökhan, I really appreciate that! 🙂
jon
Hi
could you please make this clear :
A = dist.euclidean(eye[1], eye[5])
why eye[1], eye[5] ? in dlib eye landmarks to which eye[1], eye[5] is referring ?
Adrian Rosebrock
These are the individual indexes of the (x, y)-coordinates of the eyes. These indexes map to the equation in Figure 4 above (keep in mind that the equation is one-indexed while Python is zero-indexed). Furthermore, you can read more about the individual facial landmarks in this post.
Shivani Junawane
vs.show() no such function found..
This is the error i am getting.. I am able to run the code with built in video.. but not using laptop camera.. please resolve this issue..
Adrian Rosebrock
There is no function called
vs.show()
anywhere in this blog post. Did you meanvs.stop()
?Firatov
Hi Adrian,
Great post! Tested this one with mobile phone (iPhone) and it works okay. dlib detection is a bit problematic on iphone camera so sometimes it doesn’t detect blinks because of bad lighting.
I like the simple idea behind it. I tried to apply this idea to “eyebrow raise” detection mechanism but the ratio is not changing as drastically as eye ratio. Do you maybe have suggestion or idea to apply the same idea to eyebrow raising or any other facial gesture?
Adrian Rosebrock
Keep in mind that the eyebrow facial landmarks are only represented by 5 points each — they don’t surround the eyebrow like the facial landmarks do for the eye so the aspect ratio doesn’t have much meaning here. I would monitor the (x, y)-coordinates of the eyebrows, but otherwise you might want to look into other facial landmark models that can detect more points and encapsulate the entire eyebrow.
Roy Gustafson
Hi Adrian, thanks for this guide. As of now, I’m trying to use this system for wink detection. Right now I’m gathering data, but what I’ve determined is that both EAR’s decrease by something like 40% no matter which eye winks. Then I determine which EAR decreased more, and which decreased less. I may hard code it, if I can generalize it to a ratio indicating a wink, then a difference indicating WHICH eye is winking. From there, I need to make sure it doesn’t give me false positives for blinks and squints (although squints might be impossible to rule out).
But this project has given me a lot to go off of! Thanks so much
Jinwoo
Hi Adrian,
I’m having a problem running this code. It says
“detect_blinks.py: error: the following arguments are required: -p/–shape-predictor”
Can you please help me solve this error?
Adrian Rosebrock
Hi Jinwoo — I would suggest that you read up on command line arguments before continuing.
Mohammed Salman
Do you know what is the issue here ?
I’ve read what you have linked.. Don’t seem to find the solution here.
Adrian Rosebrock
Please read the article again. It provides a discussion on command line arguments and how to use them. The problem is that you’re not specifying the
--shape-predictor
argument to your script.Ketan Vaidya
Hi! Great tutorials on the site! Just to give you a suggestion;
Could you also use an IR lighting rig to light up the subject at night time? Because most webcams have the capability to detect IR.
Thanks!
Ayush Karapagale
its very slow isnt there any way to fasten it ??…..
Adrian Rosebrock
What are the specs of the computer you are using to execute the code? This code can easily run a modern day laptops/desktops.
ayush karapagale
i have apple macbook air… but i am doing a project that requires raspberry pi only because i have to make the device portable… i ahe tried increasing the gpu to 256 mb but its still the same
Adrian Rosebrock
I will be writing an updated blog post that provides a number of optimizations for blink detection on the Raspberry Pi within the next couple of weeks. Stay tuned!
ayush karapagale
in the video you are able to run the program fast… can u
please tell how ??
reza
Hi .I want to write a program that count people(footfall counting).can you help me?tnx
Dheeraj
Hi Adrian,
Its not accurate at all, even if i move my eyes and don’t blink it count it as blinked. why ?
Adrian Rosebrock
It sounds like you need to adjust the
EYE_AR_THRESH
variable as discussed in the post.zjfsharp
It’s amazing! Thank you, Adrian Rosebrock! I want to use this to my fatigue detection experience.
Adrian Rosebrock
Thanks, I’m happy to hear you found the project helpful! 🙂 Best of luck on your fatigue detection work.
shubhank rahangdale
Hi Adrian
if fileStream and not vs.more(VideoStream(src=0).start()):
TypeError: more() takes exactly 1 argument (2 given)
This is the error i am getting.. I am able to run the code with built in video.. but not using laptop camera.. please resolve this issue..
shubhank rahangdale
Thanks, I found the bug..
Adrian Rosebrock
Congrats on resolving the issue Shubhank!
shubhank
hi… Adrian
Could you share your content number so that I can contact you for my project details and idea .
Adrian Perez
Hello! Adrian, thanks for share your experience.
how do you add a graphic or plot with the eye blink data?
could you share this code to?
Thanks
Adrian Rosebrock
Are you trying to plot the EAR over time? If so, I would suggest using matplotlib, Bokeh, or whatever plotting library you feel comfortable with.
junryy
hi,Adrian,i use other video with my eyes, but the demo don’t detect blink. how to do work out the problem?
Thanks
Tommy Tang
Hi Adrian,
Thank you so much for sharing and I followed all your steps to create a blink rate monitoring as well as a head tilting monitoring using some other data among the 68 points. All works pretty well but I found that the predictor will fail to predict the accurate eye contour when the object is wearing optics. Do you have any suggestion for that? Cause I know in openCV haar cascade there seems to be a specific classifier for eyes with glasses. Will there be a specific predictor built for this case?
Adrian Rosebrock
That’s a great question. If the driver is wearing glasses and the eyes cannot be localized properly, you would likely need to create a specific predictor. Another option might be to try an IR camera, but again, that would also imply having to train a custom predictor. I’ve never tried this method with the user wearing glasses.
Johan
HI Adrian, I want to convert this to C++ code, can you please point me right direction, Thank you
Alan
Have you read about Face Landmark Detection on Dlib website in section C++ examples?
Chamath
Hi thank for your amazing tutorial. But i got an error and i can’t resolve it. can you please help me.
[usage: faceland.py [-h] -p SHAPE_PREDICTOR_68_FACE_LANDMARKS.DAT
faceland.py: error: the following arguments are required: -p/–shape_predictor_68_face_landmarks.dat]
Thank You.
Adrian Rosebrock
Please read the comments before you post. I have already answered this question in reply to “Jinwoo” above.
jasmeet
please elaborate it i didn’t get the solution.
thanking you
Adrian Rosebrock
Read my tutorial on argparse and command line arguments. If you read the tutorial you will understand command line arguments and be able to resolve the problem.
Arighi
Hey Adrian, i really love your tutorial. It helped me a lot for finising my project. But i have some problem making it automatically set the threshold based on the person’s default opened eye EAR (different race, different eye EAR).
Like i set it for 0.2, ot worked great for me, but not for my chinese friend. It detected his eyes closed. So i have to manually edit the threshold. Is there any way to make it more dynamic?
Adrian Rosebrock
In short, not easily. I would suggest collecting as much EAR data as possible across a broad range of ethnicities and then using that as training data. Secondly, keep in mind what I said regarding in the “Improving our blink detector” section. You can treat the EAR as a feature vector and feed them into a SVM for better accuracy.
gopi
Arighi,
Can you try capturing the EAR in the initial 2-4 seconds (maybe pick the maximum EAR obtained in that time frame) and then instead of going by the absolute EAR of 0.3 or 0.2 etc. you could go by % drop in the max EAR as a qualifier for drowsiness. That way you don’t have to change the EAR threshold at all. Please note that while an EAR threshold of 0.3 worked for me it didn’t do that well for my wife and we both are Indians and from the same region too. So, in all probability capturing the user’s base EAR in the initial few seconds and then measuring the drop% could be a way to go.
Adrian, it would be great to hear your view on this.
cheers.
Jack
Hello there:
I have a quick question about the facial landmark detection: if only a partial face is presented, is it possible to detect any part of the face elements, e.g. only one eye? Or do we need to retrain the data set to just detect an eye? Thanks.
Adrian Rosebrock
Keep in mind that facial landmark detection is a two phase process. First we must localize the face in an image. This normally done using HOG + Linear SVM or Haar cascades. Only after the face is localized can we detect facial landmarks. In short, you need to be able to detect the face first.
Jack
Thanks for the reply. If we know that the image is only for an eye area, is it possible to use facial landmark to just detect the feature or outline of the eye? Thanks.
Adrian Rosebrock
Unfortunately, no. The facial landmark detector assumes you are working with the entire face. If you had just eye images and wanted to localize the eye you would need an eye detector + a trained shape predictor for the eye region.
J-F Duquette
Hi Adrian,
Many thanks for you sharing your knowledge. I’m trying to use your video file and everything is loading without errors but the video doesn’t show at all. I have follow your tutorial on how to install OpenCV and i have install video lib. I found to the web that i could be something with FFMPEG ?
Thanks for your help
Adrian Rosebrock
It’s hard to say what the exact issue could be, although it sounds likely that your system does not have the proper video codecs installed to read your video. I would suggest installing FFMPEG then re-compiling and re-installing OpenCV.
Fernando J.
Hi Adrian, thank you very much for the wonderful tutorials and courses that you present each time.
First question: Could this flicker detector be used as liveness detection in any facial recognition system?.
Second question: Do you plan to prepare a tutorial on some effective mechanism for the liveness detection in a facial recognition system?.
Thank you!.
Adrian Rosebrock
1. Yes, this could be used for liveness detection, although I would recommend using a depth camera as well.
2. I’ll add liveness detection as a future potential blog post, thank you for the suggestion.
Ankit
line 116, its give invalid syntax error, please help,, i am using this code in Windows, and use Webcam of my PC.
Adrian Rosebrock
What is the exact error you are getting? Did you use the “Downloads” section of this tutorial to download the code instead of copying and pasting it?
Mohammed Salman
Hi Adrian,
I’m an Engineering student. I am getting the following errors after de-commenting Line 62:
usage: detect_blinks.py [-h] -p SHAPE_PREDICTOR [-v VIDEO]
detect_blinks.py: error: the following arguments are required: -p/–shape-predictor
Please help! (I am going to take your 21 day crash course, very exicited sir!)
Best Regards.
Adrian Rosebrock
Hi Mohammed — please see my previous reply to your comment. You need to read up on command line arguments. The issue is you’re not supplying the
--shape-predictor
switch.Carlos
Hi Adrian, I installed OpenCV from this link, I followed all the steps https://pyimagesearch.com/2016/04/18/install-guide-raspberry-pi-3-raspbian-jessie-opencv-3/ and I got this right
$ source ~/.profile
$ workon cv
$ python
>>> import cv2
>>> cv2.__version__
‘3.1.0’
But with this code I get an error: ImportError: No module named spicy (and imutils and cv2 )
I made a ‘test’: when I write source~/.profile->workon cv->python->import cv2, I dont have any error, but when I write ->import cv2 on the python shell (3.4.2) I get the error No module named cv2
(I’m sorry for my english)
Good job and thanks sooo much
Adrian Rosebrock
I’m bit confused. You were able to install OpenCV 3.1 on your Raspberry Pi and access it via the command then. But then you try to import SciPy and you cannot access it? It sounds like you didn’t install SciPy on your Raspberry Pi:
Carlos
Adrian, thanks for your reply, I installed the scipy. When I open the terminal and I write->source~/.profile->workon cv->python->import cv2 there’s no any error, but when I open the Python shell and I write import cv2, then it shows “No module named cv2”. I get this error only in the Python Shell, not in the terminal, it’s like:
[…]
Terminal:
$ source ~/.profile
$ workon cv
$ python
>>> import cv2
>>> (Here there’s no problem)
Python Shell: (3.4.2)
>>>import cv2
“No module named cv2”
Thank you Adrian, regards!!!
Adrian Rosebrock
Can you clarify what you mean by “Python shell”? Are you referring to the GUI version of Python IDLE? If so, the GUI version of IDLE does not support Python virtual environments and it will not work. Please use the terminal or use Jupyter Notebooks.
Carlos
Yeah!!! exactly, now I understand, then I’ll use Jupyter.
Again, thanks so much Adrian,
Jack
Hey! How do you contact EAR if the framework returns 8 points for the eye?
Adrian Rosebrock
You might not be able to. How many landmarks are detected around each eye?
Reza
Ur code cant work for multiple faces at the same time right?
The counter variable gets violated
Adrian Rosebrock
Correct, this code is intended for a single face. You can update it to work with multiple faces by tracking each face and associating a counter with each face.
Carlos
Hi Adrian, At first thank so much, you’re the best.
I have a question, when I execute the program, I get this message (After INFO)
[INFO]…
[INFO]…
______________
** (Frame:32335): WARNING **: Error retrieving accessibility bus address: org.freedesktop.DBus.Error.ServiceUnknown: The name org.a11y.Bus was not provided by any .service files
______________
I received this warning after install opencv 3.3, before, I was executing the program with opencv 3.1 and I never received any warning, do you know what is it about?
Thank you
Adrian Rosebrock
It’s important to understand that that is is a warning and not an error. The message has no impact on your ability to execute the code or obtain the correct results.
To make the message go away run:
$ sudo apt-get install libcanberra-gtk*
Then re-compile and re-install OpenCV>
Carlos
Ok, thank you
Reza Ghoddoosian
Hi and thanks for the content
i get this error:
Unable to stop the stream: Inappropriate ioctl for device
do you know how i should sole it?
Reza Ghoddoosian
btw it does not work to read from a file , th e webcam version works
Adrian Rosebrock
Unfortunately I’m not sure what the error is here. Can you try using the FileVideoStream class?
Chris
Hi Adrian thanks for the content!
I have this error when running in my command prompt:
Unable to open shape_predictor_68_face_landmarks.dat
Both my script and the dat. file is in the same directory(desktop),do you know how to make it work?
Adrian Rosebrock
Hi Chris, you must specify the proper path to the file. You also must make sure permissions for files are set.
Chris
Hi Adrian, thanks for the reply, the error has been resolved.
Thanks again for the great content!
Salman
Thank you for this great article.
I’m working on images of eyes (just eyes, no face) to find out the drowsiness. Is it possible to use dlib for the case the eyes are cropped out of the face? Or you have better suggestions.
Thank you
Adrian Rosebrock
Hey Salman — you would need to train your own custom shape predictor for just the eyes. The method outlined in this blog post requires the entire face to be detected which in turns allows the eyes to be localized.
John
Hi, Adrian. Why don’t you use your own custom shape predictor for eye blink detection?
Adrian Rosebrock
Perhaps I’m not understanding your question — we are using a shape predictor for eye blink detection in this tutorial.
Daniel Obeng
Hello Adrian, this works amazingly well. I’m currently using it for a project in college where we need to map an eye blink to the time within the video that it occurred. Do you think you can help me modify the code so that I can also log the time (i.e the time within the video) that the blink occurred? Thanks!
Daniel Obeng
Also, I was hoping you can show me how to modify the code so that it doesn’t show the video but just works in the background.
Adrian Rosebrock
Hey Daniel, can you elaborate more on what you mean by “time within the video”? Secondly, while I’m happy to help point you in the right direction and provide suggestions please keep in mind that I publish all tutorials here on PyImageSearch free of cost. I’m simply too busy to take on additional customizations. I hope you understand.
Narmi
Sir your explanation is easily understandable..Can this will be implement using c++ in opencv?
Adrian Rosebrock
You can use this method in any programming language provided you can localize the eye region and apply the EAR algorithm.
Andrea
Hey Adrian, just a quick note to say thanks – we have used this as a base to build upon for a blink based lie detection system for a project at university. (we have credited you, of course!)
We found that blink detection is improved a lot if the EAR threshold is dynamically set to respond to the mean of recent EAR values. Also, getting some nice graphical output tracking EAR and counting blinks really helped with algorithm tuning.
Anyway, thanks for a super readable code – I enjoyed playing around with it. 🙂
Take care x
Adrian Rosebrock
Congrats on the successful project, Andrea! The blink-based lie detection system sounds very interesting. Do you have a writeup of the report so I can learn more about it?
Ashish Sharma
I am using windows
after running this code i got an error
detector = dlib.get_frontal_face_detector()
AttributeErrors: ‘module’ object has no attribute ‘get_frontal_face_detector’
Please help
Adrian Rosebrock
That is odd…which version of dlib are you using?
ASHISH Sharma
We are using dlib 18.17.100
Adrian Rosebrock
Thanks for sharing the version information. Unfortunately I’m not sure what the error would be in this case. I would suggest posting on the official dlib forums. Sorry I couldn’t be of more help here!
Hadi
Hi Adrian
I need your .exe of program. Can you give it to me?
Thankful
raghav
usage: detect_blinks.py [-h] -p SHAPE_PREDICTOR [-v VIDEO]
detect_blinks.py: error: argument -p/–shape-predictor is required
i got this error..how to solve it….
Adrian Rosebrock
Please read the comments before posting. See my reply to “Jinwoo” on May 7, 2017 (as well as others). Make sure you read on on command line arguments and how they work.
Andrew
I’m having a problem running this code. It says
“detect_blinks.py: error: the following arguments are required: -p/–shape-predictor”
Can you please help me solve this error?
I saw your reply to “Jinwoo”…but I don’t understand that.
Please explain more thoroughly.
Adrian Rosebrock
This script is meant to be executed via the command line. Open up the command line, navigate to where you downloaded the source code + example video, and then execute the script, exactly as I do in the blog post:
It’s okay if you are new to command line arguments but take the time to educate yourself on them before continuing.
mv^2
HI Adrian
error occurred.
usage: detect_face_parts.py [-h] -p SHAPE_PREDICTOR [-r PICAMERA]
detect_face_parts.py: error: the following arguments are required: -p/–shape-predictor
I watched your command “command line arguments”
i dont know how to set up an argument and path.
Adrian Rosebrock
See my reply to “Mohammed Salman” on September 9, 2017.
Dhanush
It works fine for file stream but when on executing for video stream (using USB camera) following error occurs
Traceback (most recent call last):
File “detect_blinks.py”, line 82, in
frame = imutils.resize(frame, width=450)
File “/root/.virtualenvs/cv/lib/python3.5/site-packages/imutils/convenience.py”, line 69, in resize
(h, w) = image.shape[:2]
AttributeError: ‘NoneType’ object has no attribute ‘shape’
Adrian Rosebrock
It sounds like OpenCV cannot access your webcam. Take a look at this post where I discuss OpenCV NoneType errors and how to resolve them.
Hager
Hi, dhanush. I experienced this same error…..if u solved it please let me know how. =) thank you.
Mkhuseli
Hei Adrian. Good work. After obtaining the yes, is the a function that i can use to crop both eyes?
Adrian Rosebrock
You can crop the eyes using NumPy array slices. Compute the bounding box of the coordinates and use rectangular coordinates to extract the eyes.
jathusan
hi how can i implement eye blink detection in c#?
is there any way??
help me…
rvk
hey Adrian…
i need some help regarding my project
i am thinking of implementing drowsiness detection using CNN using eyes in the wild data set.The model has to detect the eyes and if the eyes are closed for a certain period of time the model should give some indication to the driver.Firstly,is it possible in real time using CNN.whats the best way to train the model.
I am not asking you for code..all i need is,what libraries should i use..how should i save the trained weights.can CNN work on webcam real time streaming.if so,how.?
Thanks in advance. 🙂
sorry for my bad english.
Adrian Rosebrock
Is there a particular reason why you would want to use a CNN? Before even starting a project you should consider the reasoning behind “why”. The method proposed here doesn’t require a CNN and using deep learning could very easily become overkill. I’m also not familiar with the closed eyes in the wild dataset. Do you have a link to it?
Carlos
Hi, Adrian, and thank you, I have a question, I wanna make an <> based in this blink detection. I add some code lines, removing the average of the EAR for both eyes. I replaced it by something like that: If (leftEAR>rightEAR:left wink) if(leftEAR<rightEAR:right wink), (if leftEAR=rightEAR and <EYE_AR_THRESH, then it's a normal blink), but it always shows the same EAR value for each eye, despite I close just one eye. Thanks!!!!
Ashish Sharma
Hi adrian,
Your blog is superb
i can run a program succesfully but i also want to make an exe. so how to make .
Adrian Rosebrock
Unfortunately Python + OpenCV together does not lend well to create an executable file. You would need to distribute the source code.
Jeru Shalom Barlos
Hi , i have a following error. How can I resolve this sir?
usage: detect_blinks.py [-h] -p SHAPE_PREDICTOR [-v VIDEO]
detect_blinks.py error: argument -p/–shape-predictor is required.
I have already installed the necessary libraries thru pip install dlib , and all of the requirement, still getting errors. Please help 🙁
Adrian Rosebrock
See this blog post on command line arguments. Make sure you read the post completely.
Gani
Someone please guide me – is there any pure javascript library that does eye blink detection?
Adrian Rosebrock
I don’t think so. Did you do any research on it?
Boris
we would like to use Python 3.6 with Spyder!
can we use this program for making blink detector which u posted?
Adrian Rosebrock
Yes, but you’ll want to make sure the Python interpreter you are using with Sypder can access OpenCV and any other required libraries.
Boris
Thank you for replying : )
I got a problem while installing the dlib. I failed to install dlib even though I searched almost web and blog.
Im not sure but many say it is difficult to download the dlib on Window.
Is there any way that I can use ur code without dlib?
I’d like to make a eye blink detection with Python but without dlib. Do you have any ideas?
Thanks a lot
Adrian Rosebrock
For this particular code you would need dlib. I have not used Windows in many years so I’m unfortunately not sure what would be causing the issue with the dlib install.
Hi
Why using VideoStream and threads and not VideoCapture? Thanks!
Adrian Rosebrock
The VideoStream classes leverages threading and reduces I/O latency. See this blog post for more information.
Hi
And dont you have a problem when killing the thread in python?
If I run your code, when I press q, the terminal lags and I have to shut down and open the terminal again
Adrian Rosebrock
I have not ran into issues with the thread gracefully exiting.
marcos
Hi! Trying to implement something similiar but I want to detect winks, any idea? Try to do the same but for each eye but its not working
Also, this particular method counts when you look down, do you know how can I adjust more?
Thanks
Adrian Rosebrock
You can certainly detect winks, just compute the EAR for each eye and then track how long each eye has been closed for. As far as “looking down” you may want to adjust your camera placement or use a more advanced method for eye blink detection, perhaps one that uses multiple EAR inputs as a feature vector.
seifeddine
hi Adrian;
i runed u’r code and i get this error :
AttributeError : WebCamVideoStream instance has no aattributr ‘more”
Adrian Rosebrock
Make sure you install of “imutils” is up to date:
$ pip install --upgrade imutils
malo
Hello! First I want to thank you, your tutorial have been of great help.
I´m trying something similar but with smiles, if I measure the distance of points 49 and 55 (dist.euclidean(mouth[0], mouth[6])) I can detect a smile but the problem I have encounter is that the distance change depending of the distance to the web cam.
Do you know if there is a way to normalize de distance of the points, making it not dependig of the distance to the camera?
Adrian Rosebrock
Hey Malo — there are a few ways to approach this problem. Is there any particular reason you are relying strictly on the distance? You could attempt use an aspect ratio calculation here for the smile here as well. This would not make the system reliant on the distance.
malo
What do you mean with use an aspect ratio calculation?
Adrian Rosebrock
Refer to this blog post. We compute the “EAR” or “Eye Aspect Ratio”. You can do something similar with the mouth landmarks (perhaps a “Mouth Aspect Ratio”) just as a quick test. If that doesn’t work you can normalize the distance of the mouth by scaling it by the width of the face then trying to threshold on it.
Malo
Sorry to bother you again.
But how can I meassure the width of the face?
It´s not the same problem. Gnna meassure the width of the face doing the distance between two points but thats gonna change depending of how far Im from the camera.
Adrian Rosebrock
You know the bounding box of the face so you can therefore compute the width of the face. You could also compute the width based off two opposing chin facial landmarks as well.
If you divide the distance between your two mouth landmarks by the face width you end up with a ratio. This ratio will not change. Try it for yourself and see.
malo
yeah..but I couldn´t find an aspect ratio for the smile.
Also if I can solve this I can track all the others point of the face and notice differents expressions
Vamshi Reddy Pothuganti
one single question why did you use imutils.video and imutils why do you want to publicize yourself when a new person is trying to develop a new component they want to try from scratch why do you want to gain a name when dlib is open source python is open source and ubuntu is also open source why are you doing like this i seriously want to use skiimage dlib numpy for the easy interface and easy understanding instead of your complicated words in the code so how should we proceed?
Adrian Rosebrock
Perhaps I’m not understanding your criticism here. The imutils library is open source. You can use it if you would like or not. That’s really your choice, just like it’s your choice if you want to use other open source libraries such as scikit-learn, dlib, NumPy, etc. It’s really up to you. The reason I used imutils is stated in this blog post — it contains my threaded implementation of the VideoStream class which is more efficient for frame reads.
Vamshi Reddy Pothuganti
I also want to get rid of imutils face_utils and argparse what is the best way to do that and what should i use instead of shape = face_utils.shape_to_np(shape) how can i get rid of this and also why did you use args = vars(ap.parse_args())
Adrian Rosebrock
If you want to get rid of “face_utils” you will need to implement it by hand in your own code. You can get rid of argument parsing as well but you should read this blog post first.
lalo
Have you try make en executable of this code?
Adrian Rosebrock
No, it would be a royal pain and not worth it. Trying to bundle together a Python app that includes the OpenCV bindings and system dependencies would be challenging to say the least.
ASHISH Sharma
Sir i want to hide a a frame windows please help me
Adrian Rosebrock
Can you clarify what you mean by “hide a frame window”?
Siang
Hi, Dr.Adrian.
I would like to thank you for the great tutorial, especially with clear explanations.
i would like to ask is it possible to extract the (x,y) value from any of the point (P1 – P6) as shown in figure 3 ? If so, how should I extract the coordinate ?
Thanks in advanced.
Adrian Rosebrock
This blog post actually shows you how to extract the eye coordinates. Lines 94 and 95 extract the (x, y)-coordinates for both the left eye and right eye. You can then loop over each of the respective sets of points.
evan
Hey Adrian. Thanks for your knowledge and enthusiasm–
Im (newish to python) and trying to get the blinks to trigger short midi sequences using pygame. I got it to work per se, but the video is paused during playback and then resumes after. Ideally it wouldnt, improving the timing of the next trigger (so they could potentially overlap.) I tried a couple threading situations, but couldnt seem to get the right configuration. Am i on the right track at least?
thanks
Adrian Rosebrock
Yes, threading would be your best bet here. My guess is that you are forgetting to make your thread a daemon:
Which will ensure it runs in the background.
Arfizur rahman
Hi, Dr.Adrian.
Many many thanks for this tutorial, It really helped me a lot.
Can you make a tutorial on improving the blink detector, as you mentioned in the “Improving our Blink detector”.(13-dim feature vector, SVM).
Thanks again.
Adrian Rosebrock
Hey Arfizur — thank you for the suggestion. I have made note of it but I cannot guarantee if or when I may write the tutorial.
priya
when i placed my mobile infront of webcam it actually counting the blink of my pic on mobile phone lol!!!
Ben
Hi Adrian, great tutorial! When I tested it, my EAR was ~0.2 when my face is close to camera, and was increasing and eventually went to ~0.35 when I move my face back from camera (eyes open in both cases), so if I set the treshhold to 0.2, it will not work when my face is not close to camera. Is there a way to handle this? I assume I can multiply EAR by a constant ratio based on the size width of my face shape compared to the width of the entire photo, but I am not sure.
Adrian Rosebrock
You can normalize the EAR by the width (or height) of the bounding box surrounding your face. Give that a try.
Gwendy
Nice tutorial!
Adrian Rosebrock
Thanks Gwendy, I’m glad you enjoyed it 🙂
Ben
Thanks for the tutorial!
Adrian Rosebrock
Thanks Ben, I’m glad you found it helpful!
Madhurish
Hi Adrian,
We can apply above code for certain types of people on whom the threshold(0.3) perfectly matches. But if I want apply on large dataset containing many videos then the threshold will not work for all videos. So is there any method from which we can set threshold so that it works for all videos.
I thought of one idea like we can store EAR for each frames and then analyse them to set threshold.
Anyways you are doing a great work as these topics are not easy to understand but due to these blogs you made these topics easily understandable.
Thanks
Adrian Rosebrock
See my comments in the blog post. I would suggest taking a temporal approach and taking the EAR over N frames, forming a feature vector, and then training a machine learning model, like an SVM over it. This will make the system more resilient and will not require a threshold.
Madhurish
Thanks, I will try.
Taufiq Ari W
I want to ask about the value of 0.05 / 0.1 / 0.15 / 0.2 /, 0.25. that’s what value is it? and what units? then use the formula how?
thank you Mr. Adrian Rosebrock
Brij
Hey bro,
Awesome work ..I and my team started from a scratch and by looking all your blogs finally after 4 days and 3 full nights I am able to count my blinks!!!..so happy!!…I modified your code little bit as I have used my android camera connected to server so i have not use FileVideoStream instead i used urllib and also i made some other changes like the dataset one and it took me 2 days just to install all the libraries ..
but when the code successfully compiled i forgot all the nights that we spent .
Thanks bro!..now i will take this one a slight ahead!..cheers!
Adrian Rosebrock
Congrats Brij! I’m so excited for you and your team!
Richa Agrawal
hello sir, thanks a lot for providing code, which is really helpful, Sir I am getting an error in the code and cannot understand how to correct it so if you could help it would really be great.
The error is shown below:
usage: detect_blinks.py [-h] -p SHAPE_PREDICTOR [-v VIDEO]
detect_blinks.py: error: the following arguments are required: -p/–shape-predictor
…
Adrian Rosebrock
You need to supply the command line arguments to the script. See this post for more details.
Dr. Bernard
Adrian,
This is VERY cool! May I ask the following:
1. I see about 100 comments here – is the link at the top to the eye blink counter still the best link?
2. Can I set the parameters so that it does not create visible circles around the eyes… I would like to use this for normal videoconferencing without the distraction of the green circles…
Thank you for creating such an important program
Adrian Rosebrock
1. Which link are you referring to? Please be more specific.
2. You can comment out Lines 106 and 107.
hasib
hey Adrian i need only eye_detector (HOG) + a trained shape predictor for the eye region.can you help me o build it
Adrian Rosebrock
I do not have a shape predictor for just the eye region. You would need to take a look at the dlib documentation on how to train your own custom shape predictors.
Saeed
Hi DR.Rosebrock
Thanks for your great post.Your post has been a great help for my project.
Could you explain this paragraph?
“Computing the eye aspect ratio for the N-th frame, along with the eye aspect ratios for N – 6 and N + 6 frames, then concatenating these eye aspect ratios to form a 13 dimensional feature vector.”
How do I implement this for eye blink detector?
Thanks and respect for your post.
Adrian Rosebrock
You would maintain the eye aspect ratios for the previous set of N frames. Then you would concatenate them into a single list and pass them through a trained model, such as an SVM or Logistic Regression model.
yuan
hello sir, thank you for this great tutorial! I can run the “real-time-facial-landmarks”, but when I run the “blink-detection”, it told me that ” AttributeError: ‘module’ object has no attribute ‘FACIAL_LANDMARKS_IDXS'”. How can I solve the problem?
Adrian Rosebrock
This was caused in the latest release of imutils v0.5. I’ll be fixing it in within the next few days with a release of imutils v0.5.1, but in the meantime just change “FACIAL_LANDMARKS_IDXS” to FACIAL_LANDMARKS__68_IDXS and it will work.
Adrian Rosebrock
v0.5.1 of imutils has been released. If you upgrade your install of imutils you will no longer see the error 🙂
Jasen
Error coming like this…
usage: detect_blinks.py [-h] -p SHAPE_PREDICTOR
detect_blinks.py: error: the following arguments are required: -p/–shape-predictor
Adrian Rosebrock
You need to supply the command line arguments to your script. It’s okay if you are new to them, but you NEED to read up on them before you continue.
Jasen
I already went through it. Actually i am doing this program in python shell in windows. I am not getting what to do with this argument here. Argument values we can pass when we try to run the program in terminal, right? I am not doing in that way. I have shape_predictor_68_face_landmarks.dat file in same directory in which main program exist. So i am not sure the need to give argument commands in the program. Opening the file using dlib.shape_predictor alone would do it, right?
Adrian Rosebrock
Don’t launch a Python shell and execute the script. Instead, just open your command line, navigate to where you downloaded the code, and execute the script using the Python executable. Do not use the Python shell itself. If you read the tutorial I linked you to in my previous comment it will help clear up your confusion on command line arguments. There is no need to edit any file. There is no need to edit or open any code. Just change directory to where you downloaded the script and execute it.
Jasen
Thanks i got it…
Ben
Hi Adrian, I have a question about dlib point detection. I installed it and everything works ok, except when my eyes aren’t facing straight in front of camera, in some frames it detects eye points wrong, so the points are moving above my real eye points and back again to the right values, and it keeps changing every frame although I don’t move at all. So my question is is there a way to detect those error cases in order to exclude them from calculations?
Adrian Rosebrock
That is odd behavior for sure. Are you using the “Downloads” section of my post to download the code + examples? Or are you using your own implementation?
Ben
I just built the latest dlib version for the iPhone, and it is the same: if you smile fast too “hard”, so your eyes are almost closed, the detector starts swinging points to your brows and back. Is there a way to detect those cases or even better remove them?
Adrian Rosebrock
I haven’t encountered such a situation. That would be a good question for Davis, the creator of dlib. I would ask him on the dlib GitHub project page.
Ben
I used https://github.com/zweigraf/face-landmarking-ios this github project to test it on my iPhone, which uses dlib too. The case I’m talking about is when you move your head down, so top part of eyes is a little bit hidden by brows.
Jasen
error coming like this…..
AttributeError: module ‘imutils.face_utils’ has no attribute ‘FACIAL_LANDMARKS_IDXS’
I tried replacing FACIAL_LANDMARKS_IDXS with FACIAL_LANDMARKS__68_IDXS.
then it will show AttributeError: module ‘imutils.face_utils’ has no attribute FACIAL_LANDMARKS__68_IDXS
I am using imutils 0.5.1
Adrian Rosebrock
It sounds like you’re not actually using imutils 0.5.1 then. v0.5.1 of imutils includes both FACIAL_LANDMARKS_68_IDXS along with an alias variable FACIAL_LANDMARKS_IDXS that points to FACIAL_LANDMARKS_68_IDXS. I know from your previous comments that you’re struggling with executing the script and likely have some confusion regarding Python package basics. I would suggest triple and quadruple checking your install of the imutils package and after that, triple and quadruple checking that your Python environment is indeed importing v0.5.1 of imutils.
Jasen
Thank You so much Adrian. I could resolve it. Actually i was installing imutils with the command ‘pip install imutils’. Thought it would get me the latest version. Isn’t it like that? Anyway now i given command ‘pip install imutils==0.5.1’, and problem is resolved. Thanks again.
Adrian Rosebrock
If imutils is already installed it won’t upgrade the package. You would have needed:
$ pip install --upgrade imutils
jinxing
Hi Adrian,When I type the following command in the terminal, I get this error.I have configured the environment according to your blog.If you can answer me, I will be very grateful.
…
import cv2
ModuleNotFoundError: No module named ‘cv2’
Adrian Rosebrock
It sounds like you don’t have OpenCV installed on your system. Make sure you follow one of my OpenCV install tutorials to get OpenCV installed on your machine.
Preetha
Hey Adrian,
It would be great if you could help me out with the link to install opencv 3 and python on Windows 10, and also let me know how Opencv can access the webcam on my laptop, and what changes have to be done in my code
Thank you
Adrian Rosebrock
Hey Preetha — I do not officially support Windows here on the PyImageSearch blog. I highly recommend you use a Unix-based machine like Linux (Ubuntu) or macOS. I provide a number of different install tutorials to get you started as well. I hope that helps!
Petter
Is there a way to find the pupil of the eyes and track it using this kind of method?
Adrian Rosebrock
I haven’t tried this method, but I know other PyImageSearch readers have gotten it to work. I would suggest starting there.
Petter
Thanks for replying that quick and also for giving me a starting point.
MANAS SIKRI
First of all I would like to thank you for your blog.It was of great help.
I wanted to detect the blinks for different people in the frame separately.How can I do so?
Adrian Rosebrock
Thanks Manas, I’m glad you’re enjoying the blog!
As for multi-person blink detection, that’s totally possible, but will require reworking the code quite a bit. You’ll want to detect all faces in a frame, loop over them, and then maintain separate counters for each of them, allowing you to determine when either of them have blinked. You may also want to perform simply object tracking so you can easily associate IDs with people.
MANAS SIKRI
Thank you, for giving me some starting point.I would try to implement this.
Shivam Gupta
Hey! Adrian, I want to make a project which will detect face and update the attendance in the database. But with simple face detection there is an ambiguity that it can detect fake images too, so in order to differentiate between the fake and real image I got the idea of blinking eye face detection tutorials by you, from git hub . Is it possible to detect blinking eye face and update attendance in the database. Or is there any other alternative to make my project without this ambiguity.
Adrian Rosebrock
What you’re referring to is actually part of a larger field of study called “liveliness detection”. I would suggest reading a few papers on liveliness detection and finding one that is sufficient for your project.
Piyush Nimoria
Agreed Shivam, what if some one records video of your eyes blinking and use it, the blink would still count right.
Adrian Rosebrock
Correct — that is why I suggested Shivam take a look at “liveliness detection” algorithms.
sungmin
hello Andria
We use your code, but webcam does not open.
Which program do we need to install?
We use every program that you install.
Adrian Rosebrock
Does the script automatically exit? Does it produce an error message? Any other information you can provide would be helpful.
Tan
Hi Adrian, can I use a wireless sport camera instead of webcam/usb camera/ raspberry pi camera?
Adrian Rosebrock
Yes, provided that the
cv2.VideoCapture
function supports your wireless stream.Jerry Cogswell
Hi, Adrian, I’ll bet this would be useful as part of a lie detector system used with other clues. That’s assuming that the person is not a pathological liar who is as comfortable with lying as with breathing. Such use has probably been done, ya? BTW did you know that the lie detector was invented by Dr. Marston who created the Wonder Woman comic? There’s a movie about it.
Marina
I’m confused >.> Are we supposed to be training a SVM on the feature vectors in real time or something? <.<
Adrian Rosebrock
We don’t actually train a SVM in this tutorial. I recommended using a SVM if you wanted to improve the method. You would train the SVM offline and then use it in real-time after its been trained.
ِAfnan
Hello …
I have only one question ..
Can OpenCV be used to identify the iris and integrate it into Python?
Adrian Rosebrock
OpenCV itself can facilitate building an algorithm to detect the iris of the eye; however, OpenCV does not include any built-in functions that automatically detect the iris. You would need to actually implement the algorithm itself.
Vas
Hey Andrian,
Thank you. Your tutorial was helpful, but we have a small problem. We are using logi-tech webcam for video streaming, the video is slow what we need to do.
Adrian Rosebrock
Are you running the code on a laptop or a Raspberry Pi? What are your system specs and how large is the input frame?
Piyush Nimoria
Hi Adrian,
Thanks for a great article. When I am running your code, the blink count is incremented even though I move here and there and keep my eyes open. How can I make it more accurate?
Also can this code be implemented in java?
Would really appreciate your response
Adrian Rosebrock
You should tune the EAR threshold value. As far as improving the model see my notes in the post about a rolling window of EAR values + SVM.
Aaron Packham
Hi Adrian, I am doing a University project and I wanted to incorporate a fatigue detection camera within the product I am making. Unfortunately I do not know anything about OpenCV, Python, and dlib or coding for that matter. Is there anyway you could help me?
Adrian Rosebrock
You will need to have at least some knowledge of programming to be successful in your project. If you’re new to computer vision and OpenCV, that’s fine, but you’ll need to read Practical Python and OpenCV first — that book will teach you the basics.
syed
i really want to thank you for such a good explanation and references
Adrian Rosebrock
Thanks Syed, I really appreciate that 🙂
Sumanth R
sir thank you for the code but i am facing a problem in install dlib it gave me run time error and instructed me to install Cmake its not installing properlly sir can you please help me out please
Adrian Rosebrock
Make sure you follow my dlib install instructions to help you get dlib configured and installed properly.
shaobing
I found that if I didn’t blink but moved my head back and forth, Blinks’ value would also increase, meaning the program thought I blinked.
AJ
Hi Adrian, can I run this on raspberry pi? if not, are you going to post one for raspi?
Adrian Rosebrock
See this tutorial.
Hamdi
Hi Adrian,
How can I implement blink detection algorithm and your centroid tracker each other ? I want to create system be like finding faces ,finding id’s and counting ids blinks . How can I do it can you help me ?
Adrian Rosebrock
I would suggest you take your time and start slow. I assume you have been able to get them both to run independently, correct?
If so, the next step is to start start incorporating facial landmark detection into the centroid tracking code. Detect landmarks for each face and visualize them. Make sure they are working.
From there, extract the eye regions.
Then move on to computing the EAR.
Finally, add in the variables to detect blinks.
Take your time, go slow, and debug often.
And if you need additional help, refer to Practical Python and OpenCV so you can learn the fundamentals of computer vision and image processing. That book shows basic examples of how to build computer vision applications. I’m confident it will help you here as well.
aditya verma
Hey Adrian,
This code works like a charm with people who do not wear spectacles, but is gives very ambiguous results for people wearing spectacles. Is there any way to fix this?
Hamod
Hi Adrian.
You are awesome. I have learn a lot from you; and actually I am looking for gaze/eye tracking code, do you post any?
Thank you very much.
Adrian Rosebrock
Sorry, I do not currently have any tutorials on that topic.
Ziyad
Hello Adrian, thanks for your useful articles.
is there any option to runs blink detection without using dlib packages? if exist, what should i prepare or do to make it?
Karan ahuja Ahuja
Hi Adrian,
Thank you a bunch.
If I hold a real photo in front of webcam and if I shake the photo,
Then a blink is falsely detected.
How can I go about solving this?
Sam
Hey I’m trying to add functionality of detecting when a tongue is sticking out but I’m having problems making it work. I’m trying to take the color above the lower edge of the lower lip and the color below it which are supposed to be pink above and skin color below and then when a tongue is sticking out its pink both above and below. But the color difference is not distinguishable enough. Do you have any other ideas?
Adrian Rosebrock
Interesting project. I don’t have any tutorials on that topic but I’ll consider it for the future. Thank you for the suggestion Sam!
Ananya Vaish
Hi Adrian, this post has really helped a lot. Can you please help me with Mouth Aspect Ratio for smile detection? In what standard range should the ratio lie in order to stop depending from person to person ?
Adrian Rosebrock
I’m actually covering Mouth Aspect Ratio (MAR) inside Raspberry Pi for Computer Vision.
Sumiya
Hello Adrian, Thanks for making us more learned. Can you provide the code that represents EAR in real-time as Figure 5. I really want it and I hope you will join my requist.
Adrian Rosebrock
I do not have such code, that is a figure from the paper. You can use matplotlib to generate such a plot though.
Eren
Thanks for the great tutorial.
I have a question about creating a video stream from the video file. In my project, I am getting the video from a post request as a byte array. However, I couldn’t figure how FileVideoStream can use my byte array to read the video. I searched on several resources, but all solutions require first saving the file to the disk and then read from the disk again. I think this is an overhead. Can you suggest me a way to do this without saving the video to the disk?
Many thanks from now,
Adrian Rosebrock
How is the byte array formatted? Can you access it normally via “cv2.VideoCapture”?
Eren
The shape of the array is (size of the file in bytes,). For example for a video of 1 mb, when I look at itsarray.shape, I see (1000000,) .
I can’t access it with cv2.videoCapture as well. I looked at its documentation and saw that it can read video only from the path or the webcam.
In my case, there is a video in the memory(with byte array) and I want to use this video with opencv methods. Have you ever encountered with a similar situation?
Adrian Rosebrock
It seems like the frame/image array has been flattened in some manner. It’s hard to say what the problem is, I have never encountered that issue before. My only suggestion would be to ensure you have installed the proper video codecs for the video file and that OpenCV supports those codecs.
Alex
Hi Adrian! I am just wondering why I got this error constantly: error: (-215:Assertion failed) size.width>0 && size.height>0 in function ‘cv::imshow’; I searched it and found that maybe the path is not found. However, when I execute the EAR I could still get and only get ONE pair of values (namely, left, right and average), this should not be the case right?
As your code is written for command line and I am writing in jupyter, I changed the path variable as a dictionary, is that matters?
Adrian Rosebrock
It sounds like OpenCV cannot access your webcam or video file. Double-check your file paths if you are using a video file. If using a webcam, make sure OpenCV can access it.
ahmet öztürk
hello adrian. I want to use the program that counts eye blinks to use in a research. I used the demo of this program. How can I get this program which gives averages of blinking numbers over a given time period. Can I also get an information about this program with technical information? Thanks
Adrian Rosebrock
The blog post itself serves as documentation for the technical information. If you choose to use it for research make sure you cite the tutorial.
Abhijeet
Hi Adrian,
Thanks for the great Job. I am trying to recognize blink detection having faces with spectacles on but could not recognize it. As far as i understand face landmark predictors detect facial, points regardless of whether you are wearing spectacles or not.So i am unable to get where it fails.could you please suggest what steps are supposed to be taken.
Cheers
Pham
Hi Adrian,
The method works well on the images that need to have the face. In my dataset, I just have the left eye and right eye (similar to Figure 3 above) captured by the camera that attached to two eyes of the person.
Can you give me some advice on how to prepare data and train to detect 6 those points?
My dataset contains thousands of images as in this blog in “Figure 3: The 6 facial landmarks associated with the eye.”
Laura Giraldo
Hi Adrian. Thank you for the code!. But I have a problem. I have OpenCV on a virtual machine, then, I have my project on jupyter. How can I excute the command from this virtual machine?. Thank you so much!
Adrian Rosebrock
I would recommend you simply execute the code via the command line. While I’m happy to provide the code and tutorial for free I cannot debug your dev environment.
Owen lee
Awesome!
Thank you for your ability
Adrian Rosebrock
Thanks Owen.
Deepak
Hi Adrian,
The blog is quite impressive and worked in first try after following the steps mentioned. Great!
The example identifies blinks even if we put an photo/ snap in front of video. We want that when photo is placed in front of video then blinks should not be considered.
What we need to achieve this.
Thanks,
Deepak
Arslan Ali
Hi Adrian,
Thanks for the great project. I’m trying to modify it in order to create 3-functions. First one detects only Single-blinks ( which is already done there by you ).
The second function detects only 2-consecutive blinks and the third function counts only 3-consecutive blinks. But i’m unable to come up with any logic to do so. Can you help me out please.
Eder
Hi Adrian,
I am working on a project to drive a device through eye tracking. I could perfectly detect the eyes and pupils based on their material. I can’t identify the correct region the user is looking at. Is there a way to define regions on the screen to be identified based on the user’s eyes?
Adrian Rosebrock
That’s a calibration-related problem. It’s more challenging than it appears on the surface. Start by focusing your research efforts on “camera and eye calibration”.
Khayam khan
How can we find out drowsiness using eye blinks..
i mean the average rate of eye blinking is 13 to 20 per min so we have to wait for the whole minute to count the eye blinks…
Adrian Rosebrock
Have you taken a look at my drowsiness detection tutorial? I would suggest starting there.
Sanjay J
I am using a Raspberry Pi 3. The RPi freezes when I execute
python detect_blinks.py –shape-predictor shape_predictor_68_face_landmarks.dat
I am using it within a venv using workon cv.
Is it the right device or should I use a Windows 10 laptop with Python ? I was unable to install dlib. But will try again.
Adrian Rosebrock
If you’re using a Raspberry Pi you should follow this tutorial instead. Specifically, swap in Haar cascades for face detection as they will be faster on the RPi.
Abusufyan Sher
Sanjay as Dlib give so many warnings and errors like Cmake and windows 10 SDK,
For Dlib installation first install Visual studio 2015 or latest, then install visual studio build tools 2019 and update C++ packages. which maybe 1 to 4GB.
after successfull, then import Cmake library and after that import Dlib.
Harsha R S
This project is quite impressive. So even I am developing the same project with some additional features such as displaying a timer like how you display the EAR and I want to display the timer till 60 seconds , after that the timer restarts and the number of blinks in a duration of 60 seconds are stored in-order to send a notification to the user of the system if the blink rate or the blinks fall below the normal blink rate which we initialize to some default value. So can I get some assistance in developing the same?.
Hoping for the solution for my queries. (1. Display Timer 2. Send a notification to the user)
thank You.
Jason K
Hi Adrian,
Excellent topics and good coding tutorials! Just to let you know our left and right eye blink differently. Quite astounding to see it with your code. With many compliments.
Adrian Rosebrock
Thanks Jason!
Anthony The Koala
Dear Dr Adrian,
In your earlier reply “Adrian Rosebrock April 17, 2018 at 9:15 am” someone mentioned about smile detection. I would like to know/extend this to (a) different kinds of smiles such as closed mouth/showing teeth and (b) frowns and (c) sadness.
Question please:
Is the aspect ratio calculation mentioned in the earlier reply the minimum requirement for all variations of smile, frowns and sadness? Are additional methods needed to capture all variations of smile, frown and sadness.
Thank you,
Anthony of Sydney
Leiu
Hi,Adrian.Thanks for your detailed tutorials!!! u are such a nice guy,cuz i noticed u almost reply anyones comments,i am a new student in deep-learning and Opencv from China.
whats more, i want to ask u about how do u draw the curve of variables of ear(eye aspect ratio)? I tried to draw it by matplotlib packages,is that right?
Adrian Rosebrock
The actual drawing is not using OpenCV (not matplotlib).
Leiu
Thanks for ur replying.and i already figured it out by matplotlib.But i still have a question wanna to ask you.
Why after i run the code with your provided video file ,it shows an error:Nonetype object has no attribute shape when your video is over.
I think it should jump out from the loop cuz the vs.more is false.but WHY it failed
Adrian Rosebrock
OpenCV could not read your image/frame. See this tutorial for more details.
Urvashi Patel
Hello sir, Thank you so much for sharing this information. But i have faced some issue. when i detect my face then it complete consider blink but when i see any photos through webcam then it also consider blink how it possible?
Adrian Rosebrock
Perhaps incorporate liveness detection into your algorithm.
Michael Cain
I got to this lesson through your 17-day class. Getting this one to work on my face live from my web camera is going to be an interesting exercise. I’m acquiring “old guy” face, the relevant parts of which are narrowed eyes and thick dark eyebrows. As applied in the provided code, the dlib software jumps back and forth between returning values for my actual eyes, or for the space between my eyes and eyebrows. Even when it’s using my actual eyes, their narrowness tends to fool the simple EAR test: it either thinks I’m blinking a lot, or not at all.