A few months ago I demonstrated how to install the Keras deep learning library with a Theano backend.
In today’s blog post I provide detailed, step-by-step instructions to install Keras using a TensorFlow backend, originally developed by the researchers and engineers on the Google Brain Team.
I’ll also (optionally) demonstrate how you can integrate OpenCV into this setup for a full-fledged computer vision + deep learning development environment.
To learn more, just keep reading.
Installing Keras with TensorFlow backend
The first part of this blog post provides a short discussion of Keras backends and why we should (or should not) care which one we are using.
From there I provide detailed instructions that you can use to install Keras with a TensorFlow backend for machine learning on your own system.
TensorFlow? Theano? Who cares?
It’s important to start this discussion by saying that Keras is simply a wrapper around more complex numerical computation engines such as TensorFlow and Theano.
Keras abstracts away much of the complexity of building a deep neural network, leaving us with a very simple, nice, and easy to use interface to rapidly build, test, and deploy deep learning architectures.
When it comes to Keras you have two choices for a backend engine — either TensorFlow or Theano. Theano is older than TensorFlow and was originally the only choice when selecting a backend for Keras.
So why might you want to use TensorFlow over a different backend (such as the no-longer-being-developed Theano)?
The short version is that TensorFlow is extremely flexible, allowing you to deploy network computation to multiple CPUs, GPUs, servers, or even mobile systems without having to change a single line of code.
This makes TensorFlow an excellent choice for training distributed deep learning networks in an architecture agnostic way, something that Theano does not (currently) provide.
To be totally honest with you, I started using Keras well before TensorFlow was released (or even rumored to exist) — this was back when Theano was the only possible choice of backend.
I haven’t given much thought to whether Theano or TensorFlow should be my “go to” backend. Theano was working well for what I needed it for, so why bother switching?
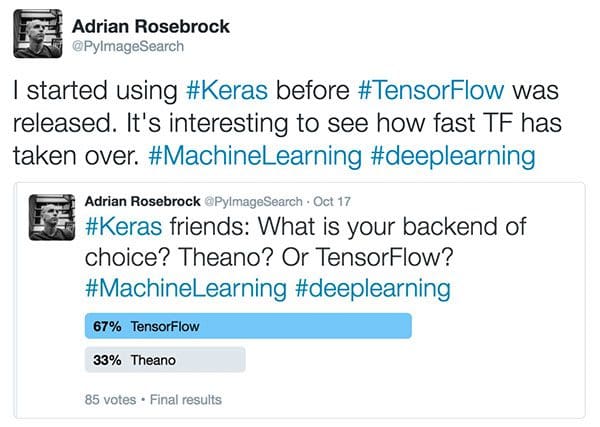
My eyes started to open when I ran this recent poll on Twitter asking my followers which backend they preferred when using Keras:

67% of respondents said they were using TensorFlow as their backend. I was honestly quite surprised. How, as a long-time Keras user, could I possibly be in the minority?
This 67% of respondents might be swayed since TensorFlow is now the default backend when installing Keras…or it could be because many of my followers are finding TensorFlow a better, more efficient backend (and using more TensorFlow specific features).
Regardless of the exact reasoning, there is one thing you cannot dispute: TensorFlow is here to stay.
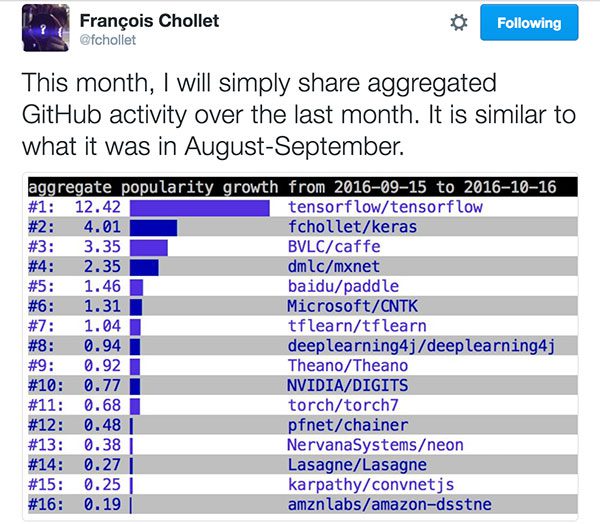
If you need further proof all you need to do is take a look at this deep learning GitHub activity analysis from François Chollet (creator and maintainer of Keras):

As we can see, TensorFlow is topping the charts by a mile (#1) with Theano at #9.
While Keras makes it simple for us to switch backends (all we need to do is install our respective backends and edit a simple JSON configuration file), we still need to be mindful of what the trends are telling us: that TensorFlow will continue to be the preferred Keras backend in the (near) future.
Update 2018-06-04: Theano is no-longer being actively developed (announcement 2017-09-29) and as you guessed it, TensorFlow is now the default.
Step #1: Setup Python virtual environment
If you’ve ever read any of my previous tutorials (whether for OpenCV, CUDA, Keras, etc.) you’ve likely picked up on the fact that I’m a huge fan of using Python virtual environments.
I especially recommend Python virtual environments when working in the deep learning ecosystem. Many Python-based deep learning libraries require different versions of various dependencies.
For example, if you wanted to use Keras + Theano together you would need the latest version of Theano (i.e., their latest GitHub commit, which isn’t always the version published on PyPI).
However, if you wanted to try a library such as scikit-theano you would need a previous version of Theano that is not compatible with Keras.
The dependency version issue only compounds as you start to add in other Python libraries, especially deep learning ones (such as TensorFlow), which are volatile in their very nature (since deep learning is a fast-moving field with updates and new features being pushed online every day).
The solution?
Use Python virtual environments.
I won’t go into a huge rant on the benefits of Python virtual environments (as I’ve already done that in the first half of this blog post), but the gist is that by using Python virtual environments you can create a separate, sequestered Python environment for each of your projects, ensuring that each Python environment is independent of each other. Doing this allows you to totally and completely avoid the version dependency issue.
I’m going to assume that you have both virtualenv and virtualenvwrapper installed on your system (if not, both are pip-installable and require only a small update to your shell configuration; just follow the links above for more information).
Once you have virtualenv and virtualenvwrapper installed, let’s create a Python 3 virtual environment exclusively for our Keras + TensorFlow-based projects:
$ mkvirtualenv keras_tf -p python3
I’ll name this virtual environment keras_tf for Keras + TensorFlow (I also have a virtual environment named keras_th for Keras + Theano).
Anytime you need to access a given Python virtual environment just use the workon command:
$ workon <virtual_env_name>
In this particular case we can access the keras_tf virtual environment using:
$ workon keras_tf
Again, while this is an optional step, I really encourage you to take the time to properly setup your development environment if you are even remotely serious about doing deep learning research, experiments, or development using the Python programming language — while it’s more work upfront, you’ll thank me in the long run.
Step #2: Install TensorFlow
Installing TensorFlow is trivially easy as pip will do all the heavy lifting for us:
$ pip install --upgrade tensorflow
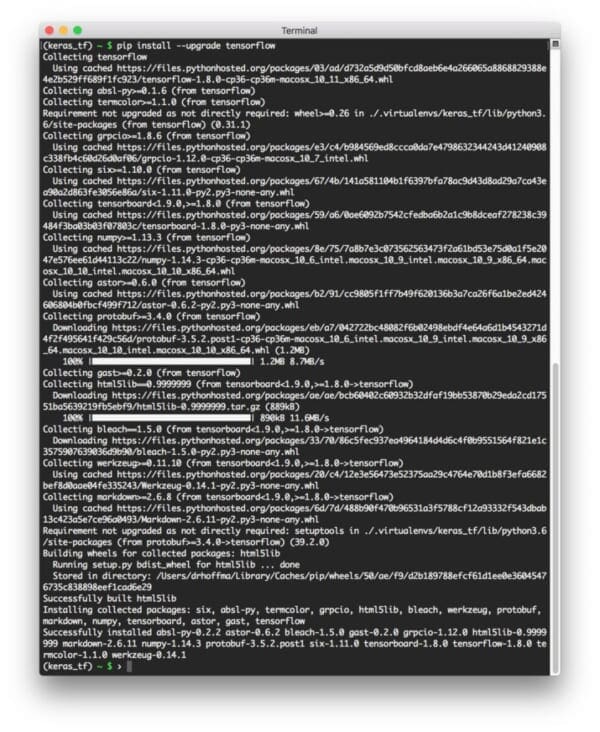
Below you can see a screenshot of TensorFlow being downloaded and installed:

Assuming your TensorFlow install exited without error you can now test the installation by opening a Python shell and trying to import the tensorflow package:
$ python
>>> import tensorflow
>>>
Step #3: Install Keras
Installing Keras is even easier than installing TensorFlow.
First, let’s install a few Python dependencies:
$ pip install numpy scipy
$ pip install scikit-learn
$ pip install pillow
$ pip install h5py
Followed by installing keras itself:
$ pip install keras
That’s it! Keras is now installed on your system!
Step #4: Verify that your keras.json file is configured correctly
Before we get too far we should check the contents of our keras.json configuration file. You can find this file in ~/.keras/keras.json .
Open it using your favorite text editor and take a peak at the contents. The default values should look something like this:
{
    "floatx": "float32",
    "epsilon": 1e-07,
    "backend": "tensorflow",
    "image_data_format": "channels_last"
}
Specifically, you’ll want to ensure that image_data_format is set to "channels_last" (indicating that the TensorFlow image dimension ordering is used rather than "channels_first" for Theano).
You’ll also want to ensure that the backend is properly set to tensorflow (rather than theano ). Again, both of these requirements should be satisfied by the default Keras configuration but it doesn’t hurt to double check.
Make any required updates (if any) to your configuration file and then exit your editor.
A quick note on image_data_format
You might be wondering what exactly image_data_format controls.
Using TensorFlow, images are represented as NumPy arrays with the shape (height, width, depth), where the depth is the number of channels in the image.
However, if you are using Theano, images are instead assumed to be represented as (depth, height, width).
This little nuance is the source of a lot of headaches when using Keras (and a lot of if statments looking for these particular configurations).
If you are getting strange results when using Keras (or an error message related to the shape of a given tensor) you should:
- Check your backend.
- Ensure your image dimension ordering matches your backend.
Can’t find your keras.json file?
On most systems the keras.json file (and associated subdirectories) will not be created until you open up a Python shell and directly import the keras package itself.
If you find that the ~/.keras/keras.json file does not exist on your system, simply open up a shell, (optionally) access your Python virtual environment (if you are using virtual environments), and then import Keras:
$ workon keras_tf
$ python
>>> import keras
>>> quit()
From there, you should see that your keras.json file now exists on your local disk.
If you see any errors when importing keras go back to the top of this section and ensure your keras.json configuration file has been properly updated.
Step #5: Sym-link in OpenCV (optional)
This step is entirely optional, but if you have OpenCV installed on your system and would like to access your OpenCV bindings from a Python virtual environment, you first need to sym-link in the cv2.so file to the site-packages directory of your environment.
To do this, first find where your cv2.so bindings are located on your system:
$ cd /
$ sudo find . -name '*cv2.so*'
./Users/adrianrosebrock/.virtualenvs/cv/lib/python3.6/site-packages/cv2.so
./Users/adrianrosebrock/.virtualenvs/gurus/lib/python3.6/site-packages/cv2.so
./Users/adrianrosebrock/.virtualenvs/keras_th/lib/python3.6/site-packages/cv2.so
./usr/local/lib/python3.6/site-packages/cv2.so
You’ll want to look for the global install of OpenCV which is normally in the /usr/local/lib directory if you built OpenCV from source (unless you specified a custom OpenCV install directory).
Note: The other cv2.so files returned by my find command are simply sym-links back to the original cv2.so file in /usr/local/lib .
From there, change directory into the site-packages directory of your Python virtual environment (in this case the keras_tf environment) and create the sym-link:
$ cd ~/.virtualenvs/keras_tf/lib/python3.6/site-packages/
$ ln -s /usr/local/lib/python3.6/site-packages/cv2.so cv2.so
$ cd ~
Again, this step is totally optional and only needs to be done if you want to have access to OpenCV from inside the keras_tf virtual environment.
Step #6: Test out the Keras + TensorFlow installation
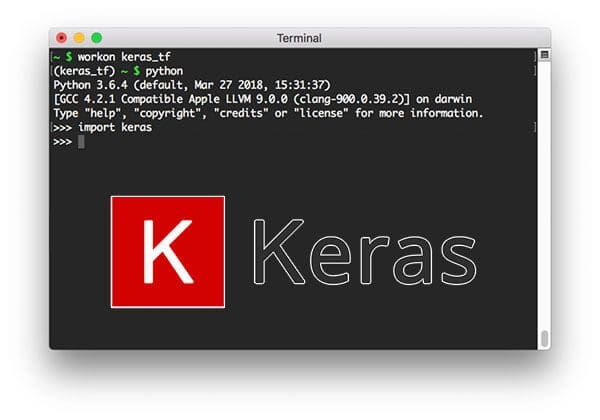
To verify that Keras + TensorFlow have been installed, simply access the keras_tf environment using the workon command, open up a Python shell, and import keras :
(keras_tf) ~ $ python
Python 3.6.4 (default, Mar 27 2018, 15:31:37)
[GCC 4.2.1 Compatible Apple LLVM 9.0.0 (clang-900.0.39.2)] on darwin
Type "help", "copyright", "credits" or "license" for more information.
>>> import keras
Using TensorFlow backend.
>>>
Specifically, you can see the text Using TensorFlow backend display when importing Keras — this successfully demonstrates that Keras has been installed with the TensorFlow backend.
Provided you performed the optional Step #5 and want to to test out your OpenCV sym-link, try importing your OpenCV bindings as well:
(keras_tf) ~ $ python
Python 3.6.4 (default, Mar 27 2018, 15:31:37)
[GCC 4.2.1 Compatible Apple LLVM 9.0.0 (clang-900.0.39.2)] on darwin
Type "help", "copyright", "credits" or "license" for more information.
>>> import keras
Using TensorFlow backend.
>>> import cv2
>>>
If you get an error message related to OpenCV not being found then you’ll want to double check your sym-link and ensure it is pointing to a valid file.
What's next? We recommend PyImageSearch University.
86+ total classes • 115+ hours hours of on-demand code walkthrough videos • Last updated: January 2026
★★★★★ 4.84 (128 Ratings) • 16,000+ Students Enrolled
I strongly believe that if you had the right teacher you could master computer vision and deep learning.
Do you think learning computer vision and deep learning has to be time-consuming, overwhelming, and complicated? Or has to involve complex mathematics and equations? Or requires a degree in computer science?
That’s not the case.
All you need to master computer vision and deep learning is for someone to explain things to you in simple, intuitive terms. And that’s exactly what I do. My mission is to change education and how complex Artificial Intelligence topics are taught.
If you're serious about learning computer vision, your next stop should be PyImageSearch University, the most comprehensive computer vision, deep learning, and OpenCV course online today. Here you’ll learn how to successfully and confidently apply computer vision to your work, research, and projects. Join me in computer vision mastery.
Inside PyImageSearch University you'll find:
- ✓ 86+ courses on essential computer vision, deep learning, and OpenCV topics
- ✓ 86 Certificates of Completion
- ✓ 115+ hours hours of on-demand video
- ✓ Brand new courses released regularly, ensuring you can keep up with state-of-the-art techniques
- ✓ Pre-configured Jupyter Notebooks in Google Colab
- ✓ Run all code examples in your web browser — works on Windows, macOS, and Linux (no dev environment configuration required!)
- ✓ Access to centralized code repos for all 540+ tutorials on PyImageSearch
- ✓ Easy one-click downloads for code, datasets, pre-trained models, etc.
- ✓ Access on mobile, laptop, desktop, etc.
Summary
In today’s blog post I demonstrated how to install the Keras deep learning library using the TensorFlow backend.
When it comes to choosing a backend for Keras you need to consider a few aspects.
The first is the popularity and therefore the probability that a given library will continue to be updated and supported in the future. In this case, TensorFlow wins hands down — it is currently the most popular numerical computation engine in the world used for machine learning and deep learning.
Secondly, you need to consider the functionality of a given library. While Theano is just as easy to use as TensorFlow out-of-the-box (in terms of Keras backends), TensorFlow allows for a more architecture agnostic deployment. By using TensorFlow it becomes possible to train distributed deep learning networks across CPUs, GPUs, and other devices all without having to change a single line of code.
Since Theano development has officially ceased in September 2017, I have fully switched to TensorFlow and I’m not looking back.
If you enjoyed this install tutorial and found it helpful be sure to leave a note in the comments!
And if you would like to receive email updates when new blog posts are published on the PyImageSearch blog, please enter your email address in the form below.

Join the PyImageSearch Newsletter and Grab My FREE 17-page Resource Guide PDF
Enter your email address below to join the PyImageSearch Newsletter and download my FREE 17-page Resource Guide PDF on Computer Vision, OpenCV, and Deep Learning.


