
Table of Contents
- Grounding DINO: Open Vocabulary Object Detection on Videos
- Why Language Makes Open-Set Detection Possible
- Grounding DINO Architecture
- Comparison with Related Models
- Applications
- Challenges
- Configuring Your Development Environment
- Setup and Imports
- Load the Grounding DINO Model
- Detect Objects in Frame
- Process the Video
- Launch the Gradio Application
- Output
- Summary
Grounding DINO: Open Vocabulary Object Detection on Videos
Imagine asking a friend to find any object in a picture simply by describing it. This is the promise of open-set object detection: the ability to spot and localize arbitrary objects (even ones never seen in training) by name or description.

Unlike a closed-set detector trained on a fixed list of classes (say, “cat”, “dog”, “car”), an open-set detector can handle new categories on the fly, simply from language cues. This is like a teacher asking students to point out “an apple” or “the hedgehog” in a photo without ever having shown apples or hedgehogs during lessons.
Just as a classroom teacher can ask students to find objects by name, modern vision models can be guided by language to “detect anything you want”. Grounding DINO is a model that does exactly this: it “marries” a powerful vision detector (DINO) with language pre-training so it can understand text prompts.
In practice, this means you can give Grounding DINO a sentence like “red bike under the tree” or a simple noun, and it will draw bounding boxes around those objects, even if they were not part of its original training labels. This is achieved by aligning vision and language: region proposals are scored against text embeddings so that any novel concept can be detected.
This makes the system hugely flexible: it can be used in robotics (“pick up the blue mug”), search (“find all photos containing butterflies”), and image editing — for example, combining grounding with a diffusion model lets users say “replace the white cat with a tiger” and have the system first detect the cat via language and then inpaint a tiger. Crucially, it allows models to generalize to novel categories via language-based grounding rather than requiring labeled training images for every class.
An intuitive analogy: think of the model as a detection-minded student, and the text prompt as the teacher’s question. The student scans the image and listens to the teacher’s words. Cross-attention layers in the model act like the student’s attention being directed to relevant parts of the image by the teacher’s hint. Later, a matching process pairs each proposed object with the ground truth, much like a teacher matching student answers to the correct answer sheet. In Grounding DINO, feature fusion and cross-attention are used throughout the pipeline so that the student never loses track of the teacher’s instructions.
In practice, open-set detectors are evaluated not only on novel-category object detection (Common Objects in Context (COCO)/Large Vocabulary Instance Segmentation (LVIS) zero-shot) but also on referring expression comprehension (REC) tasks, where the query can include attributes (e.g., “man wearing blue hat”). Grounding DINO explicitly addresses all of these, whereas many prior works focused on just novel classes.
In this tutorial, we’ll start by briefly reviewing its architecture — how the model fuses image and text features through multi-stage attention to localize any object described in natural language.
Next, we’ll walk through a step-by-step implementation to run Grounding DINO on videos. You’ll learn how to:
- Load the pretrained model and processor from the 🤗 Transformers library,
- Detect objects in a single frame using a text prompt, and
- Extend the same logic to process entire videos frame by frame.
Finally, we’ll wrap it all up in an interactive Gradio application that lets users upload a video, enter a prompt like “a red car” or “a person wearing a blue hat”, and instantly see the detections in action.
By the end, we’ll have a working open-set detection pipeline powered by Grounding DINO — capable of finding anything we can describe in words.
This lesson is the 1st of a 2-part series on Vision-Language Models — Grounded Vision Models (Grounding DINO and SAM):
- Grounding DINO: Open Vocabulary Object Detection on Videos (this tutorial)
- Grounded SAM 2: Extending Open-Set Detection to Segmentation and Video Tracking
To learn what Grounding DINO is and how to perform open-vocabulary object detection on videos in an interactive Gradio app, just keep reading.📖
Would you like immediate access to 3,457 images curated and labeled with hand gestures to train, explore, and experiment with … for free? Head over to Roboflow and get a free account to grab these hand gesture images.
Why Language Makes Open-Set Detection Possible
Traditional detectors can only recognize what they were trained on. If you train on 80 object classes (such as COCO), you can’t expect it to spot “unicorns” or “martians”. Language bridges this gap: it provides a semantic space that generalizes to novel concepts. Grounding DINO injects text understanding into every stage of detection, allowing it to “imagine” and localize new objects from a description.
GLIP: Grounded Language-Image Pre-Training
GLIP (Grounded Language-Image Pre-training) is a 2022 model that pioneered the fusion of detection and language. It treats object detection as a special case of phrase grounding: during training, the model sees images with region-phrase pairs (some human-annotated, some pseudo-labeled from image captions) and learns to align each region with a phrase.
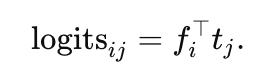
Concretely, GLIP uses a Dynamic Head one-stage detector (multi-scale FPN (Feature Pyramid Network)) for images and a Transformer (e.g., BERT (Bidirectional Encoder Representations from Transformers)) for text, and trains with a contrastive loss that aligns region features with the corresponding token embeddings. In effect, each detection prediction is scored by the dot product between the region’s feature and the embedding of each token (category name) in the prompt. This allows GLIP to detect arbitrary categories given in text prompts.
GLIP is pre-trained on a massive 27M-image corpus (3M annotated + 24M web-crawled). The result is strong zero-shot transfer: for example, without seeing any COCO images, GLIP can still achieve 49.8 AP on COCO and 26.9 AP on LVIS. After fine-tuning on COCO, GLIP achieves 60.8 AP (val), surpassing the previous state of the art.
However, GLIP’s one-stage backbone (Dynamic Head) is conceptually less flexible than a Transformer: it intersperses vision-language fusion only in the “neck” (feature pyramid) stage, limiting deep fusion of the modalities. In short, GLIP showed the power of grounded pre-training but leaves room for more fusion and stronger backbones.
Grounding DINO instead deeply fuses the modalities at multiple stages, which makes it even more powerful. In simple terms, GLIP is like a student who hears the teacher’s question once and then searches. Grounding DINO is like a student who is reminded of the teacher’s question at every step, sharpening their understanding.
The DINO Detector (Closed-Set DETR)
DINO (DETR with Improved deNoising anchOr boxes) is a 2022 Transformer-based object detector. It follows the end-to-end DETR paradigm (a Vision Transformer encoder plus a Transformer decoder with learned queries) but introduces improvements:
- denoising anchor queries,
- a mixed query selection, and
- a “look-forward” scheme.
In practice, DINO achieves state-of-the-art closed-set performance (e.g., 63.3 AP on COCO test-dev with a Swin-L backbone), far outperforming older DETR variants.
Architecturally, DINO consists of an image backbone (e.g., ResNet or Swin) producing multi-scale features, followed by a Transformer encoder and decoder with a fixed number of “object queries”. Each query yields a box and class via a standard classification/regression head.
Because it is end-to-end, DINO needs no post-processing (no non-maximum suppression (NMS)) and is highly scalable. However, DINO itself is closed-set — its classification head uses fixed weights for known classes, so it cannot detect novel concepts without modification. This limitation motivates incorporating language into DINO’s pipeline. Grounding DINO extends it with language, so that each query can also consider the text prompt.
Grounding DINO Architecture
Grounding DINO extends DINO to open-set detection by tightly integrating language. Its overall architecture (Figure 1) is a dual-encoder, single-decoder model: one Transformer backbone for the image (e.g., Swin), one for the text (e.g., BERT), followed by a multi-stage fusion pipeline and a decoder.
Figure 1 shows the Grounding DINO architecture. The image and text are processed by separate Transformers. A Feature Enhancer (neck) fuses vision and language, a Language-Guided Query Selection picks text-relevant queries, and a Cross-Modality Decoder (head) uses self-attention plus interleaved image-to-query and text-to-query attention. Outputs are object boxes grounded to text.
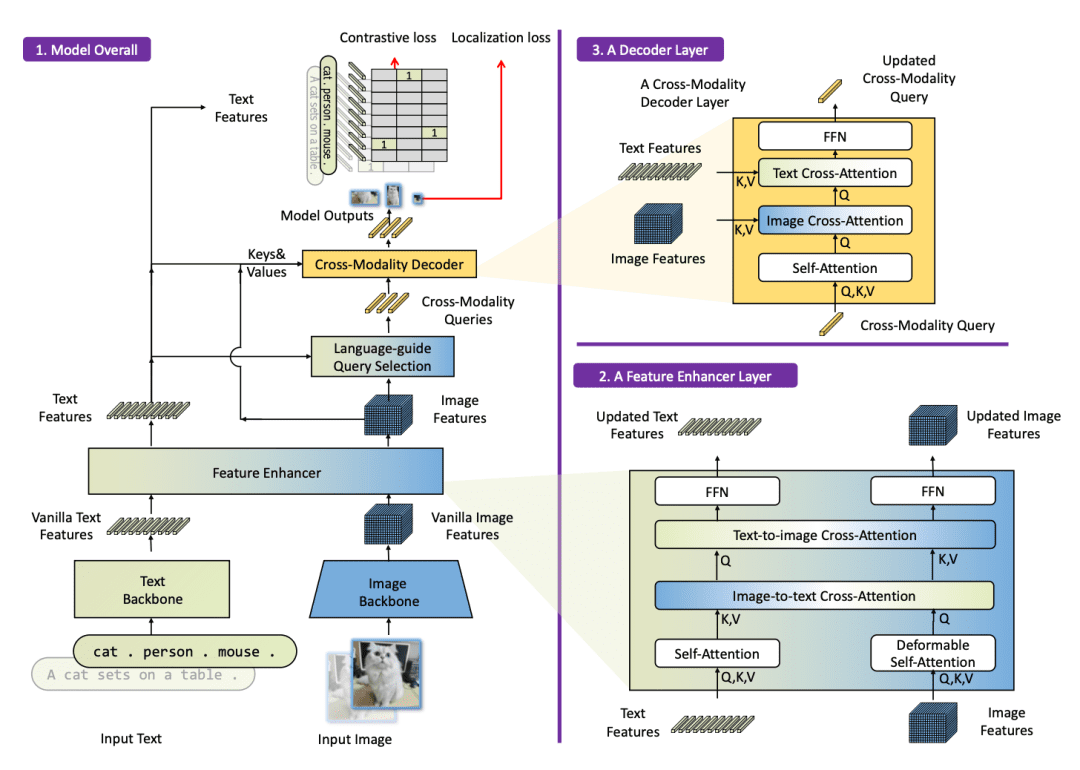
Specifically, Grounding DINO introduces three tightly integrated fusion components:
- A Feature Enhancer (Neck) that stacks self-attention and cross-attention layers to mix image and text features early on.
- A Language-Guided Query Selection step that uses the text to pick which query embeddings to focus on.
- A Cross-Modality Decoder (Head) that uses additional image-to-text and text-to-image attention to refine each query with linguistic cues.
In metaphorical terms, the feature enhancer is like having the teacher (language) present during lesson planning (enhancing features), the query selection is the teacher assigning the right questions to each student (choosing queries), and the cross-modality decoder is the teacher reviewing the students’ answers and giving feedback (refining predictions).
This “three-phase fusion” means language guides the model from start to finish, enabling it to detect “things never seen before” by name.
Let’s briefly discuss the key components.
Feature Enhancer (Neck Fusion) and Cross-Attention: The Teacher’s Guidance
The image backbone produces multi-scale feature maps, and the text backbone produces token embeddings. The “feature enhancer” stacks several fusion layers. Each fusion layer does:
- Deformable Self-Attention on image features (e.g., DINO) and standard self-attention on text features;
- cross-attention from image to text and from text to image.
At the heart of Grounding DINO is cross-attention, which enables the model’s image and text components to interact. Think of cross-attention as the teacher whispering hints to the student. For instance, the model has a set of image feature vectors (from a backbone like Swin) and a set of text feature vectors (from a language model), and cross-attention aligns them.
In cross-attention, image queries attend to text keys/values and vice versa. Concretely, in a text-to-image attention layer, the text features query (“Where in the image is ‘horse’?”) by comparing it with image features. In an image-to-text layer, image features ask (“Which word in the description is most relevant to this patch of pixels?”).
Imagine a circular brain diagram: one part processing vision and another part processing language. Cross-attention connections (arrows) weave between them, enabling joint reasoning. In practice, each cross-attention head computes a weighted sum. For example, given an image query vector q, it computes attention scores over all text feature vectors {k_t} and uses them to read a combined text context. This is repeated across layers, so image features are repeatedly infused with language meaning. It’s like the student constantly checking back to the teacher’s question at each step of their reasoning.
Mathematically, if  ,
,  ,
,  are query/value/key matrices, a scaled dot-product attention does

In Grounding DINO, there are two-way attentions: image queries on text, and text queries on image. By stacking these, the model aligns visual patterns with words. In effect, the model learns that the word “apple” corresponds to round red regions, etc. This cross-modal fusion has been shown to significantly improve open-set detection performance.
Concretely, at each layer, the image features  and text features
  are updated by attending to each other. For example, one cross-attention sub-layer computes

with analogous form for ") .
.
In simple terms, each image token can incorporate information from relevant text tokens and vice versa. This early fusion (phase 2 in Figure 1) grounds the visual features in language before queries are formed.
Language-Guided Query Selection (Phase B)
In DETR/DINO, a fixed set of learned query embeddings is used to “look for” objects. Grounding DINO adds a clever twist: it uses the text to choose or weight those queries before the decoder. Intuitively, imagine the teacher (language prompt) assigning specific questions to each student (query). If the prompt mentions a “dog” and a “ball”, some queries will be steered to focus on dog-like features, others on ball-like features.
Technically, Grounding DINO creates additional “prompt queries” derived from the text (e.g., each word or sub-phrase), and computes a compatibility score between these and the vision queries. It then selects (or re-weights) the top queries that best match the text. In our teacher metaphor, this is the teacher picking which exam questions (queries) correspond to the topics (words in the prompt). Queries irrelevant to the words are down-weighted or ignored. This ensures the model’s decoder spends its effort on the right objects, boosting accuracy on novel categories.
Concretely, it computes dot-product “logits” between every image feature vector  and every text token
  :
:
It then computes the maximum response across text tokens for each image patch and selects the top- image tokens as queries.
The selected features become the content part of the query vectors (the positional part is initialized as dynamic anchors, as in DINO). This steering ensures that queries focus on regions likely relevant to the text prompt.
Cross-Modality Decoder (Head Fusion, Phase C)
The decoder is a stack of Transformer layers that alternate three operations per layer:
- self-attention among the query vectors
- cross-attention from image features to queries
- cross-attention from text features to queries (then an FFN)
Compared to vanilla DINO, each layer has two cross-attention blocks (one attending to the image features, one to the text features). Formally, if is a set of queries, is the image features, and is the text features, each layer does:
")
^\top / d)(I W_v) (\text{image cross-attn})")
^\top / d)(T W_v^\prime) (\text{text cross-attn})")
(Then apply a feed-forward network.) Each query embedding is thus updated in lockstep with information from both modalities.
In equations, a generic attention sub-layer uses the well-known formula:
 = \text{softmax}( (Q K^\top) / \sqrt{(d)} ) * V")
which we apply using and drawn from either image or text features. This deep fusion helps the queries refine their spatial (image) and semantic (text) understanding simultaneously.
Sub-Sentence Text Representation
When encoding the text prompt (which might list multiple category names or a phrase), Grounding DINO uses a sub-sentence strategy. Instead of encoding the entire sentence or concatenating words naively (which can lead to unwanted interactions between unrelated words), it applies masks so that each concept’s words attend only to their own words.
In effect, each noun phrase or category name is encoded independently (block-diagonal attention), preserving fine-grained semantics without cross-talk. This reduces confusion when the prompt contains many words.
Bipartite Matching and Losses
During training, we need to match predicted boxes to the ground truth in a one-to-one manner (this is the DETR-style bipartite matching). Conceptually, it’s like matching each student’s answer sheet to exactly one question — we compute a cost matrix and find the lowest-cost assignment. Grounding DINO uses the Hungarian algorithm to find the best matching σ between predictions  and ground truths
  .
.
The loss for Grounding DINO then includes the usual terms: a classification (or contrastive) loss for the predicted class label (or text token), and localization losses (L1 distance and Generalized IoU) for the bounding box. In formula form, one can write (after matching):

where  are class (token) logits, and
  are box coords. Liu et al. (2024, Grounding DINO) use the same weights (2.0 for class, 5.0 for L1, 2.0 for GIoU) in the matching cost. In analogy, this is like grading each student’s answer (classification) and measuring how close their drawn box is to the true object (regression losses), summing the “error” over all matched pairs.
This end-to-end, set-based loss means Grounding DINO can be trained without heuristic post-processing such as NMS. It learns to score and align detections solely through this matching loss, greatly simplifying the pipeline (just as DINO does for closed-set tasks).
Together, these components turn the closed-set DINO into an open-set detector: the model can be given any text query (e.g., category names or referring expressions) and output the matching bounding boxes.
Comparison with Related Models
There are several recent open-vocabulary detectors, but Grounding DINO stands out in how it fuses text and vision:
GLIP
Reformulates detection as phrase grounding and trains on object-text pairs. It fuses vision and language early (in the neck) and uses contrastive loss to align regions with words. GLIP is effective but built on a one-stage CNN (DyHead), so its fusion is less uniform. Grounding DINO, by contrast, uses a fully Transformer-based pipeline (as in language models), allowing it to fuse information at every layer.
In simple terms, GLIP listens to the teacher once; Grounding DINO listens continuously. The result is that Grounding DINO often outperforms GLIP on zero-shot tasks.
OWL-ViT
A Google model that attaches classification heads to a Vision Transformer backbone, enabling zero-shot detection by training on open-image-text data. OWL-ViT uses CLIP-like pretraining and then fine-tunes the ViT for boxes. According to recent studies, OWL-ViT “employs a standard ViT for image encoding, removing the final token pooling and adding lightweight box heads to tokens”.
Its design is elegant and simple, but it fuses vision-language only at the final classification stage. Grounding DINO, in contrast, fuses throughout (neck and head).
Standard DINO or DETR
These are closed-set detectors (no language). Grounding DINO is built on DINO and inherits its strengths (like strong anchors and no-NMS end-to-end training), but surpasses it by handling text queries.
In summary, what makes Grounding DINO special is the deep, multi-phase fusion of vision and language. It uses multi-scale image features (from a Swin Transformer) and text embeddings (from a transformer such as BERT), merges them in a “feature enhancer” with deformable attention for images and self-attention for text, then guides queries with the text, and finally decodes with cross-attention to output boxes.
This “complete marriage” lets it detect objects by name with unprecedented accuracy. Indeed, Grounding DINO sets new records on zero-shot benchmarks, significantly beating GLIP and OWL-ViT (e.g., achieving  52.5 AP on COCO in zero-shot mode, versus 46-48 for prior models).
Applications
Because Grounding DINO can detect whatever you tell it to look for, its applications are wide:
- Interactive Retrieval: In large photo databases, one could search “sunset over mountains with animals” and use Grounding DINO to find exactly those scenes, even if no one labeled the images that way. It bridges the gap between textual queries and visual content.
- Robotics and Vision: A robot with Grounding DINO can be given natural-language commands. E.g., “pick up the red ball on the floor.” The detector will find the red ball even if it’s not from a standard class list, enabling flexible robot manipulation and navigation. This is like telling a vacuum cleaner robot to “go to the brown chair,” and having it understand what “chair” means without explicit chair training.
- Assistive Tech: Systems for the visually impaired can describe or locate novel objects mentioned by the user.
- Image Editing: As demonstrated by the authors, Grounding DINO can be combined with a generative model (e.g., Stable Diffusion) to do language-driven edits. For example, ask “replace the apples in this photo with oranges” and the system uses Grounding DINO to mask out the apples, then uses the diffusion model to paint oranges in their place. This guided editing uses the detector’s masks as a focus for the generative model. The result is highly precise edits that remain realistic. Combined with grounded generative models (e.g., Grounded-Language-to-Image Generation (GLIGEN)), one can perform phrase-level edits on detected objects.
- Automated Annotation: The model can automatically label and box objects in new images given vocabulary instructions, speeding up dataset creation (e.g., via tools such as Roboflow’s auto-annotation with Grounding DINO).
Challenges
Open challenges remain.
- Even state-of-the-art models struggle with fine-grained referring expressions: for example, without dedicated training, both GLIP and Grounding DINO perform poorly on REC benchmarks.
- It can be hard to parse complex language (negations, relations) and align it accurately to vision.
- The model also requires large data: Grounding DINO uses less pretraining data than GLIP, which may limit its knowledge of rare concepts.
- As noted by the authors, Grounding DINO produces only bounding boxes (no instance masks), unlike some segmentation-capable models (GLIP-v2/SEEM).
- Finally, open-vocab detection can inherit biases from language models and web data, and its evaluation is not fully standardized (the community uses COCO/LVIS zero-shot, ODinW, RefCOCO, etc.).
- Further research is needed on robustness, efficiency (Grounding DINO-T has 172M params vs GLIP-T’s 232M), and on bridging vision-language grounding and generation.
Configuring Your Development Environment
To follow this guide, you need to have the following libraries installed on your system.
!pip install --q transformers opencv-python pillow gradio
We install transformers to load the Grounding DINO model and processor, opencv-python for advanced computer vision and image processing tasks, pillow for image manipulation, and gradio to build an interactive web interface for our application.
Need Help Configuring Your Development Environment?

All that said, are you:
- Short on time?
- Learning on your employer’s administratively locked system?
- Wanting to skip the hassle of fighting with the command line, package managers, and virtual environments?
- Ready to run the code immediately on your Windows, macOS, or Linux system?
Then join PyImageSearch University today!
Gain access to Jupyter Notebooks for this tutorial and other PyImageSearch guides pre-configured to run on Google Colab’s ecosystem right in your web browser! No installation required.
And best of all, these Jupyter Notebooks will run on Windows, macOS, and Linux!
Setup and Imports
Once installed, we move on to import the required libraries.
import os
import cv2
import torch
import tempfile
import numpy as np
import gradio as gr

from PIL import Image, ImageDraw
from transformers import AutoProcessor, AutoModelForZeroShotObjectDetection
We import os and tempfile to handle file management and temporary storage, cv2 (OpenCV) to read and process images efficiently, torch for tensor operations and can use GPU acceleration when a CUDA-enabled GPU is available and the model is moved to the GPU. We use numpy for numerical operations and array manipulation, and gradio to create an easy-to-use web interface.
We also import Image and ImageDraw from Pillow for image loading and annotation. Finally, we load AutoProcessor and AutoModelForZeroShotObjectDetection from the transformers library, which provides a pre-trained vision-language model (e.g., Grounding DINO or OWL-ViT) for zero-shot object detection.
Load the Grounding DINO Model
Now that our environment is set up, let’s load the Grounding DINO model — a powerful vision-language model capable of open-vocabulary object detection.
model_id = "IDEA-Research/grounding-dino-base"

processor = AutoProcessor.from_pretrained(model_id)
model = AutoModelForZeroShotObjectDetection.from_pretrained(model_id).to("cuda" if torch.cuda.is_available() else "cpu")
We begin by specifying the model checkpoint:
Next, we initialize both the processor and model using Hugging Face’s transformers library:
model_id: points to the Grounding DINO checkpoint hosted on Hugging Face Hubprocessor: handles preprocessing — it prepares both the image and text prompts for the modelmodel: performs the actual inference, predicting object locations and corresponding labels
We also move the model to GPU if one is available to accelerate computation.
Detect Objects in Frame
Now that our model is ready, let’s define a helper function to perform object detection on individual video frames or images.
def detect_objects_in_frame(frame, text_prompt, box_threshold=0.6, text_threshold=0.5):
   image = Image.fromarray(cv2.cvtColor(frame, cv2.COLOR_BGR2RGB))
   inputs = processor(images=image, text=[[text_prompt]], return_tensors="pt").to(model.device)

   with torch.no_grad():
       outputs = model(**inputs)

   results = processor.post_process_grounded_object_detection(
       outputs,
       inputs.input_ids,
       threshold=box_threshold,
       text_threshold=text_threshold,
       target_sizes=[image.size[::-1]],
   )[0]

   draw = ImageDraw.Draw(image)
   for box, score, label in zip(results["boxes"], results["scores"], results["labels"]):
       x0, y0, x1, y1 = box.tolist()
       draw.rectangle([x0, y0, x1, y1], outline="red", width=3)
       draw.text((x0, y0), f"{label} ({score:.2f})", fill="red")

   return cv2.cvtColor(np.array(image), cv2.COLOR_RGB2BGR)
The function detect_objects_in_frame() takes an input frame and a text_prompt (e.g., “person,” “car,” or “dog”) and returns the same image with detected objects outlined.
Here’s how it works step by step:
First, we convert the frame from BGR to RGB using cv2.cvtColor() and then wrap it with Image.fromarray() to create a PIL image object (Line 2).
The processor handles all preprocessing steps — resizing, normalizing, and tokenizing. Here, we pass both the image and the text prompt (wrapped in a nested list to match batch dimensions). Setting return_tensors="pt" converts everything into PyTorch tensors, ready for model inference. Finally, we move these tensors to the same device (CPU or GPU) as the model with .to(model.device) for efficient computation (Line 3).
We perform inference inside a torch.no_grad() context. This tells PyTorch not to track gradients, which saves memory and improves speed since we aren’t training the model (Line 5).
The model processes both the visual and textual embeddings and produces raw detection outputs (Line 6).
The raw outputs need to be translated into human-understandable detections (Lines 8-13). The post_process_grounded_object_detection() method does this by:
- Mapping model predictions back to the original image size (
target_sizes). - Filtering boxes based on confidence thresholds (
box_thresholdandtext_threshold). - Returning final lists of bounding boxes, scores, and associated text labels.
The [0] at the end simply extracts the first item in the result list, as we’re processing a single image (Line 14).
We initialize a drawing canvas on top of our image using Pillow’s ImageDraw (Line 16).
For each detected object:
- The coordinates
(x0, y0, x1, y1)define the bounding box corners. - We draw a red rectangle to mark the object’s location.
- Above the box, we display the predicted label and confidence score (rounded to two decimals).
This visual overlay makes it easy to interpret what the model has detected in the scene (Lines 17-22).
Since we initially converted from BGR → RGB, we now do the reverse before returning the final image. We convert the PIL image back to a NumPy array and reorder the color channels to BGR, ensuring compatibility with OpenCV visualization and video writing functions (Line 22).
Process the Video
Now that we can detect objects in individual frames, the next step is to process an entire video.
def process_video(video_path, text_prompt):
   cap = cv2.VideoCapture(video_path)
   fps = cap.get(cv2.CAP_PROP_FPS)
   width = int(cap.get(cv2.CAP_PROP_FRAME_WIDTH))
   height = int(cap.get(cv2.CAP_PROP_FRAME_HEIGHT))

   out_path = os.path.join(tempfile.gettempdir(), "output.mp4")
   fourcc = cv2.VideoWriter_fourcc(*'mp4v')
   out = cv2.VideoWriter(out_path, fourcc, fps, (width, height))

   frame_count = int(cap.get(cv2.CAP_PROP_FRAME_COUNT))
   frame_idx = 0

   while cap.isOpened():
       ret, frame = cap.read()
       if not ret:
           break

       # Run detection every N frames or all frames
       annotated = detect_objects_in_frame(frame, text_prompt)
       out.write(annotated)

       frame_idx += 1
       if frame_idx % 10 == 0:
           print(f"Processed {frame_idx}/{frame_count} frames...")

   cap.release()
   out.release()
   return out_path
The function process_video() automates this process by running our detection pipeline on every frame, drawing bounding boxes, and saving the final annotated video.
Let’s walk through the code step by step.
We start by opening the video file using OpenCV’s VideoCapture. This object allows us to read frames one by one from the input video (Line 2).
Next, we extract key video metadata (Lines 3-5):
- FPS (frames per second): determines how quickly frames are played back.
- Width and Height: the frame resolution, used later to create the output video file.
Casting width and height to integers ensures compatibility with OpenCV’s video writer.
Then, we prepare to save the processed video. We first define the output path, storing the result temporarily using Python’s tempfile module. We define the video codec using cv2.VideoWriter_fourcc(*'mp4v'). The 'mp4v' codec ensures our output video is encoded in a standard MP4 format, compatible with most media players (Lines 7 and 8).
We initialize a VideoWriter object with the same FPS, resolution, and codec as the input video. This writer will store the annotated frames sequentially (Line 9).
We fetch the total number of frames in the video, which helps in progress tracking. The variable frame_idx keeps count of how many frames we’ve processed so far (Lines 11 and 12).
This loop continues as long as the video file is open and frames are available (Lines 14-17).
cap.read()reads the next frame and returns two values:ret: a Boolean indicating whether the frame was read successfully.frame: the actual image array for that frame.
IfretisFalse, it means the video has ended or there was an error — so we exit the loop.
For each frame, we call our earlier detect_objects_in_frame() function, passing the current frame and the user’s text prompt. The function returns an annotated image with bounding boxes and labels drawn. We then write this annotated frame to our output video file using out.write(). This step repeats for every frame, effectively performing real-time object detection across the entire video (Lines 20 and 21).
We increment the frame counter with each iteration. To avoid cluttering the console, we print progress every 10 frames — a simple yet useful way to monitor how quickly processing is going (Lines 23-25).
Once all frames have been processed, we release both the video capture and video writer objects to free up resources. Finally, we return the path to the saved video file, which now contains bounding boxes and object labels for every frame (Lines 27-29).
This function enables the model to perform open-vocabulary object detection on video streams, identifying any object described by plain language frame by frame.
Launch the Gradio Application
Finally, let’s bring everything together into an interactive web app using Gradio.
def run_ispy(video, prompt):
   return process_video(video, prompt)

with gr.Blocks() as demo:
   gr.Markdown("## 🕵️ Interactive Open Set Object Detection with Grounding DINO")

   video_input = gr.Video(label="Upload a video")
   text_input = gr.Textbox(label="Enter what to find", placeholder="e.g. person with blue hat")
   video_output = gr.Video(label="Processed video")

run_btn = gr.Button("Run Detection")
run_btn.click(run_ispy, inputs=[video_input, text_input], outputs=video_output)

demo.launch()
We define a simple function run_ispy() that connects our video-processing logic with the Gradio interface (Lines 1 and 2):
- Input:
video(from Gradio’s video input) andprompt(text). - Action: it calls
process_video()— the function that reads the video frame-by-frame, runs detection, and writes an annotated video to a temp path. - Return: the path to the processed video file. Gradio expects either a file path or a video-like object here, so returning the
out_pathfromprocess_video()is correct.
We open a gr.Blocks() context to build a flexible layout (Lines 4 and 5).
gr.Blocks()gives us a modern, composable canvas for inputs, text, and controls.gr.Markdown()renders the title — a friendly UI heading for users that explains the app’s purpose.
We create the three key interface components: input, parameter, and output (Lines 7-9).
video_input = gr.Video(...): an upload widget that accepts common video files. Gradio will hand our function either a local file path (string) or a small dict that contains the file path, depending on runtime.process_video()expects a path, so returning a path from Gradio’s value is what we handle.text_input = gr.Textbox(...): free-text prompt; users type what to “search” for in natural language.video_output = gr.Video(...): an output placeholder that will show the annotated video returned byrun_ispy().
We add a button and wire it to the function (Lines 11 and 12).
gr.Button("Run Detection"): creates the UI control users click to start processing.run_btn.click(...): connects button clicks to code:run_ispy: is the Python function executed when the button is pressed.inputs=[video_input, text_input]: maps the current values of those widgets intorun_ispy(video, prompt).outputs=video_output: tells Gradio to place the return value ofrun_ispyinto thevideo_outputwidget.
- Behind the scenes, Gradio serializes widget values, calls
run_ispy, waits for completion, and then updates the UI.
We start the app server (Line 14).
demo.launch()spins up a local web UI (and, by default, a sharable public link if Gradio’s sharing option is enabled).- Once launched, a browser tab opens (or a link is printed) and users can upload a video, type a prompt, click Run Detection, and watch the annotated result appear once processing completes (Figure 2).

Output
In the Gradio application above, we uploaded a short animated clip and entered the prompt “a cartoon bunny with big ears.” After hitting Run Detection, the model began analyzing each frame of the video.
As the video processed, Grounding DINO identified objects in each frame that matched our text description. The model drew bounding boxes around the detected regions (in this case, the bunny) and labeled them with the corresponding confidence scores.
The annotated video was then displayed directly inside the Gradio interface under the Processed Video section.
We can now visually confirm where and when the object of interest appears throughout the clip (Figure 3).
What's next? We recommend PyImageSearch University.
86+ total classes • 115+ hours hours of on-demand code walkthrough videos • Last updated: July 2026
★★★★★ 4.84 (128 Ratings) • 16,000+ Students Enrolled
I strongly believe that if you had the right teacher you could master computer vision and deep learning.
Do you think learning computer vision and deep learning has to be time-consuming, overwhelming, and complicated? Or has to involve complex mathematics and equations? Or requires a degree in computer science?
That’s not the case.
All you need to master computer vision and deep learning is for someone to explain things to you in simple, intuitive terms. And that’s exactly what I do. My mission is to change education and how complex Artificial Intelligence topics are taught.
If you're serious about learning computer vision, your next stop should be PyImageSearch University, the most comprehensive computer vision, deep learning, and OpenCV course online today. Here you’ll learn how to successfully and confidently apply computer vision to your work, research, and projects. Join me in computer vision mastery.
Inside PyImageSearch University you'll find:
- ✓ 86+ courses on essential computer vision, deep learning, and OpenCV topics
- ✓ 86 Certificates of Completion
- ✓ 115+ hours hours of on-demand video
- ✓ Brand new courses released regularly, ensuring you can keep up with state-of-the-art techniques
- ✓ Pre-configured Jupyter Notebooks in Google Colab
- ✓ Run all code examples in your web browser — works on Windows, macOS, and Linux (no dev environment configuration required!)
- ✓ Access to centralized code repos for all 540+ tutorials on PyImageSearch
- ✓ Easy one-click downloads for code, datasets, pre-trained models, etc.
- ✓ Access on mobile, laptop, desktop, etc.
Summary
Grounding DINO represents a significant step toward truly flexible vision systems. By weaving language into every stage of detection—much like a teacher guiding a student — it can identify anything anyone can describe in natural language.
Its architecture integrates multi-stage fusion mechanisms such as the feature enhancer, query selection module, and cross-attention decoder, allowing the model to align text and visual features in a unified space. This end-to-end design enables zero-shot generalization, meaning it can detect objects without explicit retraining for specific classes.
In this tutorial, we explored how to bring that capability into action — turning Grounding DINO into an interactive Gradio app for open-set object detection on videos. With just a short prompt like “a cartoon bunny with big ears” or “person wearing a blue hat”, the model can track and localize objects across frames with remarkable precision.
This combination of language-driven detection and frame-by-frame video processing bridges the gap between static vision models and dynamic perception systems. Whether it’s for creative visual editing, adaptive robotics, autonomous monitoring, or intelligent video search, Grounding DINO shows how natural language can guide the visual world — giving models the ability to see what we say.
Citation Information
Thakur, P. “Grounding DINO: Open Vocabulary Object Detection on Videos,” PyImageSearch, P. Chugh, S. Huot, G. Kudriavtsev, A. Sharma, and P. Thakur, eds., 2025, https://pyimg.co/dqwp7
@incollection{Thakur_2025_grounding-dino-open-vocabulary-object-detection-on-videos,
  author = {Piyush Thakur},
  title = {{Grounding DINO: Open Vocabulary Object Detection on Videos}},
  booktitle = {PyImageSearch},
  editor = {Puneet Chugh and Susan Huot and Georgii Kudriavtsev and Aditya Sharma and Piyush Thakur},
  year = {2025},
  url = {https://pyimg.co/dqwp7},
}
To download the source code to this post (and be notified when future tutorials are published here on PyImageSearch), simply enter your email address in the form below!

Download the Source Code and FREE 17-page Resource Guide
Enter your email address below to get a .zip of the code and a FREE 17-page Resource Guide on Computer Vision, OpenCV, and Deep Learning. Inside you'll find my hand-picked tutorials, books, courses, and libraries to help you master CV and DL!

Comment section
Hey, Adrian Rosebrock here, author and creator of PyImageSearch. While I love hearing from readers, a couple years ago I made the tough decision to no longer offer 1:1 help over blog post comments.
At the time I was receiving 200+ emails per day and another 100+ blog post comments. I simply did not have the time to moderate and respond to them all, and the sheer volume of requests was taking a toll on me.
Instead, my goal is to do the most good for the computer vision, deep learning, and OpenCV community at large by focusing my time on authoring high-quality blog posts, tutorials, and books/courses.
If you need help learning computer vision and deep learning, I suggest you refer to my full catalog of books and courses — they have helped tens of thousands of developers, students, and researchers just like yourself learn Computer Vision, Deep Learning, and OpenCV.
Click here to browse my full catalog.