In this tutorial, you will learn how to perform AprilTag detection with Python and the OpenCV library.

AprilTags are a type of fiducial marker. Fiducials, or more simply “markers,” are reference objects that are placed in the field of view of the camera when an image or video frame is captured.
The computer vision software running behind the scenes then takes the input image, detects the fiducial marker, and performs some operation based on the type of marker and where the marker is located in the input image.
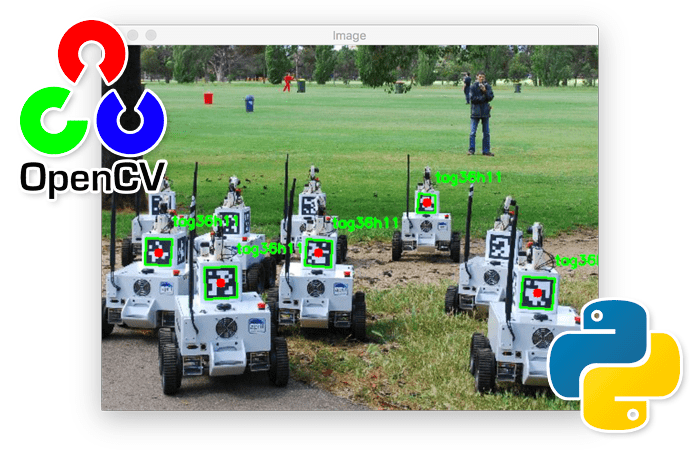
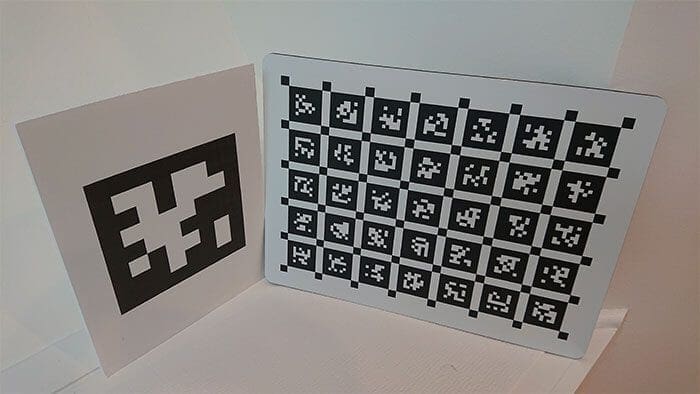
AprilTags are a specific type of fiducial marker, consisting of a black square with a white foreground that has been generated in a particular pattern (as seen in the figure at the top of this tutorial).
The black border surrounding the marker makes it easier for computer vision and image processing algorithms to detect the AprilTags in a variety of scenarios, including variations in rotation, scale, lighting conditions, etc.
You can conceptually think of an AprilTag as similar to a QR code — a 2D binary pattern that can be detected using computer vision algorithms. However, an AprilTag only holds 4-12 bits of data, multiple orders of magnitude less than a QR code (a typical QR code can hold up to 3KB of data).
So, why bother using AprilTags at all? Why not simply use QR codes if AprilTags hold such little data?
The fact that AprilTags store less data is actually a feature and not a bug/limitation. To paraphrase the official AprilTag documentation, since AprilTag payloads are so small, they can be more easily detected, more robustly identified, and less difficult to detect at longer ranges.
Basically, if you want to store data in a 2D barcode, use QR codes. But if you need to use markers that can be more easily detected in your computer vision pipeline, use AprilTags.
Fiducial markers such as AprilTags are an integral part of many computer vision systems, including but not limited to:
- Camera calibration
- Object size estimation
- Measuring the distance between the camera and an object
- 3D positioning
- Object orientation
- Robotics (i.e., autonomously navigating to a specific marker)
- etc.
One of the primary benefits of AprilTags is that they can be created using basic software and a printer. Just generate the AprilTag on your system, print it out, and include it in your image processing pipeline — Python libraries exist to automatically detect the AprilTags for you!
In the rest of this tutorial, I will show you how to detect AprilTags using Python and OpenCV.
To learn how to detect AprilTags with OpenCV and Python, just keep reading.
AprilTag with Python
In the first part of this tutorial, we will discuss what AprilTags and fiducial markers are. We’ll then install apriltag, the Python package we’ll be using to detect AprilTags in input images.
Next, we’ll review our project directory structure and then implement our Python script used to detect and identify AprilTags.
We’ll wrap up the tutorial by reviewing our results, including a discussion on some of the limitations (and frustrations) associated with AprilTags specifically.
What are AprilTags and fiducial markers?

AprilTags are a type of fiducial marker. Fiducials are special markers we place in the view of the camera such that they are easily identifiable.
For example, all of the following tutorials used fiducial markers to measure either the size of an object in an image or the distance between specific objects:
- Find distance from camera to object/marker using Python and OpenCV
- Measuring size of objects in an image with OpenCV
- Measuring distance between objects in an image with OpenCV
Successfully implementing these projects was only possible because a marker/reference object was placed in view of the camera. Once I detected the object, I could derive the width and height of other objects because I already know the size of the reference object.
AprilTags are a special type of fiducial marker. These markers have the following properties:
- They are a square with binary values.
- The background is “black.”
- The foreground is a generated pattern displayed in “white.”
- There is a black border surrounding the pattern, thereby making it easier to detect.
- They can be generated in nearly any size.
- Once generated, they can be printed out and added to your application.
Once detected in a computer vision pipeline, AprilTags can be used for:
- Camera calibration
- 3D applications
- SLAM
- Robotics
- Autonomous navigation
- Object size measurement
- Distance measurement
- Object orientation
- … and more!
A great example of using fiducials could be in a large fulfillment warehouse (i.e., Amazon) where you’re using autonomous forklifts.
You could place AprilTags on the floor to define “lanes” for the forklifts to drive on. Specific markers could be placed on large shelves such that the forklift knows which crate to pull down.
And markers could even be used for “emergency shutdowns” where if that “911” marker is detected, the forklift automatically stops, halts operations, and shuts down.
There are an incredible number of use cases for AprilTags and the closely related ArUco tags. I’ll be covering the basics of how to detect AprilTags in this tutorial. Future tutorials on the PyImageSearch blog will then build off this one and show you how to implement real-world applications using them.
Installing the “apriltag” Python package on your system
In order to detect AprilTags in our images, we first need to install a Python package to facilitate AprilTag detection.
The library we’ll be using is apriltag, which, lucky for us, is pip-installable.
To start, make sure you follow my pip install opencv guide to install OpenCV on your system.
If you are using a Python virtual environment (which I recommend, since it is a Python best practice), make sure you use the workon command to access your Python environment and then install apriltag into that environment:
$ workon your_env_name
$ pip install apriltag
From there, validate that you can import both cv2 (your OpenCV bindings) and apriltag (your AprilTag detector library) into your Python shell:
$ python
>>> import cv2
>>> import apriltag
>>>
Congrats on installing both OpenCV and AprilTag on your system!
Having problems configuring your development environment?
All that said, are you:
- Short on time?
- Learning on your employer’s administratively locked system?
- Wanting to skip the hassle of fighting with the command line, package managers, and virtual environments?
- Ready to run the code right now on your Windows, macOS, or Linux system?
Then join PyImageSearch Plus today! Gain access to PyImageSearch tutorial Jupyter Notebooks that run on Google Colab’s ecosystem right in your browser! No installation required.
And best of all, these notebooks will run on Windows, macOS, and Linux!
Project structure
Before we implement our Python script to detect AprilTags in images, let’s first review our project directory structure:
$ tree . --dirsfirst
.
├── images
│   ├── example_01.png
│   └── example_02.png
└── detect_apriltag.py

1 directory, 3 files
Here you can see that we have a single Python file, detect_apriltag.py. As the name suggests, this script is used to detect AprilTags in input images.
We then have an images directory that contains two example images. These images each contain one or more AprilTags. We’ll use our detect_apriltag.py script to detect the AprilTags in each of these images.
Implementing AprilTag detection with Python
With the apriltag Python package installed, we are now ready to implement AprilTag detection with OpenCV!
Open up the detect_apriltag.py file in your project directory structure, and let’s get started:
# import the necessary packages
import apriltag
import argparse
import cv2

# construct the argument parser and parse the arguments
ap = argparse.ArgumentParser()
ap.add_argument("-i", "--image", required=True,
	help="path to input image containing AprilTag")
args = vars(ap.parse_args())
We start off on Lines 2-4 importing our required Python packages. We have:
apriltagargparsecv2
From here, Lines 7-10 parse our command line arguments. We only need a single argument here, --image, the path to our input image containing the AprilTags we want to detect.
Next, let’s load our input image and preprocess it:
# load the input image and convert it to grayscale
print("[INFO] loading image...")
image = cv2.imread(args["image"])
gray = cv2.cvtColor(image, cv2.COLOR_BGR2GRAY)
Line 14 loads our input image from disk using the supplied --image path. We then convert the image to grayscale, the only preprocessing step required for AprilTag detection.
Speaking of AprilTag detection, let’s go ahead and perform the detection step now:
# define the AprilTags detector options and then detect the AprilTags
# in the input image
print("[INFO] detecting AprilTags...")
options = apriltag.DetectorOptions(families="tag36h11")
detector = apriltag.Detector(options)
results = detector.detect(gray)
print("[INFO] {} total AprilTags detected".format(len(results)))
In order to detect AprilTags in an image, we first need to specify options, and more specifically, the AprilTag family:

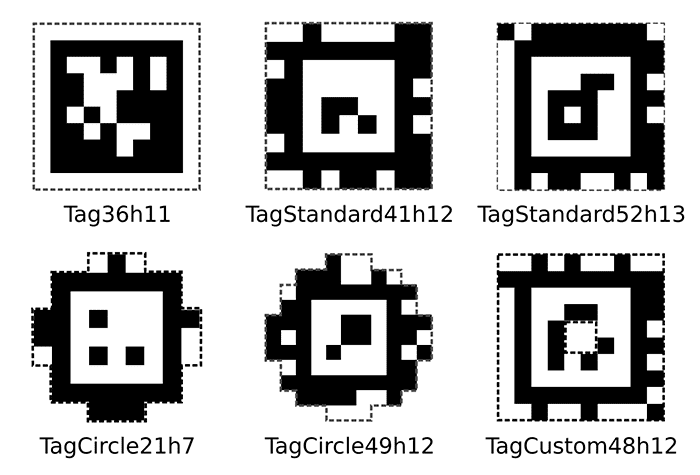
A family in AprilTags defines the set of tags the AprilTag detector will assume in the input image. The standard/default AprilTag family is “Tag36h11”; however, there are a total of six families in AprilTags:
- Tag36h11
- TagStandard41h12
- TagStandard52h13
- TagCircle21h7
- TagCircle49h12
- TagCustom48h12
You can read more about the AprilTag families on the official AprilTag website, but for the most part, you typically use “Tag36h11”.
Line 20 initializes our options with the default AprilTag family of tag36h11.
From there, we:
- Initialize the
detectorwith these options (Line 21) - Detect AprilTags in the input image using the
detectorobject (Line 22) - Display the total number of detected AprilTags to our terminal (Line 23)
The final step here is to loop over the AprilTags and display the results:
# loop over the AprilTag detection results
for r in results:
	# extract the bounding box (x, y)-coordinates for the AprilTag
	# and convert each of the (x, y)-coordinate pairs to integers
	(ptA, ptB, ptC, ptD) = r.corners
	ptB = (int(ptB[0]), int(ptB[1]))
	ptC = (int(ptC[0]), int(ptC[1]))
	ptD = (int(ptD[0]), int(ptD[1]))
	ptA = (int(ptA[0]), int(ptA[1]))

	# draw the bounding box of the AprilTag detection
	cv2.line(image, ptA, ptB, (0, 255, 0), 2)
	cv2.line(image, ptB, ptC, (0, 255, 0), 2)
	cv2.line(image, ptC, ptD, (0, 255, 0), 2)
	cv2.line(image, ptD, ptA, (0, 255, 0), 2)

	# draw the center (x, y)-coordinates of the AprilTag
	(cX, cY) = (int(r.center[0]), int(r.center[1]))
	cv2.circle(image, (cX, cY), 5, (0, 0, 255), -1)

	# draw the tag family on the image
	tagFamily = r.tag_family.decode("utf-8")
	cv2.putText(image, tagFamily, (ptA[0], ptA[1] - 15),
		cv2.FONT_HERSHEY_SIMPLEX, 0.5, (0, 255, 0), 2)
	print("[INFO] tag family: {}".format(tagFamily))

# show the output image after AprilTag detection
cv2.imshow("Image", image)
cv2.waitKey(0)
We start looping over our AprilTag detections on Line 26.
Each AprilTag is specified by a set of corners. Lines 29-33 extract the four corners of the AprilTag square, while Lines 36-39 draw the AprilTag bounding box on the image.
We also compute the center (x, y)-coordinates of the AprilTag bounding box and then draw a circle representing the center of the AprilTag (Lines 42 and 43).
The last annotation we’ll perform is grabbing the detected tagFamily from the result object and then drawing it on the output image as well.
Finally, we wrap up our Python by displaying the results of our AprilTag detection.
AprilTag Python detection results
Let’s put our Python AprilTag detector to the test! Make sure you use the “Downloads” section of this tutorial to download the source code and example image.
From there, open up a terminal, and execute the following command:
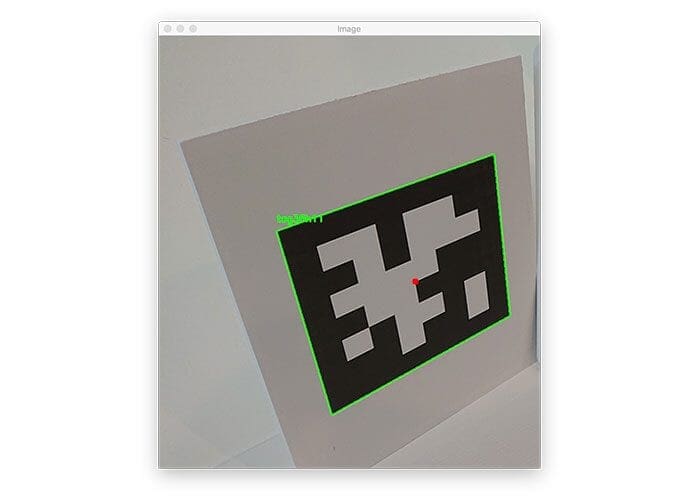
$ python detect_apriltag.py --image images/example_01.png
[INFO] loading image...
[INFO] detecting AprilTags...
[INFO] 1 total AprilTags detected
[INFO] tag family: tag36h11

Despite the fact that the AprilTag has been rotated, we were still able to detect it in the input image, thereby demonstrating that AprilTags have a certain level of robustness that makes them easier to detect.
Let’s try another image, this one with multiple AprilTags:
$ python detect_apriltag.py --image images/example_02.png
[INFO] loading image...
[INFO] detecting AprilTags...
[INFO] 5 total AprilTags detected
[INFO] tag family: tag36h11
[INFO] tag family: tag36h11
[INFO] tag family: tag36h11
[INFO] tag family: tag36h11
[INFO] tag family: tag36h11

Here we have a fleet of autonomous vehicles, each with an AprilTag placed on it. We are able to detect all AprilTags in the input image, except for the ones that are partially obscured by other robots (which makes sense — the entire AprilTag has to be in view for us to detect it; occlusion creates a big problem for many fiducial markers).
Be sure to use this code as a starting point for when you need to detect AprilTags in your own input images!
Limitations and frustrations
You may have noticed that I did not cover how to manually generate your own AprilTag images. That’s for two reasons:
- All possible AprilTags across all AprilTag families can be downloaded from the official AprilRobotics repo.
- Additionally, the AprilTags repo contains Java source code that you can use to generate your own tags.
- And if you really want to dive down the rabbit hole, the TagSLAM library contains a special Python script that can be used to generate tags — you can read more about this script here.
All that said, I find generating AprilTags to be a pain in the ass. Instead, I prefer to use ArUco tags, which OpenCV can both detect and generate using it’s cv2.aruco submodule.
I’ll be showing you how to use the cv2.aruco module to detect both AprilTags and ArUco tags in a tutorial in late-2020/early-2021. Be sure to stay tuned for that tutorial!
Credits
In this tutorial, we used example images of AprilTags from other websites. I would like to take a second and credit the official AprilTag website as well as Bernd Pfrommer from the TagSLAM documentation for the examples of AprilTags.
What's next? We recommend PyImageSearch University.
86+ total classes • 115+ hours hours of on-demand code walkthrough videos • Last updated: July 2025
★★★★★ 4.84 (128 Ratings) • 16,000+ Students Enrolled
I strongly believe that if you had the right teacher you could master computer vision and deep learning.
Do you think learning computer vision and deep learning has to be time-consuming, overwhelming, and complicated? Or has to involve complex mathematics and equations? Or requires a degree in computer science?
That’s not the case.
All you need to master computer vision and deep learning is for someone to explain things to you in simple, intuitive terms. And that’s exactly what I do. My mission is to change education and how complex Artificial Intelligence topics are taught.
If you're serious about learning computer vision, your next stop should be PyImageSearch University, the most comprehensive computer vision, deep learning, and OpenCV course online today. Here you’ll learn how to successfully and confidently apply computer vision to your work, research, and projects. Join me in computer vision mastery.
Inside PyImageSearch University you'll find:
- ✓ 86+ courses on essential computer vision, deep learning, and OpenCV topics
- ✓ 86 Certificates of Completion
- ✓ 115+ hours hours of on-demand video
- ✓ Brand new courses released regularly, ensuring you can keep up with state-of-the-art techniques
- ✓ Pre-configured Jupyter Notebooks in Google Colab
- ✓ Run all code examples in your web browser — works on Windows, macOS, and Linux (no dev environment configuration required!)
- ✓ Access to centralized code repos for all 540+ tutorials on PyImageSearch
- ✓ Easy one-click downloads for code, datasets, pre-trained models, etc.
- ✓ Access on mobile, laptop, desktop, etc.
Summary
In this tutorial, you learned about AprilTags, a set of fiducial markers that are often used for robotics, calibration, and 3D computer vision projects.
We use AprilTags (as well as the closely related ArUco tags) in these situations because they tend to be very easy to detect in real time. Libraries exist to detect AprilTags and ArUco tags in nearly any programming language used to perform computer vision, including Python, Java, C++, etc.
In our case, we used the april-tag Python package. This package is pip-installable and allows us to pass in images loaded by OpenCV, making it quite effective and efficient in many Python-based computer vision pipelines.
Later this year/in early 2021, I’ll be showing you real-world projects of using AprilTags and ArUco tags, but I wanted to introduce them now so you have a chance to familiarize yourself with them.
AprilTag FAQ:
Customization of an AprilTag is indeed possible and often essential for tailoring to specific applications that require varying sizes or encoding capabilities. While the typical AprilTag holds limited data, the size and error-correction levels can be adjusted. The customization generally involves selecting different tag families or creating a unique configuration of the tag matrix. This process can be handled via tools provided in the AprilTag library or by generating tags using specific software that supports customization features. Users might need to experiment with tag generation parameters to balance detectability with the amount of information each tag carries, adapting the tags to the constraints of their particular application.
window.rmpanda = window.rmpanda || {}; window.rmpanda.cmsdata = {“cms”:”wordpress”,”postId”:44649,”taxonomyTerms”:{“ufaq-category”:[1200],”ufaq-tag”:[]}};Detecting an AprilTag in real-time demands a combination of efficient software and capable hardware. The computational load largely depends on factors such as the resolution of the input video, the number of tags being tracked, and the complexity of the scene. Real-time detection typically requires a modern processor and may benefit from hardware acceleration, such as using GPUs, especially in environments where multiple tags are present or high-resolution video feeds are processed. For robotics and autonomous systems, where swift and accurate detection is crucial, investing in more robust computing resources ensures that the detection algorithms run smoothly and quickly, thereby supporting timely responses to the tags’ data. For developers working on such applications, profiling the software implementation on target hardware during the development phase is critical to ensure that performance requirements are met. This might include testing with various camera inputs under different operating conditions to optimize performance and reliability.
window.rmpanda = window.rmpanda || {}; window.rmpanda.cmsdata = {“cms”:”wordpress”,”postId”:44650,”taxonomyTerms”:{“ufaq-category”:[1200],”ufaq-tag”:[]}};The performance of AprilTag detection can vary significantly across different camera types and imaging conditions. Generally, the quality of the camera sensor and the lens can affect how well the tags are captured, which in turn influences the detection accuracy. High-resolution cameras tend to perform better, as they capture more detailed images, making it easier for the detection algorithms to recognize the patterns on the AprilTag even from greater distances or smaller tag sizes.
Imaging conditions also play a crucial role. Good lighting is essential for optimal detection as it affects the camera’s ability to capture the contrast between the black and white parts of the tag. Under low light conditions, the camera might struggle to distinguish the tag from the background, leading to lower detection rates. Conversely, very bright conditions can cause glare or overexposure, which might obscure the tag’s details.
Additionally, the angle and distance of the camera relative to the tag can affect detection. Ideally, the camera should capture the tag head-on. Angled views can distort the tag in the image, making detection more challenging, although AprilTags are designed to be robust against such variations to a certain extent.
In practice, selecting the right camera and adjusting the imaging setup to ensure consistent lighting and minimal angle distortion are crucial steps in deploying a system that uses AprilTag detection effectively. This may involve using specialized camera equipment or enhancing the environmental conditions to maintain a high level of detection accuracy.
window.rmpanda = window.rmpanda || {}; window.rmpanda.cmsdata = {“cms”:”wordpress”,”postId”:44651,”taxonomyTerms”:{“ufaq-category”:[1200],”ufaq-tag”:[]}};To download the source code to this post (and be notified when future tutorials are published here on PyImageSearch), simply enter your email address in the form below!

Download the Source Code and FREE 17-page Resource Guide
Enter your email address below to get a .zip of the code and a FREE 17-page Resource Guide on Computer Vision, OpenCV, and Deep Learning. Inside you'll find my hand-picked tutorials, books, courses, and libraries to help you master CV and DL!


Comment section
Hey, Adrian Rosebrock here, author and creator of PyImageSearch. While I love hearing from readers, a couple years ago I made the tough decision to no longer offer 1:1 help over blog post comments.
At the time I was receiving 200+ emails per day and another 100+ blog post comments. I simply did not have the time to moderate and respond to them all, and the sheer volume of requests was taking a toll on me.
Instead, my goal is to do the most good for the computer vision, deep learning, and OpenCV community at large by focusing my time on authoring high-quality blog posts, tutorials, and books/courses.
If you need help learning computer vision and deep learning, I suggest you refer to my full catalog of books and courses — they have helped tens of thousands of developers, students, and researchers just like yourself learn Computer Vision, Deep Learning, and OpenCV.
Click here to browse my full catalog.