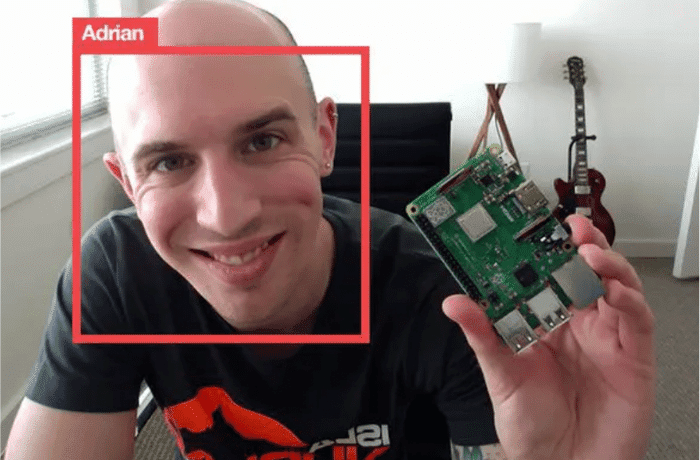
In last week’s blog post you learned how to perform Face recognition with Python, OpenCV, and deep learning.
But as I hinted at in the post, in order to perform face recognition on the Raspberry Pi you first need to consider a few optimizations — otherwise, the face recognition pipeline would fall flat on its face.
Namely, when performing face recognition on the Raspberry Pi you should consider:
- On which machine you are computing your face recognition embeddings for your training set (i.e., onboard the Raspberry Pi, on a laptop/desktop, on a machine with a GPU)
- The method you are using for face detection (Haar cascades, HOG + Linear SVM, or CNNs)
- How you are polling for frames from your camera sensor (threaded vs. non-threaded)
All of these considerations and associated assumptions are critical when performing accurate face recognition on the Raspberry Pi — and I’ll be right here to guide you through the trenches.
To learn more about using the Raspberry Pi for face recognition, just follow along.
Looking for the source code to this post?
Jump Right To The Downloads SectionRaspberry Pi Face Recognition
This post assumes you have read through last week’s post on face recognition with OpenCV — if you have not read it, go back to the post and read it before proceeding.
In the first part of today’s blog post, we are going to discuss considerations you should think through when computing facial embeddings on your training set of images.
From there we’ll review source code that can be used to perform face recognition on the Raspberry Pi, including a number of different optimizations.
Finally, I’ll provide a demo of using my Raspberry Pi to recognize faces (including my own) in a video stream.
Configuring your Raspberry Pi for face recognition
Let’s configure our Raspberry Pi for today’s blog post.
First, go ahead and install OpenCV if you haven’t done so already. You can follow my instructions linked on this OpenCV Install Tutorials page for the most up to date instructions.
Next, let’s install Davis King’s dlib toolkit software into the same Python virtual environment (provided you are using one) that you installed OpenCV into:
$ workon <your env name> # optional $ pip install dlib
If you’re wondering who Davis King is, check out my 2017 interview with Davis!
From there, simply use pip to install Adam Geitgey’s face_recognition module:
$ workon <your env name> # optional $ pip install face_recognition
And don’t forget to install my imutils package of convenience functions:
$ workon <your env name> # optional $ pip install imutils
PyImageConf 2018, a PyImageSearch conference
Would you like to receive live, in-person training from myself, Davis King, Adam Geitgey, and others at PyImageSearch’s very own conference in San Francisco, CA?
Both Davis King (creator of dlib) and Adam Geitgey (author of the Machine Learning is Fun! series) will be teaching at PyImageConf 2018 and you don’t want to miss it! You’ll also be able to learn from other prominent computer vision and deep learning industry speakers, including me!
You’ll meet others in the industry that you can learn from and collaborate with. You’ll even be able to socialize with attendees during evening events.
There are only a handful of tickets remaining, and once I’ve sold a total of 200 I won’t have space for you. Don’t delay!
Project structure
If you want to perform facial recognition on your Raspberry Pi today, head to the “Downloads” section of this blog post and grab the code. From there, copy the zip to your Raspberry Pi (I use SCP) and let’s begin.
On your Pi, you should unzip the archive, change working directory, and take a look at the project structure just as I have done below:
$ unzip pi-face-recognition.zip ... $ cd pi-face-recognition $ tree . ├── dataset │ ├── adrian │ │ ├── 00000.png │ │ ├── 00001.png │ │ ├── 00002.png │ │ ├── 00003.png │ │ ├── 00004.png │ │ └── 00005.png │ └── ian_malcolm │ ├── 00000000.jpg │ ├── 00000001.jpg │ ├── 00000003.jpg │ ├── 00000005.jpg │ ├── 00000007.jpg │ ├── 00000008.jpg │ └── 00000009.jpg ├── encode_faces.py ├── encodings.pickle ├── haarcascade_frontalface_default.xml └── pi_face_recognition.py 3 directories, 17 files
Our project has one directory with two sub-directories:
dataset/
: This directory should contain sub-directories for each person you would like your facial recognition system to recognize.adrian/
: This sub-directory contains pictures of me. You’ll want to replace it with pictures of yourself ?.ian_malcolm/
: Pictures of Jurassic Park’s character, Ian Malcolm, are in this folder, but again you’ll likely replace this directory with additional directories of people you’d like to recognize.
From there, we have four files inside of pi-face-recognition/
:
encode_faces.py
: This file will find faces in our dataset and encode them into 128-d vectors.encodings.pickle
: Our face encodings (128-d vectors, one for each face) are stored in this pickle file.haarcascade_frontalface_default.xml
: In order to detect and localize faces in frames we rely on OpenCV’s pre-trained Haar cascade file.pi_face_recognition.py
: This is our main execution script. We’re going to review it later in this post so you understand the code and what’s going on under the hood. From there feel free to hack it up for your own project purposes.
Now that we’re familiar with the project files and directories, let’s discuss the first step to building a face recognition system for your Raspberry Pi.
Step #1: Gather your faces dataset
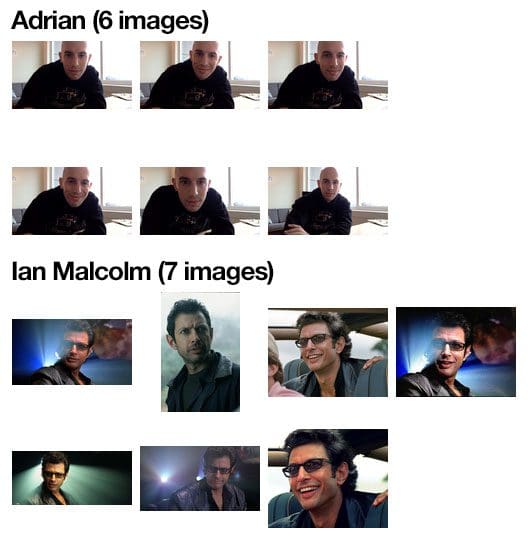
Before we can apply face recognition we first need to gather our dataset of example images we want to recognize.
There are a number of ways we can gather such images, including:
- Performing face enrollment by using a camera + face detection to gather example faces
- Using various APIs (ex., Google, Facebook, Twitter, etc.) to automatically download example faces
- Manually collecting the images
This post assumes you already have a dataset of faces gathered, but if you haven’t yet, or are in the process of gathering a faces dataset, make sure you read my blog post on How to create a custom face recognition dataset to help get you started.
For the sake of this blog post, I have gathered images of two people:
- Myself (5 total)
- Dr. Ian Malcolm from the movie Jurassic Park (6 total)
Using only this small number of images I’ll be demonstrating how to create an accurate face recognition application capable of being deployed to the Raspberry Pi.
Step #2: Compute your face recognition embeddings
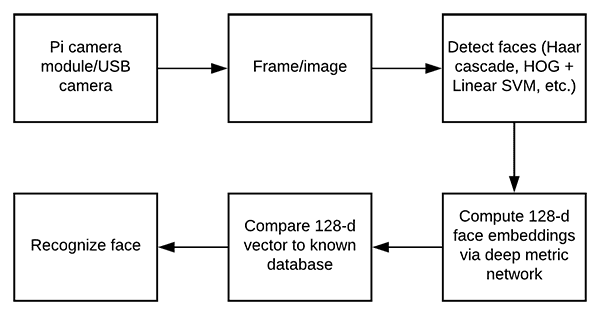
We will be using a deep neural network to compute a 128-d vector (i.e., a list of 128 floating point values) that will quantify each face in the dataset. We’ve already reviewed both (1) how our deep neural network performs face recognition and (2) the associated source code in last week’s blog post, but as a matter of completeness, we’ll review the code here as well.
Let’s open up encode_faces.py
from the “Downloads” associated with this blog post and review:
# import the necessary packages from imutils import paths import face_recognition import argparse import pickle import cv2 import os # construct the argument parser and parse the arguments ap = argparse.ArgumentParser() ap.add_argument("-i", "--dataset", required=True, help="path to input directory of faces + images") ap.add_argument("-e", "--encodings", required=True, help="path to serialized db of facial encodings") ap.add_argument("-d", "--detection-method", type=str, default="cnn", help="face detection model to use: either `hog` or `cnn`") args = vars(ap.parse_args())
First, we need to import required packages. Notably, this script requires imutils
, face_recognition
, and OpenCV installed. Scroll up to the “Configuring your Raspberry Pi for face recognition” section to install the necessary software.
From there, we handle our command line arguments with argparse
:
--dataset
: The path to our dataset (we created a dataset using method #2 of last week’s blog post).--encodings
: Our face encodings are written to the file that this argument points to.--detection-method
: Before we can encode faces in images we first need to detect them. Our two face detection methods include eitherhog
orcnn
. Those two flags are the only ones that will work for--detection-method
.
Note: The Raspberry Pi is not capable of running the CNN detection method. If you want to run the CNN detection method, you should use a capable compute, ideally one with a GPU if you’re working with a large dataset. Otherwise, use the hog
face detection method.
Now that we’ve defined our arguments, let’s grab the paths to the images files in our dataset (as well as perform two initializations):
# grab the paths to the input images in our dataset print("[INFO] quantifying faces...") imagePaths = list(paths.list_images(args["dataset"])) # initialize the list of known encodings and known names knownEncodings = [] knownNames = []
From there we’ll proceed to loop over each face in the dataset:
# loop over the image paths for (i, imagePath) in enumerate(imagePaths): # extract the person name from the image path print("[INFO] processing image {}/{}".format(i + 1, len(imagePaths))) name = imagePath.split(os.path.sep)[-2] # load the input image and convert it from BGR (OpenCV ordering) # to dlib ordering (RGB) image = cv2.imread(imagePath) rgb = cv2.cvtColor(image, cv2.COLOR_BGR2RGB) # detect the (x, y)-coordinates of the bounding boxes # corresponding to each face in the input image boxes = face_recognition.face_locations(rgb, model=args["detection_method"]) # compute the facial embedding for the face encodings = face_recognition.face_encodings(rgb, boxes) # loop over the encodings for encoding in encodings: # add each encoding + name to our set of known names and # encodings knownEncodings.append(encoding) knownNames.append(name)
Inside of the loop, we:
- Extract the person’s
name
from the path (Line 32). - Load and convert the
image
torgb
(Lines 36 and 37). - Localize faces in the image (Lines 41 and 42).
- Compute face embeddings and add them to
knownEncodings
along with theirname
added to a corresponding list element inknownNames
(Lines 45-52).
Let’s export the facial encodings to disk so they can be used in our facial recognition script:
# dump the facial encodings + names to disk print("[INFO] serializing encodings...") data = {"encodings": knownEncodings, "names": knownNames} f = open(args["encodings"], "wb") f.write(pickle.dumps(data)) f.close()
Line 56 constructs a dictionary with two keys — "encodings"
and "names"
. The values associated with the keys contain the encodings and names themselves.
The data
dictionary is then written to disk on Lines 57-59.
To create our facial embeddings open up a terminal and execute the following command:
$ python encode_faces.py --dataset dataset --encodings encodings.pickle \ --detection-method hog [INFO] quantifying faces... [INFO] processing image 1/11 [INFO] processing image 2/11 [INFO] processing image 3/11 ... [INFO] processing image 9/11 [INFO] processing image 10/11 [INFO] processing image 11/11 [INFO] serializing encodings...
After running the script, you’ll have a pickle file at your disposal. Mine is named encodings.pickle
— this file contains the 128-d face embeddings for each face in our dataset.
Wait! Are you running this script on a Raspberry Pi?
No problem, just use the --detection-method hog
command line argument. The --detection-method cnn
will not work on a Raspberry Pi, but certainly can be used if you’re encoding your faces with a capable machine. If you aren’t familiar with command line arguments, just be sure to give this post a quick read and you’ll be a pro in no time!
Step #3: Recognize faces in video streams on your Raspberry Pi
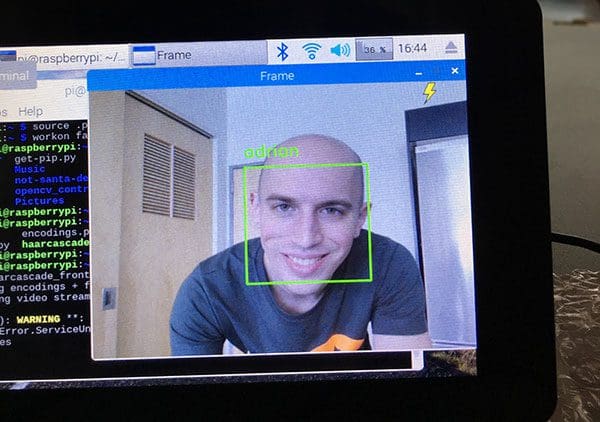
Our pi_face_recognition.py
script is very similar to last week’s recognize_faces_video.py
script with one notable change. In this script we will use OpenCV’s Haar cascade to detect and localize the face. From there, we’ll continue on with the same method to actually recognize the face.
Without further ado, let’s get to coding pi_face_recognition.py
:
# import the necessary packages from imutils.video import VideoStream from imutils.video import FPS import face_recognition import argparse import imutils import pickle import time import cv2 # construct the argument parser and parse the arguments ap = argparse.ArgumentParser() ap.add_argument("-c", "--cascade", required=True, help = "path to where the face cascade resides") ap.add_argument("-e", "--encodings", required=True, help="path to serialized db of facial encodings") args = vars(ap.parse_args())
First, let’s import packages and parse command line arguments. We’re importing two modules (VideoStream
and FPS
) from imutils
as well as imutils
itself. We also import face_recognition
and cv2
(OpenCV). The rest of the modules listed are part of your Python installation. Refer to “Configuring your Raspberry Pi for face recognition” to install the software.
We then parse two command line arguments:
--cascade
: The path to OpenCV’s Haar cascade (included in the source code download for this post).--encodings
: The path to our serialized database of facial encodings. We just built encodings in the previous section.
From there, let’s instantiate several objects before we begin looping over frames from our camera:
# load the known faces and embeddings along with OpenCV's Haar # cascade for face detection print("[INFO] loading encodings + face detector...") data = pickle.loads(open(args["encodings"], "rb").read()) detector = cv2.CascadeClassifier(args["cascade"]) # initialize the video stream and allow the camera sensor to warm up print("[INFO] starting video stream...") vs = VideoStream(src=0).start() # vs = VideoStream(usePiCamera=True).start() time.sleep(2.0) # start the FPS counter fps = FPS().start()
In this block we:
- Load the facial encodings
data
(Line 22). - Instantiate our face
detector
using the Haar cascade method (Line 23). - Initialize our
VideoStream
— we’re going to use a USB camera, but if you want to use a PiCamera with your Pi, just comment Line 27 and uncomment Line 28. - Wait for the camera to warm up (Line 29).
- Start our frames per second,
fps
, counter (Line 32).
From there, let’s begin capturing frames from the camera and recognizing faces:
# loop over frames from the video file stream while True: # grab the frame from the threaded video stream and resize it # to 500px (to speedup processing) frame = vs.read() frame = imutils.resize(frame, width=500) # convert the input frame from (1) BGR to grayscale (for face # detection) and (2) from BGR to RGB (for face recognition) gray = cv2.cvtColor(frame, cv2.COLOR_BGR2GRAY) rgb = cv2.cvtColor(frame, cv2.COLOR_BGR2RGB) # detect faces in the grayscale frame rects = detector.detectMultiScale(gray, scaleFactor=1.1, minNeighbors=5, minSize=(30, 30)) # OpenCV returns bounding box coordinates in (x, y, w, h) order # but we need them in (top, right, bottom, left) order, so we # need to do a bit of reordering boxes = [(y, x + w, y + h, x) for (x, y, w, h) in rects] # compute the facial embeddings for each face bounding box encodings = face_recognition.face_encodings(rgb, boxes) names = []
We proceed to grab a frame
and preprocess it. The preprocessing steps include resizing followed by converting to grayscale and rgb
(Lines 38-44).
In the words of Ian Malcolm:
Your scientists were so preoccupied with whether they could, they didn’t stop to think if they should.
Well, he was referring to growing dinosaurs. As far as face recognition, we can and we should detect and recognize faces with our Raspberry Pi. We’ve just got to be careful not to overload the Pi’s limited memory with a complex deep learning method. Therefore, we’re going to use a slightly dated but very prominent approach to face detection — Haar cascades!
Haar cascades are also known as the Viola-Jones algorithm from their paper published in 2001.
The highly cited paper proposed their method to detect objects in images at multiple scales in realtime. For 2001 it was a huge discovery and share of knowledge — Haar cascades are still well known today.
We’re going to make use of OpenCV’s trained face Haar cascade which may require a little bit of parameter tuning (as compared to a deep learning method for face detection).
Parameters to the detectMultiScale
method include:
gray
: A grayscale image.scaleFactor
: Parameter specifying how much the image size is reduced at each image scale.minNeighbors
: Parameter specifying how many neighbors each candidate rectangle should have to retain it.minSize
: Minimum possible object (face) size. Objects smaller than that are ignored.
For more information on these parameters and how to tune them, be sure to refer to my book, Practical Python and OpenCV as well as the PyImageSearch Gurus course.
The result of our face detection is rects
, a list of face bounding box rectangles which correspond to the face locations in the frame (Lines 47 and 48). We convert and reorder the coordinates of this list on Line 53.
We then compute the 128-d encodings
for each face on Line 56, thus quantifying the face.
Now let’s loop over the face encodings and check for matches:
# loop over the facial embeddings for encoding in encodings: # attempt to match each face in the input image to our known # encodings matches = face_recognition.compare_faces(data["encodings"], encoding) name = "Unknown" # check to see if we have found a match if True in matches: # find the indexes of all matched faces then initialize a # dictionary to count the total number of times each face # was matched matchedIdxs = [i for (i, b) in enumerate(matches) if b] counts = {} # loop over the matched indexes and maintain a count for # each recognized face face for i in matchedIdxs: name = data["names"][i] counts[name] = counts.get(name, 0) + 1 # determine the recognized face with the largest number # of votes (note: in the event of an unlikely tie Python # will select first entry in the dictionary) name = max(counts, key=counts.get) # update the list of names names.append(name)
The purpose of the code block above is to identify faces. Here we:
- Check for
matches
(Lines 63 and 64). - If matches are found we’ll use a voting system to determine whose face it most likely is (Lines 68-87). This method works by checking which person in the dataset has the most matches (in the event of a tie, the first entry in the dictionary is selected).
From there, we simply draw rectangles surrounding each face along with the predicted name of the person:
# loop over the recognized faces for ((top, right, bottom, left), name) in zip(boxes, names): # draw the predicted face name on the image cv2.rectangle(frame, (left, top), (right, bottom), (0, 255, 0), 2) y = top - 15 if top - 15 > 15 else top + 15 cv2.putText(frame, name, (left, y), cv2.FONT_HERSHEY_SIMPLEX, 0.75, (0, 255, 0), 2) # display the image to our screen cv2.imshow("Frame", frame) key = cv2.waitKey(1) & 0xFF # if the `q` key was pressed, break from the loop if key == ord("q"): break # update the FPS counter fps.update()
After drawing the boxes and text, we display the image and check if the quit (“q”) key is pressed. We also update our fps
counter.
And lastly. let’s clean up and write performance diagnostics to the terminal:
# stop the timer and display FPS information fps.stop() print("[INFO] elasped time: {:.2f}".format(fps.elapsed())) print("[INFO] approx. FPS: {:.2f}".format(fps.fps())) # do a bit of cleanup cv2.destroyAllWindows() vs.stop()
Face recognition results
Be sure to use the “Downloads” section to grab the source code and example dataset for this blog post.
From there, open up your Raspberry Pi terminal and execute the following command:
$ python pi_face_recognition.py --cascade haarcascade_frontalface_default.xml \ --encodings encodings.pickle [INFO] loading encodings + face detector... [INFO] starting video stream... [INFO] elasped time: 20.78 [INFO] approx. FPS: 1.21
I’ve included a demo video, along with additional commentary below, so be sure to take look:
Our face recognition pipeline is running at approximately 1-2 FPS. The vast majority of the computation is happening when a face is being recognized, not when it is being detected. Furthermore, the more faces in the dataset, the more comparisons are made for the voting process, resulting in slower facial recognition.
Therefore, you should consider computing the full face recognition (i.e., extracting the 128-d facial embedding) once every N frames (where N is user-defined variable) and then apply simple tracking algorithms (such as centroid tracking) to track the detected faces. Such a process will enable you to reach 8-10 FPS on the Raspberry Pi for face recognition.
We will be covering object tracking algorithms, including centroid tracking, in a future blog post.
What's next? We recommend PyImageSearch University.
86 total classes • 115+ hours of on-demand code walkthrough videos • Last updated: October 2024
★★★★★ 4.84 (128 Ratings) • 16,000+ Students Enrolled
I strongly believe that if you had the right teacher you could master computer vision and deep learning.
Do you think learning computer vision and deep learning has to be time-consuming, overwhelming, and complicated? Or has to involve complex mathematics and equations? Or requires a degree in computer science?
That’s not the case.
All you need to master computer vision and deep learning is for someone to explain things to you in simple, intuitive terms. And that’s exactly what I do. My mission is to change education and how complex Artificial Intelligence topics are taught.
If you're serious about learning computer vision, your next stop should be PyImageSearch University, the most comprehensive computer vision, deep learning, and OpenCV course online today. Here you’ll learn how to successfully and confidently apply computer vision to your work, research, and projects. Join me in computer vision mastery.
Inside PyImageSearch University you'll find:
- ✓ 86 courses on essential computer vision, deep learning, and OpenCV topics
- ✓ 86 Certificates of Completion
- ✓ 115+ hours of on-demand video
- ✓ Brand new courses released regularly, ensuring you can keep up with state-of-the-art techniques
- ✓ Pre-configured Jupyter Notebooks in Google Colab
- ✓ Run all code examples in your web browser — works on Windows, macOS, and Linux (no dev environment configuration required!)
- ✓ Access to centralized code repos for all 540+ tutorials on PyImageSearch
- ✓ Easy one-click downloads for code, datasets, pre-trained models, etc.
- ✓ Access on mobile, laptop, desktop, etc.
Summary
In today’s blog post we learned how to perform face recognition using the Raspberry Pi, OpenCV, and deep learning.
Using this method we can obtain highly accurate face recognition, but unfortunately could not obtain higher than 1-2 FPS.
Realistically, there isn’t a whole lot we can do about speeding up the algorithm — the Raspberry Pi, while powerful for such a small device, is naturally limited in terms of computation power and memory (especially without a GPU).
If you would like to speedup face recognition on the Raspberry Pi I would suggest to:
- Take a look at the PyImageSearch Gurus course where we use algorithms such as Eigenfaces and LBPs to obtain faster frame rates of ~13 FPS.
- Train your own, shallower deep learning network for facial embedding. The downside here is that training your own facial embedding network is more of an advanced deep learning technique, to say the least. If you’re interested in learning the fundamentals of deep learning applied to computer vision tasks, be sure to refer to my book, Deep Learning for Computer Vision with Python.
I hope you enjoyed today’s post on face recognition!
To be notified when future blog posts are published here on PyImageSearch, just enter your email address in the form below!
Download the Source Code and FREE 17-page Resource Guide
Enter your email address below to get a .zip of the code and a FREE 17-page Resource Guide on Computer Vision, OpenCV, and Deep Learning. Inside you'll find my hand-picked tutorials, books, courses, and libraries to help you master CV and DL!
Zubair Ahmed
Loved to hear your voice for the first time and your accent 🙂
Before you said it while going through the post I was also thinking what would it be like to run this on Intel Movidius NCS, would love to see a post on it in the future
Thanks
Adrian Rosebrock
I’m not sure if you can call a Maryland/Baltimore accent a true “accent” but people do pick up on it. I’ve actually started taking speech therapy lessons to help not speak the way I do 😉
Zubair
You’re kidding me, are you serious right now?
I think this is a fine accent and you don’t need to change it, what would you sound like after this therapy or rather who would you sound like?
Adrian Rosebrock
Hah! Yes, I am serious. It’s a long, boring story but basically I talk with a low register of my voice, common for Marylanders. It’s sometimes called “vocal fry”. Just fixing that, that’s all 🙂
Zubair Ahmed
Oh wow I googled ‘vocal fry’ right now, sounds like something you should definitely do if you have this, I’m wiser now.
Its interesting to know that having a deeper voice is correlated with making more money (not bad) and attracting opposite gender (think you’re set over here, hello T 🙂
Good luck
Adrian Rosebrock
Googling for vocal fry can lead you to a lot of really, really bad cases of what it is. Mine is nowhere near as bad — I just talk in a low voice 😉
Zubair Ahmed
Happy to hear that its not that bad
claudio
hello, is it possible have youre email, i have some questions for you
thanks
Adrian Rosebrock
You can contact me via the PyImageSearch contact form.
Javaid
i want a string out from a serial port of raspberry pi when it detects my face. Plz guide me
Adrian Rosebrock
I would suggest referring to my OpenCV + GPIO tutorials.
Vijay
me too looking in this direction. Would be good idea to try this in small “toy” experiments at home.
Francisco Rodriguez
Hello Adrian Rosebrock, I want to congratulate you for all your contribution in this field, I have a question and that is that I have mounted the topic of facial recognition, but the same program that I run on my laptop recognizes a distance of up to 5 meters but in the Raspberry device does not do it at 1 max and sometimes at 2 meters away, is there any way to overcome this problem?
Adrian Rosebrock
That sounds like a difference in your camera sensors — your Raspberry Pi camera is not good enough to detect the faces from your distance. You can either:
1. Use a better camera sensor
2. Upsample the image prior to applying face detection — the problem here will be speed. The more data, the longer it will take to process.
rush
better?like
Shan
Thanks for this tutorial Adrian. I was somewhere waiting to see how Adrian would run Deep Learning on SMB’s like RBP.
Very informative post and I learned a lot.
Next I will keep my eyes open for Centroid Tracking that interests me more than anything.
Thanks
Shan
Adrian Rosebrock
Thanks Shan, I’m glad you enjoyed the post.
Mansoor
Great tutorial Adrian!!
Can Intel Movidius NCS improve the FPS? and by how much?
Thank you.
Adrian Rosebrock
This model (dlib) cannot be directly used by the Movidius NCS so a comparison cannot really be done. Some work has been done with OpenFace and FaceNet to run on the NCS, such as this repo but I haven’t been able to run it on the NCS.
Damir
Hi Adrian,
Love your work, I’ve been learning about neural networks and machine learning in the last couple of months and your blog has been of HUGE help for me, so wanted to thank you for that 🙂
Regarding this topic, have you considered converting some Tensorflow model for face recognition, such as those provided with facenet by David Sandberg, to Movidius graph in order to increase FPS for face recognition on RPi platform?
Adrian Rosebrock
See my reply to Mansoor.
Gus
Hi Adrian! I recently discovered your site and I love your tutorials. I have a question about implementing the face detection technique you described in your post “Face detection with OpenCV and deep learning” with the face recognition technique described here on a RPI3. The caffe model from the previous post achieves between 1 and 0.25 fps on my PI (running a few other real-time things). I’ve yet to implement the face recognition technique described in this post but it sounds like this method will slow my face detection/recognition pipeline down to about 0.1 fps or worse. I’m really impressed by the accuracy of the caffe model vs the haar cascades so I’d like to continue using them if possible. Do you have any suggestions for using these two models together on a RPI? I don’t expect to achieve anywhere near real-time performance but a frame rate of ~0.5fps would be nice if possible.
Thanks,
Gus
Adrian Rosebrock
The Pi just isn’t fast enough to run both the Caffe face detector along with dlib’s facial embedding network. There isn’t really any “tricks” here, unfortunately. You’ll likely less than 1 FPS if you try to combine both of them on the Pi. There is some work being done with the Movidius NCS (see other comments on this post) to help speedup the pipeline but all the pieces aren’t quite there yet.
Xue Wen
Thank you for the wonderful post! Always wait for your post to learn new things. Are you planning to write a blog about running face recognition on Intel Movidius NCS?
Adrian Rosebrock
I’m considering it but I do not have any definite plans yet.
naitik
Thanks for creating this level of informative posts which anyone can learn, This post is also very informative and useful too..
Can i ask you for some more updated posts on OCR from image let’s say my driving license with current advancements in the field will be really helpful for many.
Ian Carr-de Avelon
Dear Adrian,
In your post on face recognition on the Raspberry Pi you say:
“is naturally limited in terms of computation power and memory (especially without a GPU)”
I can’t imagine that you are unaware that different information is out there:
” and on-chip graphics processing unit (GPU).”
https://en.wikipedia.org/wiki/Raspberry_Pi
apparently the most openly documented GPU:
https://petewarden.com/2014/08/07/how-to-optimize-raspberry-pi-code-using-its-gpu/
and other video hardware they will uncripple for a price:
http://www.raspberrypi.com/mpeg-2-license-key/
What are you saying? Is this all “fake news”? or the Pi’s GPU is some kind of joke you shouldn’t really call GPU? or you just mean it’s not supported by your favourite software?
Yours
Ian
Adrian Rosebrock
Indeed, the Pi does have a GPU. The problem is pushing the computation to the GPU using existing libraries — it’s not an easy task. Secondly, I would suggest you read through Pete Warden’s post again. Notice how the inference on a single image took 3.3 seconds (even while using the GPU).
The Raspberry Pi GPU is not a “joke” but when people think of GPUs they are normally thinking of more powerful ones, such as NVIDIA’s line. Keep in mind that the Raspberry Pi, no matter what, is still limited by it’s power draw and processing power. It’s not a powerful GPU.
Furthermore, while OpenCL is making it easier, but we’ve still got a long way to go.
Anthony The Koala
Dear Dr Adrian,
Thank you for this tutorial. My particular question is about increasing the frame rate. You informed us about using eigenfaces and local binary patterns (LPB) as a method of increasing the processing rate.
You also have a tutorial at https://pyimagesearch.com/2017/02/06/faster-video-file-fps-with-cv2-videocapture-and-opencv/ which talks about faster video file FPS with cv2.VideoCapture and OpenCV, and another tutorial at https://pyimagesearch.com/2015/12/28/increasing-raspberry-pi-fps-with-python-and-opencv/.
Would these tutorials help with speeding up the processing?
Thank you,
Anthony of Sydney
Adrian Rosebrock
Both do. It just depends if you’re using a USB camera or the Raspberry Pi camera module. I actually implemented the
VideoStream
class in this blog post to combine the two blog posts you are referring to into an easy to use class. The code used in this post is already taking advantage of threaded video stream.Amit Roy
Adrain, check below blog.
https://medium.com/@aiotalabs/deep-neural-network-on-raspberry-pi-c287e06a3250
They claimed to achieve 18FPS on Pi-Zero-W with ResNet18 trained on CIFAR-10 with their technology. And they claim that they were your students 🙂
Adrian Rosebrock
This is awesome, thanks so much for sharing Amit! 😀
Adrian Rosebrock
I tested with two cameras:
1. The Raspberry Pi camera module
2. A Logitech C920 USB camera
priyanka
i only have Raspberry pi camera module but it doesn’t work with that and it shows error no module named ‘PiCamera’
Adrian Rosebrock
It sounds like you haven’t installed Python’s “picamera” module on your system:
$ pip install "picamera[array]"
Additionally, you should read this post on how to access the Raspberry Pi camera.
Lotfi
Hello Adrian,
Firstly Thanks for this tutorial Adrian.
i have a RaspberryPi and i want do the same thing that you do, but instead o do detection and the recongition in the raspberryPi , i want to stream the camera feed to the cloud and do all the proccesing their because raspberryPi is very slow.
could you suggest me a way to do that, especially the stream step.
thanks
Adrian Rosebrock
Thanks for reaching out. I don’t have any tutorials on taking a Raspberry Pi stream and piping it to the cloud for processing, but if I do cover it in the future, I’ll certainly let you know.
However, I will say that if your goal is true real-time processing that this likely isn’t a good idea. The I/O latency introduced by network overhead will be slower than just processing the frame locally.
Daniel Lopez
Hello Adrian,
First of all thanks for this tutorial.
I’m having problems when trying to install the dlib libraries on my Raspberry Pi 3 Model B.
I’m using your Raspbian.img on 32GB SD card, updated and upgraded the system (as suggested in some post) and using this command to get into the Python3 + OpenCV environment:
source start_py3cv3.sh
Once I got the py3cv3 shell I have tried: pip install dlib
and the libraries downloaded fine but the installation procedure never finish ( it was running for almost one hour) and the command cc1plus is using almost the 100% of the CPU.
Any help will be appreciate.
Thanks
Daniel Lopez
Hi again,
please discard this post, finally the library was installed (it took almost two hours to complete)
Thanks
Adrian Rosebrock
Indeed, it can take awhile for dlib and the face_recognition libraries to compile and install. Congrats on configuring your Pi for face recognition, Daniel!
Santhosh
Hii adrian, I am having the same problem with installing these dlib libraries, I keep swapping the memory for it install but the instalation stops after 95%. It hangs after this.
Julian
Hello Adrian,
i really appreciate your work !
But i have a problem right now. If i want to intall the dlib toolkit, the installation stucks at “Running setup.py bdist_wheel for dlib…” this also happens if i try to install the face_recognition module.
I tried to install dlib by your guide :https://pyimagesearch.com/2018/01/22/install-dlib-easy-complete-guide/ but if i want to check at the end if its installed it doenst show up in the terminal. I dont know why it is not working. Any idea?
Adrian Rosebrock
It’s probably not “stuck” — it’s more likely compiling and installing. Check your CPU usage and let the Pi sit overnight just to make sure.
Lucian
Hi Adrian
Will you ever make a tutorial for object detection based on HOG/SVM which not includes face detection ?
I am asking because, using Haar cascades, this task seems to be “too simple” compared to detecting, for example, an apple / a car / a pen.
Thanks
Adrian Rosebrock
Hey Lucian — I actually cover HOG + Linear SVM detectors for non-face detection inside the PyImageSearch Gurus course. One of the examples in the course is training a car detector with HOG + Linear SVM.
pursotam niraula
cant we detect particular object in the similar way??
Adrian Rosebrock
You would need a model trained to recognize an object. If you’re new to object detection give this post a read.
Michael
Hi Adrian. First of all, I’m sure that you haven’t heard it before :-): you articles rocks. Very informative and interesting, but also pedagogical.
I’m building an architecture of different classifications of live video from multiple Raspberry Pi’s (Zero’s preferred) where I need to classify:
1. different objects (people, cars, animals)
2. states in specific locations in in the image (door open/door closed
3. face detection/recognition
I lean towards 3 different models, but would like to hear your take on this architecture?
I’m satisfied with 1-2 FPS, so with the architecture of 3 models in mind (3 * 1-2 FPS = 3-6 FPS), I believe the Pi will come to short. I’m therefore thinking of a low powered centralized unit that handles image processing from 3-4 livestreams (3-4 Pi’s * 3-6 FPS = 9-24 FPS)
What low powered unit do you recommend to handle this processing or do you recommend another overall architecture?
Adrian Rosebrock
The Pi Zero is far too underpowered — I would immediately exclude it unless you wanted to play around with something like a Movidius NCS or Google’s AIY kit, but then you need to be concerned with power consumption as I assume you are. You could have a centralized system for processing all frames but keep in mind network overhead — while the central machine is technically faster you also need to account for the time it takes for the frame to be transmitted and the results returned. You might want to run some experiments to determine if that is viable. Otherwise, you might be able to replace the entire Pi architecture with a Jetson TX1 or TX2.
Michael
Hi Adrian,
Thank you for the quick answer. Yeah, need to do some testing with network latency.
Have a wonderful summer
Ritvik Ranadive
Hello Adrian,
Do you know if the Jetson TX1 supports python sklearn SVM. I am facing issues in importing a once class SVM that I trained on my personal computer.
Adrian Rosebrock
Yes, it’s a Linux-based OS that will support scikit-learn. Without knowing what the error is I can’t provide any recommendations but my gut tells me you might be using two different versions of Python or scikit-learn on both your Jetson and personal computer.
Chris
Hi David,
Which generation Raspberry Pie did you use for this case?
Chris
Also, will the 1st generation Raspberry Pie work for this case, if performance is not a concern at this moment? It is said to be an ARM11 running at 700MHz
Adrian Rosebrock
I used a Pi 3B for this example. I would not use a Pi 2 or earlier.
Patrik
Hi Adrian!
Is it possible that the face recognition omit the photographs?
Thanks
Adrian Rosebrock
Hey Patrik — could you be a bit more specific in what you mean by saying omitting a photograph?
Paul Christian
Adrian, thanks for your efforts in developing this demo. Can you please tell me the OS version on RPi that you used? I have been having a difficult time just getting the python packages installed! Also, did you develop and test the detector on a PC or MAC then transfer to the RPi? If not, what editor did you use on the RPi? The default RPi editor is unable to find the required python libraries? The python 3 command line can identify the libraries.
Thanks for the help
Adrian Rosebrock
I used Raspbian Stretch for the example. I normally use either Sublime Text or PyCharm with the SFTP plugin to code on my Mac but the code itself is actually stored on the Pi. Sublime Text will run on the Pi though, that’s another good option.
If you are having trouble getting your Pi configured make sure you take a look at my Raspbian .img file included in the Quickstart Bundle and Hardcopy Bundle of my book, Practical Python and OpenCV. The .img file comes with OpenCV, Python, and the face recognition modules pre-installed. Just flash the .img file to your Pi, boot, and you’re good to go. It will save you a lot of time and hassle.
Antony Smith
Hey Adrian, will try a couple ideas on this one but it seems I’m the only one to get the:
ValueError: unsupported pickle protocol: 3
when it come to line 22: data = pickle.loads(open(args[“encodings”], “rb”).read())?
Any idea what could be causing this as I get the same error if I just run the rec on a single still image.
Same ‘pickle’ error, though no error on importing any of the libraries?
Adrian Rosebrock
Which version of Python are you using? I would suggest you re-run the script to extract the facial embeddings (which generates the pickle file). Then try to execute the facial recognitions scripts.
Khaw Oat
Is this a deep learning?
Adrian Rosebrock
It’s using deep learning under the hood. See this post for more details.
Khaw Oat
hood?
I don’t understand this word.
Adrian Rosebrock
Hood as in “under the hood of a car”. The blog post I linked you to will show you how deep learning object detection works similar to how if I opened the hood of a car you would see how the engine works.
Khaw Oat
Thank You.
I’m working on a deep learning project.
Vincent Kok
Hi Adrian,
Very cool tutorial! I am doing some research on how a small or large database would affect the performance of the face recognition. Any ways I could measure the performance/time from when the input image is given to it is being recognize as a person ID? I would like to try for a database with 100 person VS 50 person to see if there is speed difference.
Hope you could help me on this.
Thanks!
Adrian Rosebrock
All you would need is a simple call to the “time” function in Python:
From there you can perform your evaluation.
Kasidet Pea
Hi Adrian! Thanks for this tutorial. Would you recommend what camera I could use to do face recognition with raspberry pi
Adrian Rosebrock
The Raspberry Pi camera module is a good start. I’m also a fan of the Logitech C920 which is good given the price.
Sahil
Instead of only name, is it possible to make a user interface that can display all the information of person.?
Adrian Rosebrock
Sure, that’s totally possible. You’ll want to look into dedicated Python GUI libraries such as TKinter, QT, and Kivy.
Pegah
Hi Adrian,
Very cool tutorial , but I’m trying to run the code on Raspberry pi , every time i run the code after about 1 minute i get segment fault
do you have any suggestion for me ?
Adrian Rosebrock
Which script is generating the segmentation fault?
Sarah
I also got a segmentation fault when running encode_faces.py
Ben Nguyen
I also got a segmentation fault within the encode_faces.py script
What should I do?
FYI: This is my first project with the raspberry pi (I know it’s kind of a big project to start with) So if the answer could be simplified so that someone like me could under stand that would be greatly appreciated.
Adrian Rosebrock
Your machine is running out of memory. As I said, don’t try to encode the faces on the Raspberry Pi. Do that on your laptop/desktop where your machine has more RAM. Then take the trained model and deploy it to the Pi.
Jerry
Hello! I’ve just started using the Raspberry Pi to work on a project based on facial recognition. Would you mind explaining how I can use my laptop to train the model or just some way to start this process?
Thanks a lot for your help!
Adrian Rosebrock
You run the “encode_faces.py” on your laptop/desktop. Then, take the output encodings and transfer it to the Pi with your “pi_face_recognition.py” script. The “pi_face_recognition.py” script is then executed on the Pi.
Sandra
I managed to execute encode_faces.py without any problems and obtained encodings.pickle. However, on running pi_face_recognition.py, I received a segmentation fault. Is this because of the same reason (my machine is running out of memory)? Or is this happening because of some other memory fault? Would you be so kind as to help me figure this out?
Thank you!
Adrian Rosebrock
It’s hard to say without knowing which line of code is throwing the error. Try using “print” statements and Python’s debugger tool (pdb) to figure out which line of code is causing the seg-fault.
Alex
Hello Adrian,
I am facing the same issue as others on that specific topic. I have encoded the faces (hog method) and then copy/pasted the result on the Pi.
When I try to run pi_face_recognition.py on the Pi, I get to various points of the script (per the print outputs I added) before reaching either:
1) a Segmentation fault
2) a freeze of the terminal
My 3B+ is not overclocked (default 1400 MHz) and I have tried a variety of RAM split, giving 128 Mb->256 Mb -> 512 Mb to the GPU, to no avail.
If a freeze is reached, the 4 cores stay at 100% use per htop and I have to kill the process via another terminal. If a segmentation fault happens, the script just exits.
Any idea what would be causing this? How can I diagnose further?
Thanks!
Alex
Actually, calling `export OPENBLAS_NUM_THREADS=1 ` solved this issue. The script is now stable, running at 2.5 fps.
See https://github.com/ageitgey/face_recognition/issues/294 for more details (all the way at the end).
However, only one core is being used. Any clue how to use all 4 cores and not crash?
Kai
Hi, adrian
when i wan to run python encode_faces.py –dataset dataset –encodings encodings.pickle \–detection-method hog
it has error saying that importError: no module named face_recognition.
is that the face_recognition module must be install in the environment in order to run?
Ps: i have installed the face_recognition module, but not in the environment.
Adrian Rosebrock
Are you using a Python virtual environment when you execute the script? If so, you need to install face_recognition into the Python virtual environment as well. Keep in mind that Python virtual environments are independent of your system install.
Wilmer
Adrian I have the same problem, but I am not using virtual environments and I already installed the face_recognition module.
Jenson
Hi,
could anyone help me with a possible fix for this please?
[INFO] loading encodings + face detector…
[INFO] starting video stream…
Traceback (most recent call last):
File “pi_face_recognition.py”, line 42, in
frame = imutils.resize(frame, width=500)
File “/home/pi/.virtualenvs/cv/lib/python3.5/site-packages/imutils/convenience.py”, line 69, in resize
(h, w) = image.shape[:2]
AttributeError: ‘NoneType’ object has no attribute ‘shape’
Adrian Rosebrock
OpenCV is unable to access your Raspberry Pi camera module or your USB webcam. Which are you using? USB camera or Raspberry Pi camera module? Keep in mind that depending on which one you are using you’ll need to update either Line 27 or Line 28.
Filip Jurković
sorry,
where do I modify the type of camera that I am using?
Adrian Rosebrock
Line 27 and 28 of the
pi_face_recognition.py
script.Andrew
Hi Adrian! Thanks for this guide!
The `face_recognition.face_encodings()` method is causing a segmentation fault in the “encode_faces.py” file on my Raspberry Pi 3B with a fresh install of Raspbian Stretch. Any idea on how to fix this?
Thanks!
Adrian Rosebrock
Hey Andrew — it sounds like there may be a problem with your dlib install but it’s hard to pinpoint what the exact error is. I would start by posting the problem on the official face_recognition GitHub page.
Milenko
Hi Andrew,
I have the same problem. Did you manage to fix it?
Thanks!
akshay
How you solved it
Anuj
Hi Adrian,
I have a dataset containing 6 faces of 3 people each. I ran this code and it works fine when detecting my face and my friend’s face. It faces trouble while detecting the third person’s face. It detects it as my face. Does this algorithm work only for binary classification?
Adrian Rosebrock
This algorithm can work for multi-person classification. Keep in mind that we are using a simple k-NN classifier here. For improved accuracy try taking the embeddings and training a non-linear model on them.
Yong Shen
Adrian, I am in the midst of improving the accuracy. What do you mean by taking embeddings and training a non linear model … Can u elaborate further ? Thanks Adrian
Adrian Rosebrock
Take a look at this tutorial where I show you how to train a non-linear model on the face embeddings.
Vamshi
Hi Adrian.. Thanks for the dlib installation process. Installed dlib successfully but cant install face_recognition, showing memory after downloading 99%. Please help me..
Adrian Rosebrock
Hey Vamshi, I’m not sure I understand the error. Has the download stalled or are you actually getting an error message?
pedroprates
The installation is probably too big for your available pip cache. Try running pip –no-cache-dir install face_recognition to avoid this issue.
arulraj
Hi Adrian,
Instead of video streaming, can I give the image directly to identify the face. If yes, what is the function I should use. Please assist.
frame =
image
Adrian Rosebrock
You should follow this post instead.
Ahmed
Hi Adrian,
I am trying to save the data that I got from previous training to re-use them later on, without having to train again on that person but train on another person and still be able to recognize the person person.
Any ideas?
Adrian Rosebrock
Dauy, a PyImageSearch reader, had a similar question on the original face recognition post. You can see my reply to them here.
Vamshi
Hi Adrian when i show any face to camera it is showing segment.. Untill then video streaming was working perfect. When i show any face window is getting closed and showing segmentation fault.. Please help me
Vamshi
I mean segmentation fault
Adrian Rosebrock
I would insert “print” statements to determine which line is causing the segfault. Off the top of my head it’s likely a problem with your dlib install.
Ankit Kumar Singh
Nice Tutorial Adrian!!
I would like to know whether this method will detect and recognize faces when we don’t look straight into the camera i.e. the face is tilted by at least 45 degrees in either direction?
Thanks
Ankit
Adrian Rosebrock
Hey Ankit — have you tried it with your own data yet? Be sure to give it a try first. Secondly, you might want to look into face alignment.
hami
hello adrian,i want to use two camera for face recognition but i no idea for this,how i add another camera for this project?
Adrian Rosebrock
This tutorial will show you how to add multiple cameras to the Raspberry Pi.
Alian
Hi Adrian,
first of all thanks for your great tutorial.
i am a beginner and learn step by step from you and now i want to do this project on my PI 3 B.
the last step i have done was installing imutils.
i dont have a camera, is it possible to go on this project on a video file? what are the differences in steps?
i read https://pyimagesearch.com/2018/06/18/face-recognition-with-opencv-python-and-deep-learning/ tutorial too, but you prefer not to use it on Raspberry PI.
what should i do now? could you help me please?
Adrian Rosebrock
If you’ve already read the previous tutorial then you’ll notice we use the “cv2.VideoWriter” function to write frames to disk. You can use that method with this code as well.
aliyan
hi Adrian,
i’m a beginner on pi 3 B and learn from you.
i want to do this project, is it possible to do this project without camera on a video file?
what are the different steps?
could you help me please?
Adrian Rosebrock
Yes, you can absolutely perform face recognition on a video file. You should refer to this post for more information.
Tommy
Hello Adrian,
When I use:
vs = VideoStream(usePiCamera=True).start()
I have below error:
(cv) $ python pi_face_recognition.py –cascade haarcascade_frontalface_default.xml –encodings encodings.pickle
…
ImportError: No module named picamera.array
What I should to do.
Thank a lot.
Adrian Rosebrock
Hey Tommy — you need to install the “picamera” module into your “cv” Python virtual environment:
Steven Veenma
First of all thanks for you wonderfull contributions to offer image processing to a broad public. Recently I concentrated on this tutorial to use this as a building block for a smart drone we intend to make.
I got some problems running the pi_face_recognition.py script. Below the message I got.
[INFO] loading encodings + face detector…
[INFO] starting video stream…
Unable to init server: Could not connect: Connection refused
(Frame:905): Gtk-WARNING **: cannot open display:
Browsing these errors I realized that I choosed to use the rasbian stretch lite image that has no graphical interface. Without a GUI the image could not be shown. To avoid the hassle of a new installation I found some sources to repair this
https://raspberrypi.stackexchange.com/questions/72218/raspbian-stretch-lite-lightdm-doesnt-run
https://www.thegeekstuff.com/2010/06/xhost-cannot-open-display/
Then I had to solve some additional problems:
– Automatical login didn’t accept the credentials so I choosed B3 in raspi-config
– The profile file appeared not to be loaded automatically, so I loaded this manually
But fortunately when I runned the script now from this very basic graphical environment it did very well. Suprisingly I got fps rates between 5 and 6. So apparently it outperformes the other RPI3 based solutions with fps rates that are reported considerably lower. Perhaps the performance of these is limited by the burden of complete graphical processes. I think avoiding the graphical environment is a angle to improve the performance. In many use cases the graphical environment is not needed.
Adrian Rosebrock
Thanks so much for sharing, Steven!
Steven Veenma
I justed tested the sd card in a RPI2 without problems: FPS 2.5-3.0
KKaisern
Hi, Adrian
Currently, I working a raspi project which is biometric authentication for smart mirror, and I plan to implement face recognition into the Magic Mirror as a third party modules. Can this pi face recognition work well with Magic Mirror? Appreciate that if you could reply me. Thanks.
Adrian Rosebrock
I haven’t built a magic mirror myself, but yes, I imagine it would. As long as the camera can easily detect the face it shouldn’t be a problem.
Huang-Yi Li
Hi, Adrian
I try to construct a dataset consist of 5 persons. But I found out the results with low accurateness. How can I improve the accurateness?
Thanks.
Adrian Rosebrock
You may want to play with the confidence and threshold parameters of the actual face_recognition method (see the documentation for more details). I’m also not sure how many images you have per person — you may need to gather more.
Benedict
Hi Adrian,
I’m currently working with my raspberry pi project with OpenCV that should detect vehicles and work just like your OpenCV people counter blog. I need identifier like haar that detect only vehicles…. Also would it be slow running in the raspberry pi? Thanks
Adrian Rosebrock
I would start by reading this post on object detection so you can understand the concept better. The problem is super accurate methods like deep learning object detectors will run super slow on the Pi. You should also look at Haar cascades and HOG + Linear SVM detectors. You may need to train your own model.
claude
Hi Adrian,
Thanks you for you post.
is it possible to use this face recognition method with a Movidius stick plugged in RPI 3B ?
If yes, do you have a solution ?
Thanks in advance.
Claude
Adrian Rosebrock
I’m sure it’s possible to some degree, but I do not have a tutorial dedicated to Movidius face recognition. There is a thread on the Movidius forums that may interest you.
Huang-Yi Li
Hi Adrian,
I notice a problem about the accuracy. According to your method and code, I try so many faces and I think it has good accuracy for recognizing westerner. But I try it by using Asian faces, it has very low accuracy. Do you know the reason(s)?
Adrian Rosebrock
Hi Huang-Yi — that is strange behavior, but I will say that the dataset was trained on images of popular celebrities (actors, musicians, etc.), many of which are of western descent. I imagine there is some unconscious bias in the dataset itself. That said, if you have a dataset of Asian faces you could perform transfer learning via fine-tuning to make the model more accurate on your own dataset.
Jason
Hi Adrian,
Thank you for your code. The same case as what Huang Yi said, it can hardly recognize my friends who are from East Asian.
Adrian Rosebrock
Unfortunately I think it’s a bias of the dataset the model was trained on. I highly doubt that anyone “purposely” excluded East Asians from the dataset, but it unfortunately looks like East Asians may have been under represented in the dataset — this is a problem that we all need to be careful and mindful of now that machine learning is becoming more prevalent in our daily lives. In your case I would suggest training a model on an East Asian dataset if you are specifically interested in recognizing East Asian friends.
Jason
Hi Huang-Yi,
Have you found any method to improve the accuracy for Asian people?
Huang-Yi Li
Hi Jason,
In order to solve this problem, I am trying find a dataset of Asian faces. And I use other way temporarily to recognize East Asians. I use the model from https://github.com/davidsandberg/facenet and I use SVM to classify faces.
Huang-Yi Li
Thanks for your reply. If i want to perform transfer learning, what should I study or learn something? Since I only know you use dlib and face recognition module in this post, but I don’t have any idea about tuning their parameters (assume that I have a dataset of Asian faces.)
Adrian Rosebrock
Actually, Deep Learning for Computer Vision with Python covers how to perform transfer learning, including how to perform transfer learning for object detection. I would suggest starting there.
Huang-Yi Li
Could you tell me which bundle(s) contain these contents?
Adrian Rosebrock
Both the Practitioner Bundle and ImageNet Bundle discuss both transfer learning and object detection. The ImageNet Bundle includes more information on object detection and more transfer learning examples as well.
Sachin
Hi Adrian, many thanks for the tutorial!
Was wondering if there is a way to return the percentage match that was acquired in recognizing the face detected? Or does the algorithm give a binary match/no match type answer?
Many Thanks
Adrian Rosebrock
Hey Sachin — the algorithm used here is a modified k-NN algorithm. You could further modify it to return a percentage but it doesn’t mean much when using k-NN. In a couple of weeks I’ll be showing a different face recognition method that can return actual probabilities. Be sure to stay tuned for the post!
Vedant Bhalgama
Hey Adrian!
It was a nice project but now i wanted to convert this into attendance system, so can u guide me for doing so?
Adrian Rosebrock
My book, Raspberry Pi for Computer Vision, shows you how to build a face recognition-based attendance system. I suggest starting there.
Salih
boxes = [(y, x + w, y + h, x) for (x, y, w, h) in rects]
I did not get this line much how do we reorder those?
rubentxo
Hi Adrian,
Running the code in a Raspberry Pi and coding with Thonny IDE, I get this error in the command line:
$ sudo python encode_faces.py –dataset /home/pi/PruebasPython/pi-face-recognition/dataset –encodings encodings.pickle –detection-method hog
Traceback (most recent call last):
File “encode_faces.py”, line 1, in
from imutils import paths
ImportError: No module named imutils
Your imutils module is installed (I’m not using the virtual environment).
If I create a example.py code with:
from imutils import paths
I don’t get any error. So, I supoose the imutils is installed well and it also appears in the
Manage packages of Thonny IDE.
I’m stuck! 🙁
Regards! And thanks for your awesome lessons!
rubentxo
The problem is SOLVED!
Executing Python 3 in the command line I’ve made the script could work.
Sorry for inconvenience.
Thansk for you r lessosn!
regards,
Adrian Rosebrock
Congrats on resolving the issue!
Myat Pwint Phyu
I also this problem. Would you want to solve this problem?
Adrian Rosebrock
Can you try executing the script via command line argument instead?
Bao
I have problem too, please help me.
Haziq Sabtu
Hey Adrian Rosebrock,
I’m still new to the world of programming and Raspberry Pi. I am really hype about this project. What code do I need to run in order to make the output of the face recognition to interact with other program (such as I want the light in my room to turn on as it detected my face). I am not asking for a complete guide but it will be very much appreciated if u could give some keywords or links to this kind of things. Basically I just want things to interact.
Many thanks =D
Adrian Rosebrock
Hey Haziq, it sounds like you are building an IoT application. Exactly what code you write is heavily dependent on your application (i.e., opening a lock, turning on a light, etc.). You should first decide on what action you want performed and then research what libraries you can use to achieve that goal. From there, you can link the two together — but only continue until you know how you can programmatically perform your “action”, whatever that may be.
adnan
hi Adrian,
..is there any an alternative way of face recognition. is there any tutorial for face recognition other than open cv?
Sonam
Greetings!
I am Sonam from Bhutan, a small landlocked country between India and China. Currently, I am doing a computer vision project on implementation of face recognition in surveillance systems using OpenCV with Python. I found this post important for my project and informative too.
I look forward to taking this blog as a guide for my project.
With Regards.
Adrian Rosebrock
Thanks Sonam and best of luck with your project!
Prema
Hi Adrian,
I ran encode_faces and it successfully created encodings.pickle but when I ran pi_face_recognition.py either pi camera or USB camera I received this error.
** (Frame:1626): WARNING **: Error retrieving accessibility bus address: org.freedesktop.DBus.Error.ServiceUnknown: The name org.a11y.Bus was not provided by any .service files
It manage to detect the person but the above error is displayed. Google to check what is wrong but couldn’t find an answer. I wonder if you could determine what is causing the above error. Thanks
Adrian Rosebrock
It’s a warning message from the GTK library. It can be safely ignored and it has no impact on the ability of your code to successfully and correctly run.
Hasan
Hello Adrian,
I have a question, will the commands or the syntax in general be different if I’m using windows?
I tried some of your codes but it doesn’t work properly.
Thanks
Adrian Rosebrock
The only thing that may be different in Windows would be the path separator “\” versus the standard Unix path separator “/”. Otherwise there should be no other differences.
abc
picamera.exc.PiCameraMMALError: Failed to enable connection: Out of resources
I am getting this error please help
Adrian Rosebrock
It sounds like your Raspberry Pi camera module is (1) already in use by another application or (2) is not properly connected to the Pi. Make sure you double-check and try again.
Alessandro Marques Gentil
Can I run this code in an Android smartphone?
I want to use for a project in my university, if I can do this will be perfect xD
Thanks in advance!
Adrian Rosebrock
No, this code is not portable to the Android. You could build a simple REST interface though, that would likely be the fastest solution if it’s a university project.
Wilfred
can not find zip folder to copy
Adrian Rosebrock
Hey Wilfred — which .zip file are you referring to?
azim
If I want use API to get a image such database , where to put the API into encode_faces.py ?
syafi
Hi adrian
i have problem where encode_faces.py: error: unrecognized arguments: –detection-method hog
Adrian Rosebrock
You need to properly supply the command line arguments to the script. If you need help, read this tutorial.
balaji
hi adrian
thanks for your support!!
i followed your blogs to install open cv 3 on raspberry pi and it was installed correctly ,and also i followed your blog “https://pyimagesearch.com/2015/03/30/accessing-the-raspberry-pi-camera-with-opencv-and-python/” to test my camera and it also worked.
now I am trying to do face recognition project, when i try to install “pip install face_recognition” command its showing an error message like no memory i am using 16gb memory card,,
and again i tried my raspberry pi get hanged ,,,,,,what should i do now,,
Adrian Rosebrock
It sounds like your Raspberry Pi is running out of RAM (RAM is different than the size of your SD card). Try increasing your swap size like I do in this tutorial.
gokhan
Hi. How many people can be recognized with method? And what should be number of image per person to the recognition? Thanks.
Adrian Rosebrock
Those questions are answered in the “Drawbacks, limitations, and how to obtain higher face recognition accuracy” section of this tutorial.
gokhan
Thanks! I read it, but I couldn’t found my question’s answer which how many people can be recognized with dlib? What is the model capacity? How many people can be identify?
Adrian Rosebrock
It really depends on your exact environment and how “similar” the people are in your database already, but by using this k-NN approach using pre-trained embeddings you’ll get pretty reasonable accuracy for 10-30 people. After that it doesn’t do as well. For more people you’ll want to train a network from scratch or fine-tune.
Patrick Eala
Hey Adrian! I was able to implement the real-time face recognition project. However, when I add pictures to register my face in the dataset, I sometimes run into the error “Invalid SOS parameters for sequential JPEG”. Acdg to my research SOS is the start of scan for the jpeg encodings but I don’t know what is causing the error or how to fix it. Please let me know if you have a solution for this. Thanks!
Adrian Rosebrock
That doesn’t sound like an error, it sounds like a warning from the libjpeg library used to load JPEG images via
cv2.imread
. I would safely ignore it.Gary
Good day sir, may I know how can I run both of your project :
1) qr code from pyimage
2) this project
At one time simultaneously using my RPI
Is it possible?
Adrian Rosebrock
Yes, you can certainly integrate the two but I recommend you have some prior experience with computer vision. Based on your previous comment on a separate post I get the impression that you may be new to computer vision and OpenCV. That’s okay, but make sure you educate yourself and learn OpenCV first.
Gary
Can I carry them out separately using 2 different webcam but at a time?
Adrian Rosebrock
Yes, absolutely, but I again encourage you to learn OpenCV first. If you struggle to get face recognition working on just on camera you will struggle with two as well.
Yushaa Malik
Which opencv version is used?
Adrian Rosebrock
Any OpenCV version above 3.4.2 will work.
Ethan
Hi Adrian,
Thanks for sharing the codes and guideline. I met an issue when doing face encoding. The log is below. Could you please advise what the issue I encounter? I just took the face pictures and put them to dataset with the name. Can I just take the face pictures by phone and put in the dataset?
MemoryError: std::bad_alloc
Adrian Rosebrock
Your Raspberry Pi ran out of memory. Try resizing the images to smaller spatial dimensions to reduce memory load.
Ethan
Hi Adrian,
Thanks for the feedback and understood.
In the end, I was able to use the method of your blog post on How to create a custom face recognition dataset to set the dataset.
Thank you.
Regards,
Ethan
Adrian Rosebrock
Awesome, I’m glad that helped you!
Uwe
Dear Adrian,
thank you so much for this excellent tutorial and all the work you had done for all Raspberry PI users, interested in OpenCV.
My Raspberry Pi3 now perfectly recognizes faces, using an USB web cam.
Best regards from Stuttgart / Germany
Adrian Rosebrock
Awesome, great job Uwe!
mincas
HEY ADRIAN …. thanks so much for all the tutorials and I have successfully completed this project, but there is one thing that affect my project significantly… The face recognition is not accurate eventhough I have 30 face samples each for me and my friends..
I have look up on https://pyimagesearch.com/2017/05/22/face-alignment-with-opencv-and-python/ and i think it might or may increase the accuracy …, so do u think is it possible that i incorporate the facial alignment concept into this project ?
Adrian Rosebrock
Be sure to refer to this tutorial, specifically the “Drawbacks, limitations, and how to obtain higher face recognition accuracy” section where I discuss face alignment and how to improve accuracy.
Mukesh
Hello sir!
I have followed your tutorial for face recognition using raspberry Pi .. but the issue I am facing is.. i have created face dataset as you taught in previous blog post but when I am letting other people come infront of camera they are also detected as my name and not unknown and I don’t know how that is happening! So please do tell me the solution!
Thanks in advance!
Adrian Rosebrock
Please see my reply to Bryan on ways to increase face recognition accuracy.
Bram
Thanks for the inpiration and tutorials Adrian! I was able to get it up and running on my Raspberry Pi 3 and finished my project to automatically open the central door of my appartment when my face is recognized.
Adrian Rosebrock
That’s awesome, congratulations Bram!
Debon Lysight
Im trying to do the same thing, but Im failing at finding where to detect the text of the name being outputted into the image. Is this the right way to go about it? How were you able to accomplish this? Any help is greatly appreciated!
Bryan
Hello Adrian, my name is Bryan. Your project is very good and has a good explanation. I manage to do the face recognition. Currently, I doing a project about face recognition to unlock the door. I added my face to the dataset, I can open the door using my face.
But the problem is when my friend scans the face, it recognizes as my face and unlock the door. Do you know how to improve the accuracy of the system? Hope to hear from you soon, Thank You.
Adrian Rosebrock
Make sure you refer to this tutorial where I provide suggestions on ways to increase the accuracy of face recognition systems.
Emre
Dear Adrian
How can I use IP cam with rpi, instead of USB cam for face recognition?
Emre
Adrian Rosebrock
Sorry, I don’t have any tutorials for IP cameras at the moment. I will try to cover it in the future.
Emre
Thanks Adrian.
Maybe anyone has experience with IPcams on rpi????
Lalitha
Hello Adrian,
Actually I’m trying to recognize my face ..I followed the steps from your post- how to create custom face recognition data set.I got the output pickle file for my data set.But for my face it is showing the text “unknown” for my face..Can you tell me tips how to get the name of my data set to my live video..i.e after recognizing my face.Thanks in Advance..
Lalitha
Hey, I finally got it..
Actually I gave wrong path for the Input data set.I found my mistake.
Thank you.. Adrian,I’m really inspired by you.Your posts really helped me a lot
Adrian Rosebrock
Congrats on resolving the issue!
Philip
Hi Adrian
I’m new to raspberry, i’m recently wondering is that possible that make raspberry sent PC stream video then let PC’s python deal with face recognition part to make it faster
Adrian Rosebrock
I don’t have any tutorials on streaming frames from a Pi to a PC but I will be covering that in my upcoming Raspberry Pi + Computer Vision book. Stay tuned!
Yong Shen
Dear Adrian , just a quick question, if I keep on running this project …. For the encoding parts, will the encode codes completely overwrite the data in the encoding pickles ? or does it just add on to the encoding pickles where my previous inaccurate data is still in the encoding pickles ? ..
Adrian Rosebrock
It will entirely overwrite the existing file. The embeddings for all images in your dataset will be recomputed. Be sure to refer to the comments section of this post where I discuss how you can modify the code to allow for updating the JSON file and not recomputing all of it.
Gulump
Could you link the comment?
I cannot find it
Nagaraj Desai
Although the picamera module is installed, i am getting this error:
…
ImportError: No module named ‘picamera’
Adrian Rosebrock
It sounds like you don’t have the “picamera” library installed in your “cv” virtual environment:
vaibhav
hello Adrian
i am having wifi IP camera (UNICAM IP camera) can we use that camera for capturing images for this tutorial instead of picamera. can we access that using raspberry pi since it has its own IP address.
Adrian Rosebrock
I don’t have any tutorials on IP camera streaming (yet). I will be covering the topic in my upcoming Raspberry Pi + Computer Vision book though!
sanat
Hello Adrian, first of all, great work with the tutorial. I was following the tutorial using a Raspberry Pi 2 and iBall USB camera. However, I found that using imutils.video for getting a video feed, was causing a lot of problems and the FPS was very low too. So, instead I used the cv2.VideoCapture(0) which gave a better FPS. Also, I ran into an error while converting the frame to gray using cvtColor(). It was resolved using an if condition before converting the frame.
Also, for those with problems opening the camera, run this command: export display:0
Adrian Rosebrock
I’m not familiar with the iBall USB camera. The VideoStream class wraps around the cv2.VideoCapture method and threads it, making it more efficient. I’m not sure why the VideoStream would have been faster than cv2.VideoCapture. Congrats on resolving the issue but my guess is that it may have been a small logic error somewhere in the code.
Faaiz
Sir when i am installing face recognition it is giving error temporary failure inthe name resolution..
Adrian Rosebrock
Could you share the exact error message? Without seeing the exact error message it’s hard for me to provide any suggestions.
Siva
Hi Adrian,
I am using your code to face recognition in 2GB RAM SOPINE A64 COMPUTE MODULE board. Code is running successfully but when comes to recognizing face FPS goes to 0.2 .Please suggest me to increase the FPS.
Muhammad Hassam
Hi Adrian
Thanks for you useful information i did face recognition niw i want that when camera will recognize me it will speak my name and then after good morning, good afternoon, good evening etc according to time help me how to do this
Adrian Rosebrock
Take a look at text to speech Python packages. Google’s gTTS is a good one.
Muhammad Hassam
actually i am wondering how can i use it with yourcode?
Adrian Rosebrock
I’m happy to provide my code to you for free but if you want to include any additional functionality, especially functionality outside of computer vision, I cannot add that in for you. I’ll give you a hint though — you should take a look the “for” loop on Line 90 when we loop over recognized faces. Maybes if you put put some text-to-speech code there 😉
Muhammad Hassam
after line 87 i call a function and pass name as argument in it the function defination is following
def speak(name)
os.system(“espeak ‘hello”+name+”how are you'”)
it make the system bit slower
when i tried ggts it made my process too slow coz gtts save the mp3 file first then use it need your correction sir
Sharmila
Hi Adrain
my Raspberry pi3 is too slow recognition of faces.i installed HOG detection method.And looking for CNNs for install.can u please help me?
Adrian Rosebrock
As I noted in this tutorial the Raspberry Pi is certainly going to be slow for face recognition. I’ll be covering methods on how to improve face recognition in my upcoming Computer Vision + Raspberry Pi book releasing later this year. Stay tuned!
Sherwin
Good Day Sir. Thanks for the tutorial. I had it working on the Pi. Is there a way to visualize the data using scikit learn or matplotlib?
Adrian Rosebrock
What specifically are you trying to visualize?
Hassi
Is there any way we caputer a video for dataset and then make model with that video
I.e a person come closer to camera and rpi capture video for 1 minute then it will recognize the person by that video sample
Adrian Rosebrock
It sounds like you want to build a face recognition dataset. This tutorial will help you.
Hassi
i have seen that tutorial it takes images and i tried this i want to capture video and train my model from that video by just separating images from video
Adrian Rosebrock
I will be covering that exact use case in my upcoming Computer Vision + Raspberry Pi book, stay tuned!
Talat
hi Adrian i found you blog awesome and i wanted to read every single post of this blog but my loss i am not able to find all the post can you tell me where i can find content list of your posts ?
i also need your little bit help.
I took my 700 photos as training data then it become more accurate i was wondering if i use eye cascade nose cascade lips cascade then will it be more accurate?? i mean it take 6 to 7 photos and give best result.if my idea is right then how can i implement it with your code? need your help.
Adrian Rosebrock
1. To find a list of the posts just head back to the homepage and using the pagination numbers at the bottom of the page to go back through previous posts.
2. See this tutorial where I discuss methods to improve face recognition accuracy.
dilshad
I’ve downloaded the code and trained on a friend and my face. We are both very different in appearance, yet the program recognizes us as identical most of the time. How could i improve the accuracy? I’ve already tried training with many pictures taken under different conditions(night,morning,etc..). Is there any suggestion for me on this please?
P.S: i’m new to this and my knowledge about facial recognition is mediocre.
Adrian Rosebrock
Take a look at my other face recognition tutorial which will show you how to improve face recognition results.
Akash
As for Face detection you have used Haar-cascade algorithm, so for Face recognition which algorithm you have used. As if I know there are 3 inbuilt face recognition algorithms in opencv which are – EigenFace, FisherFace and LBPH. So please explain it to me.
Adrian Rosebrock
Take a look at the this tutorial where I discuss the face recognition algorithm.
Akash
How to print probability/confidence along with name of the person recognised.
Adrian Rosebrock
See my other face recognition tutorial.
Talat shah
Hi Adrian! great tutorial. i did face recognition with the help of your code but want some additional information how can rpi respond me through voice after recognizing me by face.
Adrian Rosebrock
Take a look at “Text To Speech” (TTS) libraries. I’ll even be covering them in my upcoming Computer Vision and Raspberry Pi book!
Rory
Hi i want to add some stuff to the code but i do not know how to do it
When a unknown face is detected i want it to run a .sh file that i made
and i also want it to output the x and y position of the face (with the centre of the camera being 0).
Thanks for your help,
Rory
Adrian Rosebrock
You can use the
os.system
call to execute an arbitrary command on the system. There are other alternatives as well but I would suggest starting there.kaplaars
import error: no module named ‘imutils’
do you know how to solve it, i did the full tutorial
Adrian Rosebrock
You need to install the “imutils” library:
$ pip install imutils
Ben Nguyen
I am a little confused…
I have a raspberry pi 3 model B+
I have already installed dlib, facial recognition, and imutils in a python virtual environment
Earlier the article said that we will use OpenCV’s pre-trained Haar cascade file in order to detect faces
But later, within the encode_faces.py script there is a line that mentions the hog facial detection method
So which one is it or is it both?
And if its hogs will it need to install or will it already be pre-installed
Same for the Haar cascade file, will it need to install or is it already pre-installed
Adrian Rosebrock
We use dlib’s HOG or CNN to detect faces during the initial 128-d embedding process. A model is then trained on these 128-d vectors.
Then, when we actually deploy the model to the Pi, we use Haar cascades.
Keep in mind that you’re not supposed to train the model on the Pi — only deploy the face recognition system to the Pi.
Pavithra
HI,
I have a system with 8GB RAM without a GPU and another 4GB system with an Nvidia geforce 410m which is CUDA enabled. Which would be a better option to try out this application on?
Adrian Rosebrock
I don’t believe the 4GB GPU will be enough memory for both the CNN face detector and face embedder. Try running the face detector on the GPU and the face embedder on the CPU if you can.
ali jaafar
HI
How to make it pronounce the name of the person who sees it?
I need help
Adrian Rosebrock
Take a look at text to speech libraries. Google’s gTTS is pretty nice.
anastasia
hi adrian,
i cant unzip pi-face recognition. please help
Adrian Rosebrock
Make sure you have a good internet connection when downloading the files. Your .zip file may be corrupt due to a poor internet connection.
Muhammad Hassam
Hi Adrian
I was wondering how much photos should be there in a persons dataset i place 700 photos it started everyone calling my name i mean no one was unkown then i placed 13 photos it also have errors can you guid me the exact amount of photos of
Adrian Rosebrock
See the bottom of this face recognition tutorial where I provide suggestions on the number of faces and other methods to improve your face recognition accuracy.
Kishan Sahu
HI Adrian,
Thanks for the code and all, I had tried with it and succeded with the same but one thing is there like the frame rate is so slow so could you please help me on the same that how can i increase theframe rate.. so that the video streaming will be bit faster..
Regards
Kishan Sahu
Adrian Rosebrock
I would suggest using a Haar cascade for face detection if you aren’t already. It won’t be as accurate as a CNN or HOG detector but it will be faster. Otherwise there isn’t much else you can do other than try running the face embedding model on a Movidius NCS.
JayK
Hello!
Is it possible to run it headless, aka without the video stream window?
Adrian Rosebrock
Yes, just remove the “cv2.imshow” and “cv2.waitKey” calls. You could leave them in and test with X11 forwarding and then remove them as well.
Adrian Rosebrock
You can use the “cv2.imwrite” function to write the image to disk. I would also suggest you read through Practical Python and OpenCV so you can learn the fundamentals of computer vision and OpenCV. That book will greatly help you on your journey. Do take a look!
Adrian Rosebrock
The Haar cascade is performing face detection. The face ROI is extracted and passed into the neural network to extract the 128-d embeddings. Then a nearest neighbor algorithm is used for the recognition component.
Kkhaled11
Thank you !
Adrian Rosebrock
You are welcome!
Hashim Ahmed
Hello Adrian.
I was planning to make A home surveillance system to unlock a door using facial recognition and alarm if an unknown face is detected when the doors are locked. I would use a raspberry pi 3, pi camera, servo motor and PIR.
The idea is:
-PIR detects motion and pi camera is on and if the pi camera detects a known face the door unlocks.
-if the door is locked and inside the house a PIR detects a motion, a pi camera turns on and looks for known face, if unknown then alarm and sends a message to the user else turns off.
Can you please recommend me any tutorials or project that I might find useful for my project.
Thank you.
Adrian Rosebrock
Great idea, Hashim!
I’ll actually be doing a very similar project in my upcoming Raspberry Pi + Computer Vision book. I’ll be announcing it next week, stay tuned!
Sunday
Thanks a lot for the resources. I am new to Raspberry Pi and I currently have a face recognition-based employee attendance management system. My quest is: Please can I use this code directly for my application?
Thanks for your help!
Adrian Rosebrock
You can use the code in your own projects/applications but I request a link back/citing the PyImageSearch blog.
Toka Khaled
How can I modify the code so that images in the data set take a path of an external database server containing the images.
And Also send a list of the attendants names to that database (in python).
Any help will be appreciated.
Adrian Rosebrock
Exactly how you pull images in and out of an external database isn’t really a computer vision question. You would need to refer to the documentation of whatever database you are using.
sumanth
how can i install dlib i coudnot install dlib properly
Adrian Rosebrock
You can install dlib using this tutorial.
Rino
is C525 Logitech a good option? thanks adrian
Adrian Rosebrock
I haven’t used the C525 but I’ve used the C920 and really liked it.
Ranga priyan
Hello Adrian,
I have followed the steps for raspberry pi 3b+ and got the results but my project has a little issues and I need to use raspberry pi zero for the project can I use the above method on pi zero and obtain the above same desirable results.
Adrian Rosebrock
The Raspberry Pi Zero is going to be far too slow. I do not recommend using it and I highly advise against it.
Ranga priyan
Thanks a lot for the reply is there a other alternative where i can use a wireless camera module which is compitable with raspberry pi
Kassymzhomart Kunanbayev
Is it necessary to have at least 5 photos per person in the dataset? What if I have only 1 photo per person to build 60-person recognition system?
Adrian Rosebrock
That likely won’t work well. Refer to this tutorial where I provide my suggestions on how to improve face recognition accuracy.
ruby
Hello Adrian, thank you so much for your amazing tutorials but i have a question, how much time does it take for the first three libraries to download? i kept my raspberry downloading all night twice and my raspberry still lagged, i cannot run the code without them, any advice?
ruby
Hello Adrian,
i installed OpenCV successfully from your tutorial and i tested it but when i tried to run the Recognition code it gave me an error which is: ImportError: No module named ‘cv2’
Adrian Rosebrock
It sounds like OpenCV was not installed properly. Which install tutorial did you follow? You’re probably forgetting to use the “workon” command to access your Python virtual environment first.
Choon Kwang
Those who has segment fault when running running video stream. You most likely has the latest OPENBLAS library installed. The reason for the crash is because both dlib and OpenBLAS is multi-threading at the same time which cause face_recognition.face_encodings to crash.
TLDR solution is to set OPENBLAS to single thread:
export OPENBLAS_NUM_THREADS=1
export OPENBLAS_MAIN_FREE=1
Adrian Rosebrock
Thank you for sharing!
hcetiner
Hi sir!
thanks for sharing your knowledge with world.
I have a question.
this is raspberry pi3+
haar or ldb xml files not big differences.
face recognition slows after a while (after 50-55 seconds)
it starts so fast. but slows after a while.
somesays use python2.7 instead of python3.5
what would you prefer more except your answers above ?
it really slows down (app starts 10fps but slows down constantly after a while -1 frame for 4-5 seconds)
thank you so much
Lin
Hi Adrian! I was wondering why you don’t use that much the mobileNetSSD tensorflow model for face detection. I’ve read some comparitions (like this one https://medium.com/nodeflux/performance-showdown-of-publicly-available-face-detection-model-7c725747094a ) where it shows a huge gap between a SSD and other models.
Shoudn’t it be more reliable than other models?
Adrian Rosebrock
Are you referring to the Multi-task Cascaded CNN?
Zarar
Hi , so I downloaded your coded and ran the program but I keep getting this error –
“encode_faces.py: error: the following arguments are required: -i/–dataset, -e/–encodings”
, I have tried solutions available on the internet but they don’t seem to work.
Adrian Rosebrock
You need to supply the command line arguments to the script. Read that tutorial first.
SarraFig
Thank you Adrian a lot I like your work..
I have a question, Is it possible to work with two raspberry pi to increase the perfermance? if yes can I work with cnn then uwsing two raspberry??
Adrian Rosebrock
Using two RPis isn’t going to increase the performance. Instead, you should utilize a Movidius NCS or Google Coral USB accelerator, both of which are covered in my Raspberry Pi for Computer Vision book. You can learn more, including pre-order you own copy, using this link.
Isra Chahrazed
Hello Adrian , Thank you so much for the AMAZING Tutorials , i would like to ask you for advice , we are working on implimentating Facial recognition security system using raspberry pi , since it seems to be slow using CNN , we want to stack two raspberry pi in order to get better performance , is this possible and what would you recommand ?
Thank you
Adrian Rosebrock
I’m covering how to increase face recognition FPS on the Pi inside my Raspberry Pi for Computer Vision book. If you’re interested in learning more, including pre-ordering a copy, you can refer to the Kickstarter page.
M. Wyd
Hi Adrian, your posts help me a lot.
Thanks for sharing, it’s an amazing work that you have done here.
Adrian Rosebrock
Thank you for the kind words.
Kartik
Hi can you help me to increase the fps up to 5-8 fps
Adrian Rosebrock
I’m covering how to increase face recognition FPS on the Pi inside my Raspberry Pi for Computer Vision book. If you’re interested in learning more, including pre-ordering a copy, you can refer to the Kickstarter page.
devileye
what about reports how we do that,how many people recognized and how many people are unknown a monthly or daily reports with pie chart or something like that please give me some idea how can we create reports plz i mean your work is great in future i will enroll with your course but please tell me i search almost all internet, ya i m new (student)
Adrian Rosebrock
You’re interested in plots? Take a look at the “matplotlib” library.
Steven
Hi Adrian!
thanks for the post, i wonder how can i play a sound when a face is detected, would you please helpme.
Adrian Rosebrock
See this project which shows you how to play sound.
Vishu
Hi Adrian!
Thank you for the tutorials. I want to work on Face Recognition attendance system using raspberry pi project. So how can I do this? please help in this.
Adrian Rosebrock
I cover that exact project inside Raspberry Pi for Computer Vision. I would suggest starting there.
Adrian Rosebrock
1. Face detection finds the (x, y)-location of a face in an image (i.e., a rectangle that surrounds the face).
2. Face recognition takes the face region and identifies the person.
There are a number of algorithms that can be used for each step.
If you’re interested in face recognition specifically I would encourage to take a look at the PyImageSearch Gurus course where I cover face detection and face recognition (including the algorithms for each) in detail.
yasar
Adrian,
i have a one question ,why the face recognition not working properly? some time it predict wrong.if i show my face it says yasar then i show some one it also says yasar .pls tell good solution for it.
Adrian Rosebrock
See this tutorial where I discuss how to improve face recognition accuracy.
Cvv Hhh
Hi,
I trained the model in my windows system, I copied the pickle file to my raspberry pi. But when I run the recognizer file in raspberry pi, there is an error saying “Unsupported pickle protocol”.
Is it possible to assist with the same?
Adrian Rosebrock
You are using two different versions of Python (probably mixing Python 2.7 and Python 3). You need to use the same Python version for both training and deploying.
roshini
Hi Adrian,
When i try to run the code, the pi camera turns on and within few seconds, the frame closes with Segmentation Fault .
What could be the possible solution?
Adrian Rosebrock
Try using “print” statements to debug which line of code is throwing the seg fault. Without knowing that I unfortunately cannot provide any recommendations.
Andy
Hi, I followed every steps you stated, but when i run the code in raspberry pi, both python files encode_face.py and face_recognition.py throws error that says there is no attribute ‘face_encodings’. I checked the api.py file, and found there exists ‘def face_encodings’.
I really don’t understand why the error occurs……
I did every steps in virtual environment
Adrian Rosebrock
The “face_recognition” module is not installed OR you are not in the Python virtual environment when you are executing the script.
Ray C
Does the CNN face detector automatically ignore side faces? I’m using OpenCV 4 with GPU.
I want to make sure it is not trying to have me match partial faces which will result in bad matches
Adrian Rosebrock
It’s not so much that it “ignores” profile faces, it’s just that the model was not trained on profile faces.
Prince Sahu
Hello sir, I want to know how much time dlib would take to install in raspberry pi? One more thing, give me some guide about how can I sent the image of person in the mobile phone and also store image in the database like AWS? Please share some tutorial and video..
Thanks!
Adrian Rosebrock
1. Dlib will take a few hours to compile and install on a RPi. I would let it sit overnight.
2. Sorry, I don’t have any tutorials on storing an image in a AWS database.
Ahmed Abd ElRahman
thanks for this tutorial
i have a problem that this when new faces are captured (which are not encoded) it considered as a face from the dataset
is there a solution to increse the accuracy of the model?
Adrian Rosebrock
See this tutorial for my suggestions on increasing face recognition accuracy.
AndreI Alex
Hei Adrian,
I have a question.
I don t understand what algorihms do exactly.
So I saw that we have a haar cascade clasificator , also we use k-NN algorithm and CNN/HOG method.
Could you please tell me what are doing each?
Thank you
Adrian Rosebrock
Hey Andrel — read this post first. It will better help you understand the face recognition pipeline.
SarraF
Hey sir, Thank you very much for this amazing tutorial..
I want to ask you how can I use SVM as classifier instead of KNN ?
Adrian Rosebrock
See this tutorial.
Vegard
Thanks for the great guide, Adrian!
I’m trying to implement functionality which ignores people in the background of the video feed. Meaning if there are two people present in the image only the one closest to the camera should be detected and registered. Do you have any pointers as to how I could implement this?
I tried to use the width of the bounding box in an if-statement to eliminate the smaller boxes, but I can’t get it to work without recognizing both individuals.
Adrian Rosebrock
This tutorial on instance segmentation will teach you how to build what you’re looking for.
Steven
Hi Adrian, first of all thanks for the great tut. Looking forward to your Raspberry Pi for Computer Vision.
I have 2 questions.
Question 1:
From my Pi 3 model B+ 16GB SD Card I receive a segmentation Fault after starting the video stream. The steam is up until it detects a known or unknown face. The code works fine on my mac. I am using a USB camera on my PI but have also tested with the camera module for Pi. I have commented out the respective camera code when using the code on Pi. Im not sure where I am going wrong. (original code)
Second Question:
I attempted to update a Google sheet using the Gspread API, this works fine on my mac with your code however on the Pi it crashes with the same segmentation error. I was wondering if you had a preferred way of updating the name and time to a database or file.
Thanks in advance
Steve
Adrian Rosebrock
1. Your Pi is definitely running out of memory. What face detector are you using? Also, try reducing the frame size before applying face detection or computing the face embeddings.
2. That’s not a Google Sheets issue, it’s a problem with either the face detector or face embedding model (see my first answer to your question).
Juri
Hello,
is it possible to encode new face data progressively (i.e. adding faces to the base data) without re-encoding the whole dataset? Sorry if it’s a stupid question btw, and thanks a lot for your awesome work!
Adrian Rosebrock
Hey Juri — I’ve addressed that question a couple of times in the comments section. Please give them a read.
Juri
Whoopsie again, sorry!
The comments list is huge and i missed that :\
Again, my compliments for your awesome work and huge patience 🙂
Adrian Rosebrock
No problem! I’m glad you enjoyed the tutorial 🙂
Vishal
which raspberry pi you use??
Adrian Rosebrock
This code is compatible with the Raspberry Pi 3 and 4.
Latif
hello sir, thank you for the great post.
I’m new here and interested in deep-learning only using Raspberry and python environment. I’ve followed all of the step thoroughly but got stuck. when I tried to executed the programming. The further that I’ve got was it saying (INFO) starting video stream ad a few second of the camera frame opened up before it says SEGMENTATION FAULT. May I know what the problem might be?
thank you in advance.
Latif
I’ve found the solution I need in the comment section with the command
export OPENBLAS_NUM_THREADS=1
export OPENBLAS_MAIN_FREE=1
now the problem is that it recognized me with UNKNOWN even though I’ve already put my own face in the dataset.
thank you in advance.
Mohammad
Hello dr. Adrian
Thank you for great post
I change the code to say my name I use gtts but when say my name the capture paused how I can prevent pause the capture.
thank you in advance.
Adrian Rosebrock
Have gTTS run in a separate thread, that way it won’t block the main thread of execution.
Jude Paul
Hi Adrian,
I found a blog on face-detection which achieves 15-17 FPS on the RaspberryPi-4. They’ve made a new library called shunyaface. Check link below for the tutorial:
https://www.instructables.com/id/Real-Time-Face-Detection-on-the-RaspberryPi-4/
Here is the link to their github page: https://github.com/shunyaos/shunyaface
Adrian Rosebrock
Thanks for sharing, Jude!
John
If I were to use a USB camera instead of a PiCamera Module, where would the camera be connected? Would it go directly to the Pi, or would it connect to a PC which would also be connected to the Pi?
John
Also, I would need a microSDHC card to host Raspbian, right? Or not?
Adrian Rosebrock
It would be connected directly to the RPi.
Jaidi
Hello Adrian, Thank you for your great tutorial on facial recognition. I am working on making a facial recognition project and I want a single python script in which all sub functions like creating dataset, training the recognizer by reading dataset and lastly running facial recognition test in a single python file. Is this automization of all this code possible in such a way.
For example I have appended the code of final python script in such a way that whenever an unknown face is detected a directory will be created automatically within the dataset folder and pictures of that unknown person will be stored in that folder. Similarly next I want to run the encodings python script automatically after new images are stored in the dataset but how can I do this ?
Any help would be highly appreciable.
Thanks
Jaidi
Or is there any way by which I can run the encodings file at the background continuosly so that whenever a new face is detected and a new directory is created in dataset folder the file can read new added images and update the encodings. pickle file ?
Ramia Dandach
Hello Dr. Adrian.
How I can make a timer for every known person.
Thanks for this amazing blog and thanks a lot for your awesome work!
Gary Y
Thank you for all the help and guidance.
I just got the facial recognition working with Raspberry Pi 4 2Gb model.
I was able to skip some of the reconfiguration to save memory for dlib install, but not quite all the swap file increases.
I wonder if the PyImageSearch staff has tried the 4Gb RPi 4 , and if it would alleviate all memory issues, and work arounds.
I also did the installation with RPi3A, 3B, and 4.All 3 had GPU defaulted to 128 rather than 64.
I also wonder if the 4Gb RPi 4 could expand the GPU memory for better performance and also install the facial recognition without memory swap.
Any insights ?
Adrian Rosebrock
Hey Gary — yes ,we’ve tried with the 4GB RPi 4. We’re sharing details of our insights inside Raspberry Pi for Computer Vision. I would definitely check it out if you’re interested in applying CV to the RPi.
Arjun
Hi Adrian, I’m facing an issue I can’t figure out the answer to. When I’m trying to install dlib, the Raspberry Pi turns disconnects from the VNC server and both the power and act LEDs turn on solid and unblinking. I tried to use pip install dlib -vvv to get a verbose response to my problem, but the RPi freezes and doesn’t do anything. I’ve also noticed the Raspberry Pi turns of at the 91% mark of installing dlib. Please help!
Schalk
Firstly, thank you so much for the well documented articles.
I’m having trouble installing the face_recognition on my rpi3. I’m not getting any errors, but after more than 30 min, the installation is still stuck on…”Building wheel for dlib (setup.py)”. The cursor is spinning, and I can use the Raspbian GUI, so don’t think the system froze. I did run update and upgrade with no further results. I also tried pip –no-cache-dir install face_recognition with the hope it is just a cache related issue. No luck. Any suggestions?
Adrian Rosebrock
It could take a few hours to compile and install dlib. Let it sit and run.
shahad alaseri
hi can I ask about which camera is the best for face recognition I have a project and I’m confused about the camera that I will use with raspberry pi 4 or 3 model B which camera you choose in which raspberry pi , please I need a quick answer
Sarra fig
Hello Adrian!
I want just to ask how can I calculate the accuracy both for feature extraction and classification(with knn) ? And how to know the the real and cpu time…
Durgesh Thakur
How much images it takes to improve the accuracy for face recognition.
I mean how much images per person ?
Adrian Rosebrock
I’ve addressed that question in the comments section as well as in this post.
Mariha Asif
Anybody knows how to switch off cv2.imshow but still perform facial recognition with q as an interrupt. I have read your tutorial that cv2.imshow causes lag but if I comment it out I get my faces recognized but q interrupt doesnt work. I have to kill the program manually
Junaid
Hello Adrian. Thank you for the great tutorial on FR. I would like to mention that right now the method still recognizes the face if someone holds a picture of a person face in front of camera. How can we improve it in a way that it only detects face only when the person face is present physically in real time and not through some smartphone picture ? Can we do it with some motion detection of face ?
Adrian Rosebrock
You need liveness detection.
Nicolas Esquivel
Hello Adrian, thanks a lot for this tutorial. Everything works perfect and is very well explained. I have one question, I detect that it takes quite a lot in the face_encodings step, would it be possible to make this step a bit faster? thanks again
Adrian Rosebrock
Yes, you need to:
1. Use a GPU
2. Install dlib with GPU support
That will speedup the process.
Gulump
Thank you for this tutorial.
I have only one problem.
Lets say I have 3 users in my dataset. If i add a 4th person the dataset creation starts again from the first user.
Is there a way to only process the new user?
Adrian Rosebrock
Hey Gulump — that question has been addressed multiple times in the comments section. Please do give them a read. I take care to respond to reader questions and in turn I ask that readers with questions also refer to my responses. Please do be respectful of my time when asking for free help.
Atharva
I am really a big fan of your projects sir. Your projects helped me a lot, but recently i have been trying to install opencv in my raspberry pi, but it seems very difficult to understand the make error 163 *
Can u please guide me to resolve this error, i have tried every solutions on the internet and i reinstalled everything many times and tried different versions also but at some point it gives me the same error . At the time installing make. Please help me out
Adrian Rosebrock
If you are having trouble installing OpenCV on your Raspberry Pi take a look at Practical Python and OpenCV and Raspberry Pi for Computer Vision which include a Raspbian .img file with OpenCV pre-configured and pre-installed.
Hannah
Hey Dr.Adrian ,
Thankyou for the amazing post!
I am getting an error unable to init server: could not connect: connection refused
Gtk-Warning :cannot open display
Please help me solve this problem. I connect the Raspberry pi to my laptop using SSH.
Thankyou.
Adrian Rosebrock
You need to enable X11 forwarding:
$ ssh -X pi@your_ip_address
Bach
Hello,
Did you try it with MTCNN and FaceNet?
Adrian Rosebrock
You can swap in whatever face detector you would like.
Vincent Bénard
Hello Adrian.
This is a very interesting application for the Raspberry Pi. My education colleagues have been tasked (as a form of “getting familiar with Raspberry Pi project”) to use the R Pi to create any type of project that uses the R Pi.
As an educator, i thought it would be beneficial to teachers to have a facial recognition attendance system. So, I poked around the WEB and found your project. It looks do-able and could really be useful!
My question is: I see the facial recognition generates the name associated to the image file. Can it be made to (through creative coding) output the name to a WORD or Excel file (that could potentially be printed/emailed to the school secretary – as an example)??
***I’m entirely new to Raspberry Pi. Other than the name, I don’t really know “how” it works but am excited to explore!
Adrian Rosebrock
Hey Vincent — take a look at Raspberry Pi for Computer Vision. That book covers how to create a custom classroom attendance system that automatically applies face recognition to take attendance.
Muhammed Ilyas
Hi Adrian,
Awesome tutorial. Thanks for the content. I was trying it with my colleagues. Found a problem here. Recognition works good for bright skinned people if they are closer or far.. But for dark skinned people, it shows same name for many ( unless they are very close).. Can you help me with that?
Thanks in advance…
PanosT
First thanks for the tutorial its great! But i have a question. If i install the source code, change the database with my photos and execute the last command, will the program work or do i need to do something else?Thanks for our time!
Sohaib
Solved it, thank you.
Shiela
Hi. May we ask what are the components or hardware that were used to create this project? Thank you
Adrian Rosebrock
We tested this tutorial with the Raspberry Pi 3 and Pi 4. You can learn more inside Raspberry Pi for Computer Vision.
Adrian Rosebrock
Hey Christian — it’s wonderful that you are interested in studying computer vision; however, computer vision is a more advanced computer science topic that does require you to have intermediate programming skills. I would suggest brushing up on your coding skills first, otherwise I fear you’ll get lost down the rabbit hole.
Hany
Hello Adrian, how are you?
I have some questions about face recognition algorithms
I read the full blog but didn’t understand that why we used the a Haar cascade algorithm ? To determine the face and its location in the image!
what is the algorithm that we used to recognize the face?
What is the 128-D measurment and how is it produced?
I am working on a graduation project on face recognition, and I got a lot of benefit from your previous articles and from your site in general, but these questions I have not yet answered.
Note that my project works on Raspberry Pi4, can you explain the mechanism for recognize faces more broadly and respond to my message via the attached email?
Thank you very much
Adrian Rosebrock
Hey there Hany, congrats on working on your graduation project. I suggest you read the rest of my face recognition tutorials. They will teach you more about the face recognition model and how it’s used to generate the 128-d embeddings.