In the next couple of blog posts we are going to train a computer vision + deep learning model to perform facial recognition…
…but before we can train our model to recognize faces in images and video streams we first need to gather the dataset of faces itself.
If you are already using a pre-curated dataset, such as Labeled Faces in the Wild (LFW), then the hard work is done for you. You’ll be able to use next week’s blog post to create your facial recognition application.
But for most of us, we’ll instead want to recognize faces that are not part of any current dataset and recognize faces of ourselves, friends, family members, coworkers and colleagues, etc.
To accomplish this, we need to gather examples of faces we want to recognize and then quantify them in some manner.
This process is typically referred to as facial recognition enrollment. We call it “enrollment” because we are “enrolling” and “registering” the user as an example person in our dataset and application.
Today’s blog post will focus on the first step of the enrollment process: creating a custom dataset of example faces.
In next week’s blog post you’ll learn how to take this dataset of example images, quantify the faces, and create your own facial recognition + OpenCV application.
To learn how to create your own face recognition dataset, just keep reading!
Looking for the source code to this post?
Jump Right To The Downloads SectionHow to create a custom face recognition dataset
In this tutorial, we are going to review three methods to create your own custom dataset for facial recognition.
The first method will use OpenCV and a webcam to (1) detect faces in a video stream and (2) save the example face images/frames to disk.
The second method will discuss how to download face images programmatically.
Finally, we’ll discuss the manual collection of images and when this method is appropriate.
Let’s get started building a face recognition dataset!
Method #1: Face enrollment via OpenCV and webcam
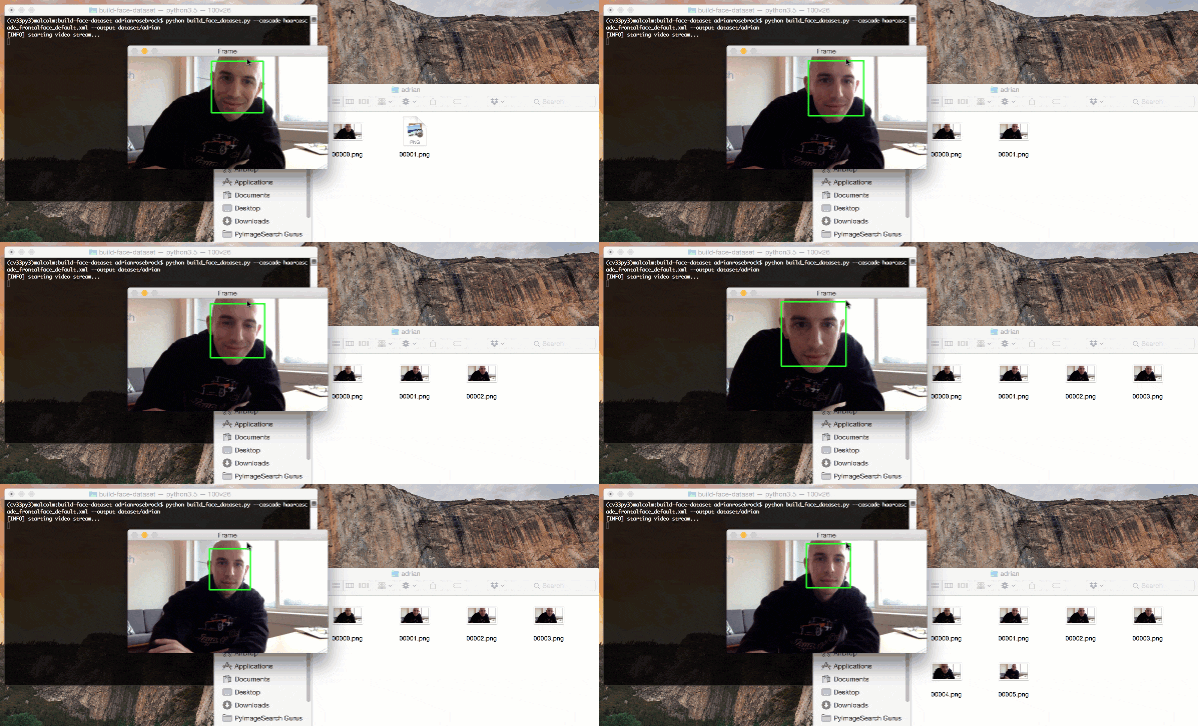
This first method to create your own custom face recognition dataset is appropriate when:
- You are building an “on-site” face recognition system
- And you need to have physical access to a particular person to gather example images of their face
Such a system would be typical for companies, schools, or other organizations where people need to physically show up and attend every day.
To gather example face images of these people, we may escort them to a special room where a video camera is setup to (1) detect the (x, y)-coordinates of their face in a video stream and (2) write the frames containing their face to disk.
We may even perform this process over multiple days or weeks to gather examples of their face in:
- Different lighting conditions
- Times of day
- Moods and emotional states
…to create a more diverse set of images representative of that particular person’s face.
Let’s go ahead and build a simple Python script to facilitate building our custom face recognition dataset. This Python script will:
- Access our webcam
- Detect faces
- Write the frame containing the face to disk
To grab the code to today’s blog post, be sure to scroll to the “Downloads” section.
When you’re ready, open up build_face_dataset.py
and let’s step through it:
# import the necessary packages from imutils.video import VideoStream import argparse import imutils import time import cv2 import os
On Lines 2-7 we import our required packages. Notably, we need OpenCV and imutils
.
To install OpenCV, be sure to follow one of my installation guides on this page.
You can install or upgrade imutils very easily via pip:
$ pip install --upgrade imutils
If you are using Python virtual environments don’t forget to use the workon
command!
Now that your environment is set up, let’s discuss the two required command line arguments:
# construct the argument parser and parse the arguments ap = argparse.ArgumentParser() ap.add_argument("-c", "--cascade", required=True, help = "path to where the face cascade resides") ap.add_argument("-o", "--output", required=True, help="path to output directory") args = vars(ap.parse_args())
Command line arguments are parsed at runtime by a handy package called argparse
(it is included with all Python installations). If you are unfamiliar with argparse
and command line arguments, I highly recommend you give this blog post a quick read.
We have two required command line arguments:
--cascade
: The path to the Haar cascade file on disk.--output
: The path to the output directory. Images of faces will be stored in this directory and I recommend that you name the directory after the name of the person. If your name is “John Smith”, you might place all images indataset/john_smith
.
Let’s load our face Haar cascade and initialize our video stream:
# load OpenCV's Haar cascade for face detection from disk detector = cv2.CascadeClassifier(args["cascade"]) # initialize the video stream, allow the camera sensor to warm up, # and initialize the total number of example faces written to disk # thus far print("[INFO] starting video stream...") vs = VideoStream(src=0).start() # vs = VideoStream(usePiCamera=True).start() time.sleep(2.0) total = 0
On Line 18 we load OpenCV’s Haar face detector
. This detector
will do the heavy lifting in our upcoming frame-by-frame loop.
We instantiate and start our VideoStream
on Line 24.
Note: If you’re using a Raspberry Pi, comment out Line 24 and uncomment the subsequent line.
To allow our camera to warm up, we simply pause for two seconds (Line 26).
We also initialize a total
counter representing the number of face images stored on disk (Line 27).
Now let’s loop over the video stream frame-by-frame:
# loop over the frames from the video stream while True: # grab the frame from the threaded video stream, clone it, (just # in case we want to write it to disk), and then resize the frame # so we can apply face detection faster frame = vs.read() orig = frame.copy() frame = imutils.resize(frame, width=400) # detect faces in the grayscale frame rects = detector.detectMultiScale( cv2.cvtColor(frame, cv2.COLOR_BGR2GRAY), scaleFactor=1.1, minNeighbors=5, minSize=(30, 30)) # loop over the face detections and draw them on the frame for (x, y, w, h) in rects: cv2.rectangle(frame, (x, y), (x + w, y + h), (0, 255, 0), 2)
On Line 30 we begin looping (this loop exits when the “q” key is pressed).
From there, we grab a frame
, create a copy, and resize it (Lines 34-36).
Now it’s time to perform face detection!
Using the detectMultiScale
method we can detect faces in the frame
. This function requires a number of parameters:
image
: A grayscale imagescaleFactor
: Specifies how much the image size is reduced at each scaleminNeighbor
: Parameter specifying how many neighbors each candidate bounding box rectangle should have in order to retain a valid detectionminSize
: Minimum possible face image size
Unfortunately, sometimes this method requires tuning to eliminate false positives or to detect a face at all, but for “close up” face detections these parameters should be a good starting point.
That said, are you looking for a more advanced and more reliable method? In a previous blog post, I covered Face detection with OpenCV and deep learning. You could easily update today’s script with the deep learning method which uses a pre-trained model. The benefit of this method is that there are no parameters to tune and it is still very fast.
The result of our face detection method is a list of rects
(bounding box rectangles). On Lines 44 and 45, we loop over rects
and draw the rectangle on the frame
for display purposes.
The last steps we’ll take in the loop are to (1) display the frame on the screen, and (2) to handle keypresses:
# show the output frame cv2.imshow("Frame", frame) key = cv2.waitKey(1) & 0xFF # if the `k` key was pressed, write the *original* frame to disk # so we can later process it and use it for face recognition if key == ord("k"): p = os.path.sep.join([args["output"], "{}.png".format( str(total).zfill(5))]) cv2.imwrite(p, orig) total += 1 # if the `q` key was pressed, break from the loop elif key == ord("q"): break
On Line 48, we display the frame to the screen followed by capturing key presses on Line 49.
Depending on whether the “k” or “q” key is pressed we will:
- Keep the
frame
and save it to disk (Lines 53-56). We also increment ourtotal
frames captured (Line 57). The “k” key must be pressed for eachframe
we’d like to “keep”. I recommend keeping frames of your face at different angles, areas of the frame, with/without glasses, etc. - Exit the loop and prepare to exit the script (quit).
If no key is pressed, we start back at the top of the loop and grab a frame
from the stream.
Finally, we’ll print the number of images stored in the terminal and perform cleanup:
# print the total faces saved and do a bit of cleanup print("[INFO] {} face images stored".format(total)) print("[INFO] cleaning up...") cv2.destroyAllWindows() vs.stop()
Now let’s run the script and collect faces!
Be sure that you’ve downloaded the code and Haar cascade from the “Downloads” section of this blog post.
From there, execute the following command in your terminal:
$ python build_face_dataset.py --cascade haarcascade_frontalface_default.xml \ --output dataset/adrian [INFO] starting video stream... [INFO] 6 face images stored [INFO] cleaning up...
After we exit the script we’ll notice that 6 images have been saved to the adrian
subdirectory in dataset
:
$ ls dataset/adrian 00000.png 00002.png 00004.png 00001.png 00003.png 00005.png
I recommend storing your example face images in a subdirectory where the name of the subdirectory maps to the name of the person.
Following this process enforces organization on your custom face recognition dataset.
Method #2: Downloading face images programmatically
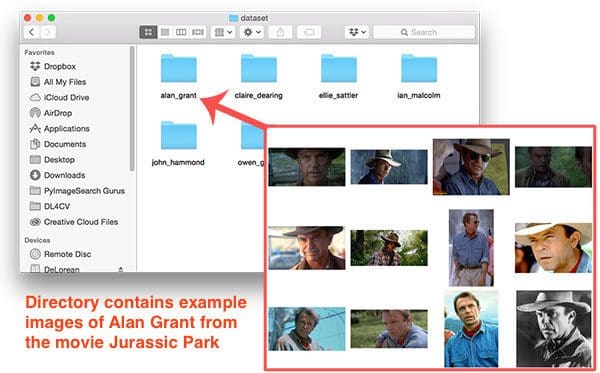
In the case that you do not have access to the physical person and/or they are a public figure (in some manner) with a strong online presence, you can programmatically download example images of their faces via APIs on varying platforms.
Exactly which API you choose here depends dramatically on the person you are attempting to gather example face images of.
For example, if the person consistently posts on Twitter or Instagram, you may want to leverage one of their (or other) social media APIs to scrape face images.
Another option would be to leverage a search engine, such as Google or Bing:
- Using this post you can use Google Images to somewhat manually + and somewhat programmatically download example images for a given query.
- A better option, in my opinion, would be to use Bing’s Image Search API which is fully automatic and does not require manual intervention. I cover the fully automatic method in this post.
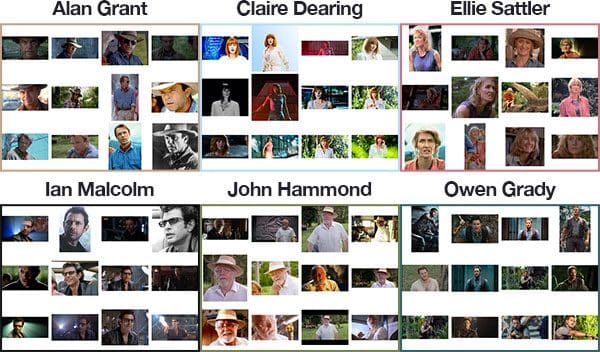
Using the latter method I was able to download 218 example face images from the cast of Jurassic Park and Jurassic World.
An example command for downloading face images via the Bing Image Search API for the character, Owen Grady, can be seen below:
$ mkdir dataset/owen_grady $ python search_bing_api.py --query "owen grady" --output dataset/owen_grady
And now let’s take a look at the whole dataset (after pruning images that do not contain the characters’ faces):
$ tree jp_dataset --filelimit 10 jp_dataset ├── alan_grant [22 entries] ├── claire_dearing [53 entries] ├── ellie_sattler [31 entries] ├── ian_malcolm [41 entries] ├── john_hammond [36 entries] └── owen_grady [35 entries] 6 directories, 0 files
In just over 20 minutes (including the amount of time to prune false positives) I was able to put together my Jurassic Park/Jurassic World face dataset:
Again, be sure to refer to this blog post to learn more about using the Bing Image Search API to quickly build an image dataset.
Method #3: Manual collection of face images
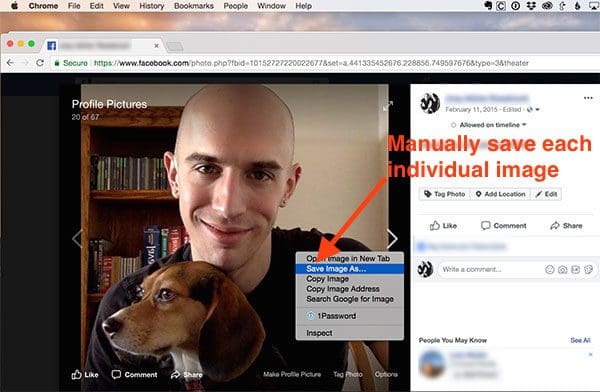
The final method to create your own custom face recognition dataset, and also the least desirable one, is to manually find and save example face images yourself.
This method is obviously the most tedious and requires the most man-hours — typically we would prefer a more “automatic” solution, but in some cases, you’ll need to resort to it.
Using this method you will need to manually inspect:
- Search engine results (ex., Google, Bing)
- Social media profiles (Facebook, Twitter, Instagram, SnapChat, etc.)
- Photo sharing services (Google Photos, Flickr, etc.)
…and then manually save these images to disk.
In these types of scenarios, the user often has a public profile of some sort but significantly fewer images to crawl programmatically.
What's next? We recommend PyImageSearch University.
86 total classes • 115+ hours of on-demand code walkthrough videos • Last updated: October 2024
★★★★★ 4.84 (128 Ratings) • 16,000+ Students Enrolled
I strongly believe that if you had the right teacher you could master computer vision and deep learning.
Do you think learning computer vision and deep learning has to be time-consuming, overwhelming, and complicated? Or has to involve complex mathematics and equations? Or requires a degree in computer science?
That’s not the case.
All you need to master computer vision and deep learning is for someone to explain things to you in simple, intuitive terms. And that’s exactly what I do. My mission is to change education and how complex Artificial Intelligence topics are taught.
If you're serious about learning computer vision, your next stop should be PyImageSearch University, the most comprehensive computer vision, deep learning, and OpenCV course online today. Here you’ll learn how to successfully and confidently apply computer vision to your work, research, and projects. Join me in computer vision mastery.
Inside PyImageSearch University you'll find:
- ✓ 86 courses on essential computer vision, deep learning, and OpenCV topics
- ✓ 86 Certificates of Completion
- ✓ 115+ hours of on-demand video
- ✓ Brand new courses released regularly, ensuring you can keep up with state-of-the-art techniques
- ✓ Pre-configured Jupyter Notebooks in Google Colab
- ✓ Run all code examples in your web browser — works on Windows, macOS, and Linux (no dev environment configuration required!)
- ✓ Access to centralized code repos for all 540+ tutorials on PyImageSearch
- ✓ Easy one-click downloads for code, datasets, pre-trained models, etc.
- ✓ Access on mobile, laptop, desktop, etc.
Summary
In today’s blog post we reviewed three methods to create our own custom dataset of faces for the purpose of facial recognition.
Exactly which method you choose is highly dependent on your own facial recognition application.
If you are building an “on-site” face recognition system, such as one for a classroom, business, or other organization, you’ll likely have the user visit a room you have dedicated to gathering example face images and from there proceed to capture face images from a video stream (method #1).
On the other hand, if you are building a facial recognition system that contains public figures, celebrities, athletes, etc., then there are likely more than enough example images of their respective faces online. In this case, you may be able to leverage existing APIs to programmatically download the example faces (method #2).
Finally, if the faces you trying to recognize do not have a public profile online (or the profiles are very limited) you may need to resort to manual collection and curation of the faces dataset (method #3). This is obviously the most manual, tedious method but in some cases may be required if you want to recognize certain faces.
I hope you enjoyed this post!
Go ahead and start building your own face datasets now — I’ll be back next week to teach you how to build your own facial recognition application with OpenCV and computer vision.
To be notified when next week’s face recognition tutorial goes live, just enter your email address in the form below!
Download the Source Code and FREE 17-page Resource Guide
Enter your email address below to get a .zip of the code and a FREE 17-page Resource Guide on Computer Vision, OpenCV, and Deep Learning. Inside you'll find my hand-picked tutorials, books, courses, and libraries to help you master CV and DL!
Raymond KUDJIE
Thanks for presenting the various approches!!
Adrian Rosebrock
Thanks Raymond 🙂
Ben
Thanks for the post Adrian, it is very interesting and helpful.
Adrian Rosebrock
Thank you Ben, I appreciate the kind words.
Abkul
Great post. I am excited that you are covering this topic I asked about sometimes back.Thank You.
Adrian Rosebrock
Thanks Abkul.
Harrison
Adrian,
Thanks for the post, this website is always my go to for code that’s easy to implement and understand. I have actually been developing a facial recognition security system for a while now, and after initial testing, I have taken to using dlib, and a library called “face_recognition”, instead of OpenCV. The main reason being, I had a very high false positive rate when using OpenCV, and by that I mean, the program wasn’t very good at recognizing when someone was “Unknown”, and instead, it incorrectly labeled that person as someone from its known dataset. Have you experienced this when using OpenCV for facial recognition? And what are your thoughts on the whether or not OpenCV is the best or most robust library for facial recognition?
Adrian Rosebrock
Hey Harrison — I’ll actually be covering that exact question and topic in my next post 🙂 Stay tuned!
Shashi
Even i m the one among those who have faced this problem, i actually tried training the nn by various faces at different distance from cam, and different at positions, the brightness also becomes one of the constraint, it worked for me but the scenario becomes worst when the face is recognised from a far distance, it would again recognize the unknown faces as some know face from dataset..
Dave Xanatos
Thanks as always, a great tutorial. Code ran great as soon as I saw the info about line 24 on a R-Pi 🙂 Will be integrating a variant of this functionality on my robots.
Adrian Rosebrock
Let me know how the project works out, Dave! Best of luck with it.
Will
Is the process to be discussed in the next two lessons specific to faces, or can I substitute face with any object and follow along?
Adrian Rosebrock
It will be specific to faces.
Rabbani
Thanks for giving such a great tutorial.
i hope u will provide custom object detection also in future
Adrian Rosebrock
I will consider it, but I do offer custom object detection inside the PyImageSearch Gurus course and Deep Learning for Computer Vision with Python. Be sure to check those out in the meantime.
Douglas
Adrian,
Awesome stuff as usual! I am enrolled in both courses and I can highly recommend the guru’s course (have not started the DLCV yet). Who would have thought 5 years ago face recognition would be almost ubiquitous! Keep up the great work!
Adrian Rosebrock
Thanks Douglas! I’m so happy to hear you are enjoying the course. I know I’m biased (since I wrote it) but I really do believe DL4CV is even better than the Gurus course. Enjoy it and always feel free to reach out if you have any questions 🙂
Josie
Hello Adrian – as always I’m looking forward for your tutorials, helps someone like me.. making it easier to understand in the technical side.
Adrian Rosebrock
Thanks Josie 🙂
Cat person
I want to recognize the face of a particular cat (in a set of two cats). Silly question perhaps but will your upcoming face recog tutorials also work for that use case?
Adrian Rosebrock
The upcoming tutorial will be human faces, not cats. That said, you could train your own model to recognize cat faces but you would need considerably more training data (as I’ll discuss in the next post).
Anthony The Koala
Dear Dr Adrian,
Last year I asked the question on how to make your face recognition system foolproof. This was in the light of a phone manufacturer’s face recognition technology being defeated by placing a photograph of the person in front of the phone’s camera.
In the response you suggested stereoscopic images with (of course) two cameras. Two questions please.
(a) In light of this tutorial, it looks like there are no large 3D face databases. That is you have to do that yourself as in Method #3. Is there a standard on how far the cameras are apart from each other in order to capture 3D images.
(b) If one does not want to use stereoscopic photography (3D photography), would you have to add more measures in your face detection system such as a photo with subject’s eye’s closed? That is take a photo with eyes open, and take another photo with eyes closed.
Thank you,
Anthony of Sydney
Adrian Rosebrock
1. Correct, I am not doing any stereoscopic work here. The “standard” would really depend on how and where your application is deployed. With Apple’s iPhone they use their user interface to instruct you to pitch and roll your head so they can compute a more accurate representation of your face. The closer you are, the more accurate the system would be which is natural for a handheld device.
2. You may instead want to look into liveness detection which are techniques to determine if the person in the photo is real/fake.
Shashi
Thanks for helping built a custom face recognition, good resource for learners…
Adrian Rosebrock
Thanks Shashi, I’m glad you have enjoyed the post 😉
Antony Smith
Excellent stuff as always Adrian. Will definitely be looking out for next weeks post, as I have also completed a basic facial recognition system for the RasPi3 and as I see in a comment further up, have also had a major issue with false positives. I always put it down to not enough images in the training set, but have not been able to rectify as of yet.
Thanks again, and quick question:
What’s the minimum number of images per enrolment would you recommend.
Adrian Rosebrock
False-positives are certainly a problem. Using more advanced technqiues like deep metric learning can help quite a bit. I discuss them in my next post. As far as enrollment goes, I like to start with a minimum of 20 but depending on how many/how little faces you need to recognize in production you could need quite a bit more (or you may be able to get away with only a handful).
Jon Hauris
Great tutorial Adrian. Thanks for the hard work here. I am digging deep into this and it led me to your other tutorial on “dnn. blobFromImage”. In that tutorial you talk about channel-wise averaging versus pixel-wise. Can you please elaborate on what you mean by channel-wise versus pixel-wise? Here is the quote from that article:
“However, in some cases the mean Red, Green, and Blue values may be computed channel-wise rather than pixel-wise, resulting in an MxN matrix. In this case the MxN matrix for each channel is then subtracted from the input image during training/testing.”
Adrian Rosebrock
Each image to the network is MxN pixels with 3 channels, Red, Green, and Blue. For pixel-wise you would compute three average values over your training set — one for each of the RGB pixel values. You essentially average all pixels in the training set to obtain these values. For channel-wise you actually compute a MxNx3 average. Typically we use pixel-wise averages. For more information on these types of averages, including how to train your own CNNs from scratch, be sure to refer to Deep Learning for Computer Vision with Python.
Oleg
Thank you so much Adrian!
This tutorials are great and it is exactly what I was looking for!
Also, if it is not too hard, It would be great if you can also add Liveness Detection in the system which you will cover in the next post. Thank you again!
All the best,
Oleg
Adrian Rosebrock
Hey Oleg, I just finished up the final draft of next week’s post so I won’t be able to add liveliness detection to it but I will certainly try to cover it in a future post.
Oleg
Thank you! Just bought a guru course couple days ago and so far really happy with it:)
Adrian Rosebrock
Thanks Oleg! I’m so happy to hear you are enjoying the PyImageSearch Gurus course 🙂 Enjoy it and feel free to reach out if you have any questions.
dan
Is it better to build a dataset with the entire image that contains a face (along with background clutter) or with just the region of the image that is identified as the face?
Adrian Rosebrock
I personally like to store the entire image so I can apply a different face detector to it later if I so wish. Otherwise you get stuck with only the the cropped face from the detector and you lose the ability to switch detectors later on.
RobertC
Hi Adrian, thanks for this post!!! FYI: if anyone gets an error on line 38 “AttributeError: ‘NoneType’ object has no attribute ‘copy’, then be sure to comment out line 27 and uncomment line 28 if you have a Pi Camera.
Adrian Rosebrock
It sounds like OpenCV is unable to access your Raspberry Pi camera module. I assume you are indeed using Raspberry Pi camera module and not a USB webcam? And if so, can you access your camera module via the
raspistill
command?Diana
yes.how to solve this?
Adrian Rosebrock
I assume you have commented out Line 24 and uncommented Line 25 as you mentioned in the previous comment? If so, I would recommend posting on the official picamera GitHub page as there may be a problem with your install.
Bernardo Lares
I am getting the following error:
usage: build_face_dataset.py [-h] -c CASCADE -o OUTPUT
build_face_dataset.py: error: the following arguments are required: -c/–cascade, -o/–output
Adrian Rosebrock
Make sure you read up on command line arguments and how to use them. From there you’ll be able to easily solve the error.
Rion Ahl
I have got this same error and dont understand.
Adrian Rosebrock
Hey Rion, did you the argparse tutorial I linked to? What specifically do you not understand?
Andres
Hi Adrian
great tutorial as always but I have a question, why bothering in making a face recognition to store images if you are not storing the bounding boxes, it would work as fine anly taking photos, and also in that line of thought, if I want to build a dataset that includes the bounding box and the label how could I storage and then use that information(asuming I already have all the info)?
thanks in advance
Adrian Rosebrock
Hey Andres — I wouldn’t recommend storing just the faces themselves as you would lose the ability to run a different face detection method on the images at a later date. You could store the bounding box locations if you wish but the detection + recognition phases tend to go hand in hand with each other. I choose to apply detection when quantifying the faces. Make sure you read the face recognition blog post as an example.
Yann Mengin
Blog very complete. Instructions are detailed. A pleasant way to introduce people to Image and Face recognition.
Thank you! Keep the good job going.
Adrian Rosebrock
Thank you for the kind words, Yann! I really appreciate that 🙂
Ru
my problem is solved. thank you Adrian for reaching out.
kaisar khatak
Great Post! Very cool way to quickly create a custom face recognition dataset.
Another method to capture many frames/selfie images quickly is to use video capture and then use “ffmpeg -i inputFile.avi outputFile_%02d.png”
Adrian Rosebrock
Great suggestion Kaisar!
corby self
Thanks for the tutorials. I recently purchased the books and can’t wait to dive into that. I started the install on the Raspberry PI because if I foul it up, it’s a matter of wiping the SD and starting over. However I was successful compiling, Installing and running scripts. I have learned a lot in a short amount of time. But the application I want to create, the Pi lacks the processing power to do what I need in real time. So I installed Open Cv on my Mac. The problem I am running into is when I obtain video it uses the built in camera and I need to use a usb camera. How do I solve this?
Adrian Rosebrock
Thank you for picking up a copy of my books, I hope you are enjoying them!
As for your issue it sounds like you have multiple cameras on your Mac machine. Each camera is uniquely indexed so if you change:
vs = VideoStream(src=0).start()
To:
vs = VideoStream(src=1).start()
It should access your second camera.
Sam
face detect.py [-h] -c CASCADE -o OUTPUT
face detect.py: error: argument -c/–cascade is required
getting this error when i try to run your code. what is the issue here?
Adrian Rosebrock
Read this tutorial on argparse and command line arguments and your problem will be solved 🙂
Ali
Hi I got the face as boxed in the web camera.
But the problem is I could not get the data sets like you have got. the output folder is empty. why is that?
Adrian Rosebrock
You might want to double-check your file paths. It sounds like your output path (i.e., where the downloaded images are stored) is incorrect.
Nicolas
Hi Adrian, thanks for all your wonderful tutorials. It helps a lot while I’m doing a little facial recognition project.
The only problem that keeps me from progressing is that I can’t build a dataset using the build_face_dataset.py. The programs runs successfully and tells me how many pictures it got when I press Q, but no new dataset file is created. I still just have yours (Adrian and Ian_Malcolm).
Do you have an idea of the problem?
Thanks, Nicolas
Nicolas
Just to be clear, I’m running the .py in the same directory as the dataset folder. I added the argument –output dataset/nicolas but still the folder is not created…
Adrian Rosebrock
You’re pressing the wrong key on your keyboard. The “k” key will save an image to “output/nicolas” while the “q” key will exit the script. It sounds like you’re never pressing the “k” key.
Ivan Hutomo
Hi Nicholas do you finally solve your problem? Because I have same problem with you, the image didn’t store in my folder and I’m sure I pressed K button. Maybe you could help me if you already solve your problem. Thanks
Aashima
hi Adrian
I have been working on facial recognition, in this i want to create a dataset of images of people without creating it using webcam. Also i want that when the user stands in front of the webcam it should recognize the face. Then what exactly should i code in Recognize.py file?
Adrian Rosebrock
Hey Aashima — this blog post covers other methods of how you can build a face recognition dataset bot with and without a webcam so I’m a bit confused by your question. Could you clarify?
Sophia
This is an awesome post! Thank you also for making the code available. I’d like your advice on a related problem. I’d like to create a dataset of short videos of people’s facial expressions, rather than just the images of their faces.
Say I have 10 friends. I’d like to recognize the change in their facial expression, so the output would be “Sue just smiled” or “Adrian just laughed”.
I have an idea for the DL model that I would use. I need some help creating the training video datasets. I can bring in my friends to record the video. How do I modify your code to record 3-5 second clips of different people’s facial expressions and label them?
I could record the all the videos for one label at a time. So, start recording, bring in friend 1, have her laugh, stop recording, have friend 1 leave, get friend 2 ready, start recording, have friend 2 laugh, stop recording… and so on for all 10 friends, and then repeat the process for different labels (cry, frown, so on…).
I’d like the output of the creation of the dataset to be: in master directory, under label 1 directory, have 10 video clips, under label 2 directory, another 10 clips and so on..
I hope this isn’t an unreasonable request. I’d greatly appreciate your help modifying your code to create this dataset.
Adrian Rosebrock
There’s actually a really great Quora thread on how to label image clips. I’d start there. You may also be interested in my writing to video with OpenCV tutorial.
sophia
thank you for replying, will check those posts out.
Ivan Hutomo
Hello thanks Adrian for very good tutorial, I followed all your tutorial got some error and can fix that, finally your code ran well but there is some issue. It said 7 image stored etc, but I can’t find my folder and image. How this is happen? Thanks for your answer
Adrian Rosebrock
It’s hard to say what the issue is without direct access to your machine. I would suggest double-checking your file paths.
Artem
Hi, how do i create my own neural network to recognize faces? Preferably without using dlib.
Adrian Rosebrock
You can use this tutorial for a pure OpenCV-based face recognition pipeline (i.e., no dlib).
Angel
Hi Adrian,
i need help with this error,
ImportError: No module named ‘picamera’
help me plz
Adrian Rosebrock
You need to install the “picamera” Python package:
$ pip install "picamera[array]"
Muhammad Hassam
i don’t know what to put in the place of –cascade and what to put in help
and also tell me what to put in the place of –output and its help i am stuck kindly help me
Adrian Rosebrock
It’s okay if you are new to argparse and command line arguments. Just read this tutorial and you’ll be up and running in no time.
Muhammad Hassam
This is my error can you help me to resolve this?
usage: encode_faces.py [-h] -i DATASET -e ENCODINGS ENCODINGS.PICKLE
[-d DETECTION_METHOD]
Adrian Rosebrock
You need to need to supply the command line arguments to the script. If you’re new to command line arguments be sure to read this tutorial.
manikumar
Hi Adrian ….
i need some clarification like what are the photos in my dataset it will be matching with others coincidently …
Can u give me an suggestion ……
Adrian Rosebrock
I’m not sure what you mean. Could you elaborate?
Muhammad Hassam
i compiled your custome dataset code i capture almost 215 photos but still unknow on my face and i deleted your named photo and folder but when show my face it says unknow and when i show your face it recognize it and write your name
Adrian Rosebrock
See this tutorial for methods to improve your face recognition (especially the final section of the post).
Ben
Hi Adrian
I am trying to create a facial recognition system on the Raspberry Pi 2 Model B, that has raspbian stretch
I get this error even though I already installed imutils using the command from above
…
ImportError: No module named ‘imutils’
Adrian Rosebrock
It sounds like imutils did not install. Double-check that imutils is properly installed. If you’re using virtual environments make sure you are properly accessing them.
Rajkumar
I want to crop only the face (detected face in rectangle) and save it. Help me sir
Adrian Rosebrock
You can use NumPy array slicing to extract the ROI and then use the
cv2.imwrite
function to write it to disk. If you need more help refer to Practical Python and OpenCV where I explain both topics in detail (it will surely help you solve your project).VamshiKrishna
Hello Adrian,
I failed to create and train my database. I follow the steps as you have posted, but still i’m encountering many errors. so, please help me out.
Adrian Rosebrock
What are the errors you are getting? Without knowing the error I cannot provide any suggestions.
DEBANGSHA SARKAR
Hello Adrian,
You Sir, write amazingly smooth and beautiful codes. I have been struggling to work with OpenCV video stream for last 2 days on my MAC. It either hangs while breaking the loop(with q) with my code but your code works like magic. Grateful for that.
Please help me with saving a video on MAC using OpenCV. I saw your post on the same. I don’t know how you got it working but in my computer .avi extension do not save with any codec. I have tried other combinations too. Do you have anything on that?
Ibn Ahmad
Thanks Adrian.
Code ran well but no image was saved even after pressing “k” a number of times. Any idea on what might be the problem.
Adrian Rosebrock
Double-check the path to your output directory. The output directory might not exist and thus the image cannot be saved.
yatharth arora
please give the link to the next blog for data training
Adrian Rosebrock
The blog post has already been published. You can find it here.
Manuel
Hello, pyimagesearch, i have a question:
I run the script, it recognizes my face but doesnt create the directory and take frames when i press ‘K’ key. Can you help me please.
Adrian Rosebrock
Double-check your path to the output directory (you might have forgotten to create it).
Jesse
HelloAdrian, please i can’t find your blog to “how to take this dataset of example images, quantify the faces, and create your own facial recognition + OpenCV application”
Adrian Rosebrock
There is a search bar on the top-right hand side of this blog. You can use it to search for tutorials. It’s also the next post in this series. You can find it here.
LeoWangTaiwan
Hello, Adrian, thanks for your great and easy-understanding tutorial^^, however, I have a question:
Can I use pi-camera to get my custom face dataset instead of webcam?(Method 1)
and how can I do it? Thanks a lot!
Adrian Rosebrock
Yes. See this tutorial on how to access your RPi webcam.
Hanna Haponenko
Hi Adrian. Thanks for this tutorial! Unfortunately, I can’t figure out the solution to this issue. I’m getting “[INFO] starting video stream…” to print, but that is shortly followed by the error message “Unable to init server: Could not connect: Connection refused” and “(Frame:1198): Gtk-WARNING ** : cannot open display: 0”. I’m using the Raspberry Pi cam
Hanna Haponenko
Nevermind – figured it out! I had to work from the GUI, not the command line
Adrian Rosebrock
Congrats on resolving the issue!
dini
Thank you so much. How kind of you 🙂
Adrian Rosebrock
You are welcome!
Harshit
My Face Recognition is recognizing my face well but its also recognizing other people’s images as ‘me’ . But it’s performing ok on webcam video.
I have used webcam images to produce embeddings and train my classifier.
I have tried using different datasets like good quality images,webcam images etc.
.
I think the TYPE of datasets are making huge impact.
Can you kindly suggest what kind of dataset should I use,I want to test my model on webcam video for face recognition??
Zainab
Sir Is it possible to create dataset of whole body instead of face ?
Adrian Rosebrock
Are you trying to perform gait recognition?
pdevip
Dear Adrian Grt job you are doing especially for people like me novices.Here I want to develop a system which captures a face live through a web cam, identify this from already stored SQL database and if it matches, then display the details from the SQL database on screen. How it can be done? Which tool can be used and which algorithm that uses.
Kindly support
Santosh Sanjeev
How can I take an image once the face is recognised without pressing the key ‘k’ ?
I mean is it possible to take the pic of the persons face once it is detected without pressing key ‘k’??
Michael
Couldn’t find it in this article but is the code written directly on a Raspberry PI or through an IDE that’s then transfer from IDE to Pi?
Adrian Rosebrock
You could do either. Refer to this tutorial to learn how to perform development on the RPi.
Arsalan Shaikh
Hi Adrian,
Thank you so much for teaching us what you know. Appreciate your tutorials and training on starter bundle.
I was working on face recognition and for that i have to capture faces from Axis IP camera. I have changed (vs = VideoStream(src=0).start() to cv2.VideoCapture(camera rtsp link).
I am getting error on line 39: tuple object has no attribute ‘copy’.
Cant get to work around with this. Can you help.
Appreciate.
Regards
Arsalan Shaikh
Hi Adrian,
I was able to come around this issue by changing the code (frame = vs.read()) to (_, frame = vs.read()). Apparently, the IP camera video stream is 3 channel and that was causing the inccorect frame shape being read.
Now, my next step is to incorporate your align.py as step-2 of this face recognition pipeline.
I will update about the recognition accuracy after i have done face alignment.
Adrian Rosebrock
Congrats on resolving the issue!
Adrian Rosebrock
It sounds like OpenCV was not able to properly read the frame from your IP camera. You can learn more about that error, including how to resolve it, in this post.